前言
嵌入式 C 转 Rust 需要面对的新概念
Rust 嵌入式学习会遇到的挑战
Rust 嵌入式入门准备
Rust 嵌入式与 C/C++ 嵌入式的比较
Rust 嵌入式的优势
C 转 Rust 嵌入式需要了解的新概念
模块
与 C++的命名空间和Pyhton的模块不同,Rust 的模块更加灵活且作用清晰。 Rust 的模块(mod)用于封装一个逻辑块,mod 可以嵌套定义,设计成层次逻辑,且可以指定 mod 的访问属性,即私有(private)和公开(pub),两者又可细分为:
private: 该模块内部仅模块内部可见pub(crate): 模块内部对该 crate 可见pub(super):模块内部仅对本级和上级 mod 可见pub:该模块对全局可见,如果该模块被上级包含,则由上级模块最终决定最大可见范围 通常一个文件名自动成为模块名。对于文件夹来说,模块的根节点为mod.rs,模块名则为文件夹的名字
Crate
crate 是 Rust 的代码单元,也是 Cargo 管理、发布的最小单元。通常可以包含一个或多个模块。Rust有两种 crate :库(Library Crate)和二进制(Binary Crate)。
Library Crate用于提供代码库,编译后的目标文件是链接库,即动态库、静态库等,可用于Rust或第三方语言(如C/C++等)调用。当然Libary crate也可以被其他crate引用,在Cargo.tml 中指定引用信息,从而直接使用改crate的模块或 API 。大致可以理解为 C/C++ 的库,例如 stdio.h,string.h等。Binary Crate用于实现具体的程序,包含程序入口 main 函数,编译后为二进制的程序,可直接运行。可以简单理解为 C/C++ 的main.c + XX.c文件,当然实际用起来比它们更加优雅。
Package
Package 用于管理 Crate, 每个 package 的根目录包含一个文件 Cargo.toml ,用于指定 Package 的元信息,如作者、版本、features、依赖、目标编译平台。Cargo 可将 Package 发布到 crate.io。
一个 Package 可以包含多个成员(members)
Cargo
Cargo 是 Rust 的包管理工具和构建系统。它在 Rust 开发中起着至关重要的作用,主要有以下功能特点:
- 提供快捷的工程创建、编译、测试、程序下载、运行、文档生成等命令
- 版本控制、依赖控制功能
- 工程管理、发布功能
- 统一工程结构,便于理解和维护,提高开发效率和代码质量。
其功能远比 传统的 Makefile 或 CMake 丰富,但使用却更加简单高效。
features
features 在 Cargo.tml 中定义,类似 C/C++ 中编译宏的作用,可以选择性编译开启指定 feature 的代码段,从而达到缩小代码体积、实现不同的功能、满足不同的平台等功能。
枚举
Rust 的枚举与 C/C++ 的兼容,但表现形式更加丰富。不仅允许指定数字作为枚举值,同时也允许枚举项能附带一个其他类型的对象,如常用的基本类型、其他枚举、结构体、元组等类型,使用枚举能更加轻松直接的描述对象特征和逻辑。使得业务逻辑更加简单清晰。
#![allow(unused)]
fn main() {
pub enum {
    Monday,
    Tuesday,
    ...
}

enum Fruit{
    Apple = 0,
    Orange = 1
}

pub enum {
    Foo,
    Fruit(Fruit),      /* 附带另外的枚举值 */
    Id(u32),        /* 附带一个 u32 的数字 */
    Human((u8, String)),   /* 附带一个元组 */
    Stu(Student),        /* 附带一个结构体 */
}

}
Rust 有两个特别重要的枚举,经常在代码中可以看到,分别是:
Result:Reuslt 常用于表示结果,定义如下:
T 和 E 分别表示正常和异常返回的类型。该定义用于表示正常返回和异常情况返回的结果,各自附带一个类型用于返回有用的信息。该设计能避免像 C 中常使用的数字或宏返回错误值。#![allow(unused)] fn main() { enum Result<T, E> { Ok(T), Err(E), } }Option: 用于表示有无,定义如下:
T 表示数据存在时候的数据类型。使用 Option 可以避免使用 null 指针之类不安全的方式来表示有无返回对象。能提高代码可靠性、同时拥有高的执行效率。#![allow(unused)] fn main() { enum Option<T> { None, Some(T), } }
#![no_std]
no_std 环境区别于 std, no_std通常用于嵌入式裸机环境, 降低标准库所占用的程序空间。
no_std 通常不包含操作系统的基本 api,如文件系统、网络、多线程等接口。但其仍然提供了一些常用的基本接口模块,如基本数据类型,算术运算,位操作、裸地址读写等常用接口。在嵌入式裸机系统工程搭建时,需要在主模块中添加 #![no_std] 来告诉编译起不要链接 std crate。同时对于no_std 工程来说,需要自己实现 panic 接口。
Traits
Rust 是一门函数式编程的语言,trait 在该方案中发挥了巨大的作用。trait可翻译为特征,用于描述对象所具备的 api 能力或属性,也可作为标记,用于提示编译器在编译代码时确定逻辑是否合法,且没有任何运行时的消耗,也不占用程序空间。
不同于面向对象编程中的继承的思想,trait 主要用来定义共享的行为,可以在模板中作为一种约束,避免模块实例化有不符合该 trait 约束的对象引入,保证在编译能发现非法的模板使用。Rust 保证在实现灵活的编程时,又能安全、高效的定义接口,避免用户使用错误,同时也能统一接口,极大得方便移植,在常见的 Rust 嵌入式驱动中可以经常看到 trait 的使用。
另外常见的标记类的 trait 有 Send, Sync, Unpin,Clone等
异步/Future
在 Rust 中,实现了 Future trait 的对象代表可能尚未完成计算的值。Future 有一个关联的 Output 类型,它最终会解析为这个类型的值。Future trait 的定义特征是 poll 函数。
简单的理解可以认为:Future 表示一个异步操作的潜在结果。它允许你以一种非阻塞的方式执行异步任务,并在任务完成时获取结果。不像 C 中常使用注册的 callback 函数那样需要程序员清晰得去理解多任务间状态逻辑。Future 让 Rust 异步程序逻辑更加线性化,方便编写和理解。
以下展示一个简单的 异步示例:
#![allow(unused)]
fn main() {
use std::future::Future;
use std::pin::Pin;
use std::task::{Context, Poll};

struct MyFuture {
    // 一些状态,例如异步操作的计数器
    counter: u32,
}

impl Future for MyFuture {
    type Output = u32;

    fn poll(self: Pin<&mut Self>, cx: &mut Context<'_>) -> Poll<Self::Output> {
        if self.get_mut().counter < 5 {
            self.get_mut().counter += 1;
            Poll::Pending
        } else {
            Poll::Ready(self.get_mut().counter)
        }
    }
}
}
在这个示例中,MyFuture 是一个自定义的 Future,它在计数器达到 5 之前一直处于 Pending 状态,当计数器达到 5 时,返回 Poll::Ready(counter)。 总之,Future trait 和 poll 函数是 Rust 异步编程的基础,它们提供了一种强大的方式来处理异步操作和构建高效的异步程序。
零成本抽象
零成本抽象也是 Rust 的一个重要的特点。通常在高级语言中,对于抽象级别越高的对象,可能需要消耗更多的程序空间或运行时间。但在 Rust 中,很多高级抽象都是零成本的,不占用任何运行时间和程序空间。常见如下
- 迭代器
- 闭包
- 智能指针
- 枚举
- 零大小结构体
这些常用的抽象可以放心在嵌入式中使用,不会占用大量的空间,且执行效率与直接手写的代码几乎一致。
附录
Introduction - The Cargo Book (rust-lang.org)
Rust 嵌入式学习会遇到的挑战
语法和基本概念
Rust 的基本语法的入门并不难,如常见的基础变量定义、表达式、判断逻辑、循环逻辑、函数等基础语法基本上与其他语言相似,看过一两个代码后就能习惯 Rust 的语法。因此基础语法并不会有太多障碍。熟悉基础语法后就能编写一些简单命令工具、数据处理工具等,甚至基于一些开源GUI框架编写一些GUI应用。
对于 Rust 高级的知识,如范型、异步、生命周期等概念则需要去深入理解。因此Rust 的学习曲线因人而异,不同背景的人对于 Rust 语言的一些概念理解接受速度不同。比如
- C 语言背景,对堆、栈、生命周期的概念理解可能比较快,但对范型、范式编程、异步Future、零成本抽象等概念理解就稍微难。
- 对于Java:对 trait,范型、错误处理、并发编程的理解比较快,而对堆栈概念理解较弱
- 对于Python来说,模块化编程、类概念有优势。
陈天老师有个总结 Rust 学习曲线图,可以看出 Rust 从入门到精通需要经过三个奔溃时刻,在学习的过程中会发现对 Rust 的掌握不深,不要担心,在嵌入式 Rust 开发中,通常不会要求完全掌握这些 Rust 技能,在日常学习中,通过与编译器不断斗争中,会慢慢加深对这些概念的理解,直至豁然开朗。

单片机外设使用
在熟悉 Rust 基础语法后,理解一些常用库的的使用、常用开源 crate 的功能后,就可以开始入门单片机的外设开发。
由于目前嵌入式 Rust的生态并不太丰富,大多数的芯片公司仅提供传统的 C 版本的外设库,可喜的是,目前仍然有一些常见的单片机已经提供了 Rust 的外设库,如 STM32、ESP32、GD32、NRF52XX 等。如果你喜欢的单片机没有提供 Rust 外设库,也不用担心,可以自己编写一些外设库,甚至也能使用寄存器级别的开发(请放心,哪怕是寄存器级别的开发,也能保证一定安全和高效, 比同等级别的 C 寄存器级的开发简单更多)。
个人建议可以从已经支持的 Rust 外设库的单片机入门,如NRF52840、STM32、rp2040等。通过调用厂商提供的外设库接口,快速熟悉 Rust 的编程风格、API风格,感受与 C 嵌入式编程的差异。
在拿到单片机开发板后,快速根据库文档搭建编译和下载环境,然后打印hello world、点亮 led 灯。这些 Rust 例程跑起来的难度也许比C的例程更加低, 还算比较新手友好。在这个阶段的学习中,你会发现 Rust 外设驱动库的实现方式与C相差非常大,甚至你有很多疑问,不太明白为什么驱动要这样设计,不明白不用太焦虑, 这一阶段你只要能了解外设接口怎么使用即可,能让各个外设正常的工作起来。
在下一个阶段中,你需要去了解pac(外设访问控制接口)的使用,制作原理、可以尝试自己利用 svd2rust 工具自己制作一个单片机的 pac crate。然后自己尝试通过 pac crate 接口来读写芯片的寄存器。然后可以了解单片机是怎么从复位后运行到 Rust 的 main函数,具体你需要去阅读 cortex-m-rt和 cortex-m。你会发现 Rust 的启动过程竟然与C如此相似,但让一个单片机能运行起来更加简单。如果你很细心,你会继续探究 build.rs 代码的功能和编写逻辑,发现 Rust 工具的奥秘,从而能基于这些知识来开启下一个阶段。
在第三个阶段中,你可以尝试自己去编写一些芯片的 Rust 外设驱动库,如果国产的一些芯片,先模仿NRF52840、ESP32、STM32等芯片的库,再次感受驱动设计的思想。开始可以基于一些简单的芯片,如 Cortex-M0 内核的芯片,方便快速完成整个芯片驱动库的编写。最后将你编写的Rust 外设库开源出去,通过大家的意见、不断改善和优化,
生态
很多人对 Rust 嵌入式的生态持较悲观的态度,认为 Rust 目前没有太多的轮子,需要自己去造。然后我个人在两年的 Rust 嵌入式开发中感受到,目前 Rust 的生态已经足够大部分的工程实践了。在crate.io 上有大量优秀的开源 crate 能被工程中所使用。一些单片机的外设库、传感器驱动库、LCD驱动、图形显示框架、IIC/SPI/UART 通信驱动、操作系统等都有比较好的开源 crate, 且质量还不错, 加上 Rust 官方对嵌入式的支持,开放了一些抽象库,让驱动移植变得非常简单便捷,例如传感器库能轻松得在不同单片机中使用。
另外对于书籍文档类资源,Rust 嵌入式也开始有很多详细的公开资料,如ESP32 的 rust 资料非常详细,足以支撑 Rust 嵌入式的学习和开发了。
总结
对于这些挑战,其实跨越他们并不困难,一定要有信心去面对,同时也要适当放下困难、不要力图一下理解某些概念,要讲究循序而渐进,自然豁然而开朗。
附录
基础知识
在嵌入式 Rust 学习之前,如果你有以下相关基础,学习嵌入式Rust也许能很快上手。
- 能看懂原理图,了解基本的数字电路原理
- 了解单片机的基本外设功能、有微机原理基础
- 了解编译的流程,了解单片机应用开发流程
- 有相关编程经验,有 C/C++ 语言基础最好, 无基础也可, 能看懂或者理解基本的寄存器操作逻辑
如果你对单片机底层比较熟悉,那相信你能很快理解驱动代码,那么你学习的重点将是理解 Rust 单片机驱动的设计模式,感受与传统 C 驱动的差异。
对于基础知识的补习,推荐以下资料
Rust 与 C/C++ 嵌入式的比较
相同点
- 生成的目标文件都是二进制文件,也可生成
elf/hex/asm文件 - bin 文件的内容结构大体一致,都分为
text/bass/data段 - 单片机的启动原理一致,都是从中断向量表的
reset向量执行,然后初始化数据段,bss段等内容 - 都需要链接脚本文件链接所有目标文件
- 应用层通常都从
main函数中开始运行 - 都可以由中断触发进入中断服务函数
- 都能直接操作硬件寄存器
- 都有裸指针操作内存或外设寄存器
差异
- Rust 通常直接操作外设的寄存器,rust 可能会认为
unsafe, 需要特别标记 - Rust 推荐使用 pac 抽象层来操作外设寄存器
- Rust 的外设驱动抽象通常有统一的标准接口,便于移植
- Rust 的外设驱动比较抽象,但执行依旧高效,且安全,能尽最大能力保证硬件与软件的统一性,避免软件对硬件进行非法复用操作
- Rust 提供了大量的线程安全的标准库
- Rust 除裸指针外,也有胖指针,切片等更安全更高抽象的指针,且运行依旧高效
Rust 嵌入式的优势
快速搭建环境
Rust 编译环境
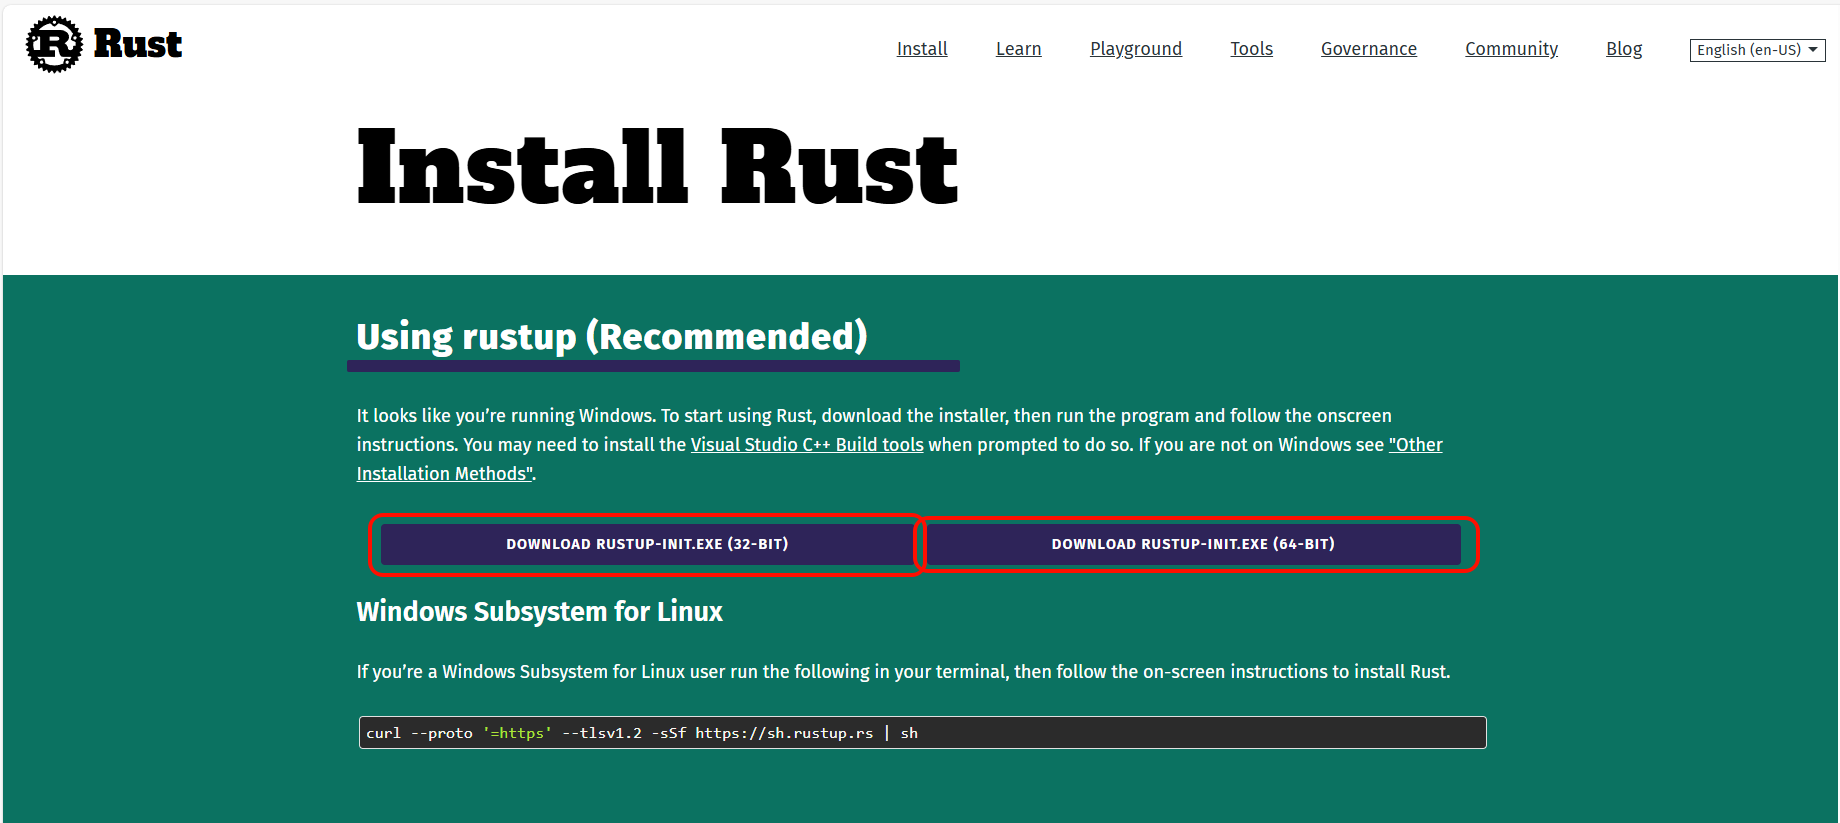
Rust 可以跨平台运行,支持 Windows/Linux/Mac 等主流系统。笔者推荐在 Mac或Linux 下学习和开发,效率更高。本书也主要介绍在 Mac/Linux 嵌入式常用工具和实践习惯。 Rust 提供了非常简单的安装命令, 详细可以参考:Rust 官方入门手册 详细请参考: Installation - The Rust Programming Language (rust-lang.org)
Mac/Linux
curl --proto '=https' --tlsv1.2 -sSf https://sh.rustup.rs | sh
国内环境如果因为网速问题,可能会下载失败,可以先执行以下命令尝试切换清华的镜像源,然后执行以上安装命令。
export RUSTUP_DIST_SERVER=https://mirrors.tuna.tsinghua.edu.cn/rustup
export RUSTUP_UPDATE_ROOT=https://mirrors.tuna.tsinghua.edu.cn/rustup/rustup
Windows
Windows 下安装稍微麻烦点,具体可参考:[Windows](MSVC prerequisites - The rustup book (rust-lang.github.io))
提醒
如果您目前只是学习Rust语法,那么可以暂时忽略以下的工具的安装,当后期需要编译和运行 Rust 单片机代码时候,您可继续安装以下工具。
设置 Rust night 版本
Rust 的嵌入式开发环境需要是 nightly 版本
rustup default nightly
嵌入式编译工具链
编译嵌入式端的目标文件,需要相应的交叉编译链, 需要手动安装你需要的工具链。Rust 目前已经支持了大部分的交叉编译链,可以通过命令查看目前系统已经支持的交叉编译链:
rustup target list
通常来说,对于不同的芯片厂商,只要芯片内核相同,都可以使用相同的编译链,无需再额外配置环境。
安装 Cortex-M0 编译工具(Py32_Rust_Dev_1.1)
rustup target add thumbv6m-none-eabi
Probe-rs
Probe-rs 是一个在Rust 嵌入式开发的常用软件工具,有下载固件到芯片,在线调试固件,打印运行日志、查看芯片内存等功能。
curl --proto '=https' --tlsv1.2 -LsSf https://github.com/probe-rs/probe-rs/releases/latest/download/probe-rs-tools-installer.sh | sh

cargo install cargo-binstall
cargo binstall probe-rs-tools
在完成这一步后,如果顺利的话,你可以跳转到:快速体验Rust 嵌入式
主控
本教程使用的开发版为 Py32_Rust_Dev_1.1, 所采用的单片机为 py32f030, 目前该单片机在国内市场使用较为普遍,同时国外也有相当多的爱好者已经移植了开源的 Arduno 和 Rust。
py32f030 内部比较简单,官方的资料也很完备,比较适合 Rust 嵌入式。该单片机资源如下:
- 内核
- 32 位 ARM® Cortex® - M0+
- 最高 48MHz 工作频率
- 存储
- Flash:64K
- SRAM:8K
- UART x2
- GPIO x30
- ADC x1
- SPI x2
- Timer x6
- I2C x1
- RTC
- Watchdo
- ......
开发版
Py32_Rust_Dev_1.1 目前已适配大部分外设的 Rust 驱动,且支持开源的 Arduno、普冉官方的 支持包也可使用。初学者可以在不同的IDE或编译工具上测试,目前支持的框架有:
- Rust
- Arduno
- Keil
- IAR
- EIDE
- GCC
- CMake

其他
如果安装环境或编译有报错,你可能需要使用以下命令安装一些工具, 详细请参考 常用工具
- 对于 Mac 系统如果没有安装 GCC 工具链
xcode-select --install
- 对于 Linux 如 ubuntu/Deepin,可以安装一些常用嵌入式工具
sudo apt-get update
sudo apt-get install build-essential
- 使用 cargo 克隆远程仓库,创建新的工程。
# 安装 generate 命令
cargo install cargo-generate
下载
可使用 Jlink或Stlink用于下载和在线查看日志,在 py32f030-hal 库的根目录下运行
cargo r --example XXX
生成其他格式的固件
# 编译并生成bin文件
cargo objcopy --example embassy_allpin -- -O binary embassy_allpin.bin
# 编译并生成 hex文件
cargo objcopy --example blinky -- -O ihex blinky.hex
# 编译并将elf文件自动转换成汇编
cargo objdump --example blinky -- -D > blinky.asm
附录
Introduction - The rustup book (rust-lang.github.io)
The Rust Programming Language - The Rust Programming Language (rust-lang.org)
Windows rust 环境安装
Windows 的Rust 开发环境安装稍微麻烦一点,但是也不难。
下载 Rust 安装器
访问 Rust 官网下载页面,点击下载你系统对应的类型下载对应的安装器。
在浏览器的下载器中保存到电脑文件夹。
运行安装器
下载完毕后,双击安装器rustup-init.exe。在 Rust 安装程序中将看到以下几个选项:
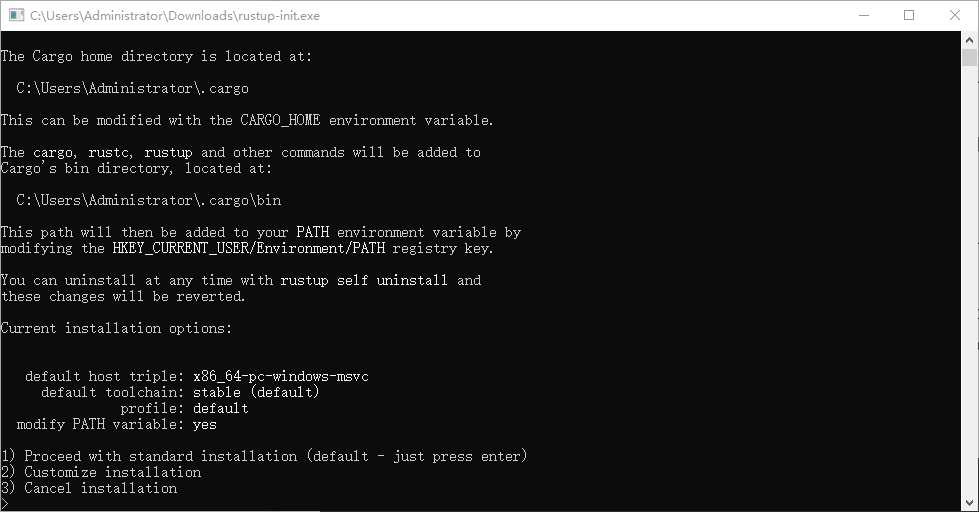 通常选择选项1最为便捷。输入1并回车后,安装器将从网络中下载安装包。因访问外网可能需要耗时10分钟左右。
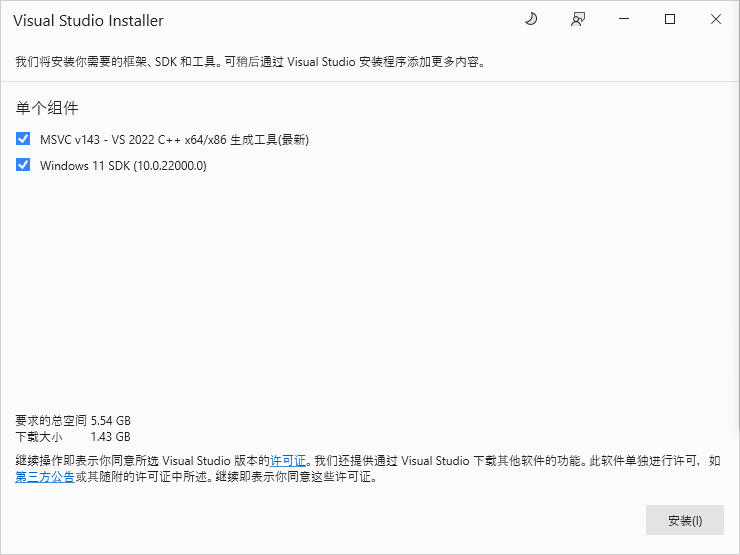
如果你的电脑没有安装 Visual Studio,安装器将会自动引导安装。选择右下角安装即可。
通常选择选项1最为便捷。输入1并回车后,安装器将从网络中下载安装包。因访问外网可能需要耗时10分钟左右。
如果你的电脑没有安装 Visual Studio,安装器将会自动引导安装。选择右下角安装即可。
安装可能比较慢,请耐心等待。

附录
常用工具和命令
Cargo
Cargo
GDB
用来调试单片机,查看或修改芯片内部数据 GDB 调试 Rust 嵌入式程序-以国产单片机为例 TODO
ext 3333
Overview of embedded programming and debugging - Debugonomicon (rust-embedded.org)
Probe-rs
Probe-rs 用于下载和调试固件,通常可使用 Jlink、Stlink、DapLink等工具下载。
目前 Py32 Rust Dev 可使用 Jlink/Stlink 下载固件并打印 defmt 或 RTT 日志。在 demo 中直接使用cargo r等命令即可。
查看支持的芯片清单
烧录
重启设备
临时探测日志
TODO
probe-rs attach
指定 jlink
读写内存或寄存器
串口烧录
附录
串口烧录程序
Py32_Rust_Dev 主板支持串口烧录,只需要连接 Type-C 到电脑即可。
Pyisp
该工具用于串口烧录 bin 文件到 Py32F030 芯片。
获取源码 及安装到 cargo 路径
git clone https://github.com/hysonglet/pyisp.git
cd pyisp
# 安装可执行 pyisp 命令到 cargo
cargo install --path .
常用命令
# 查看帮助
pyisp -h

# 查看当前连接的串口
pyisp -p

# 下载并运行
pyisp -s tty.usbserial-130 -f test.bin -g

# 循环下载
pyisp -s tty.usbserial-130 -f tttt.bin -g -c
串口下载操作
- 按下
boot键 - 按下
reset键(保持boot键按下状态) - 释放
reset键 - 0.5 秒后释放
boot键
1.3 主板下载只需按 boot 键即可,无需再按 reset 按键
Cargo
Cargo 集成了非常多的工具和包用与构建 Rust 应用、管理包依赖。用户可以定制构建脚本 cargo.toml 文件增加包依赖、编译选项、features 等, 也可使用相应的 cargo 命令自动修改 cargo.toml。
常用的 Cargo 命令
Clippy
Clippy 是一个 Lint 工具,用于实时捕获常见的语法错误或警告、代码风格提示等,并提供修复建议。可设置 Clippy 的检查类型和等级。
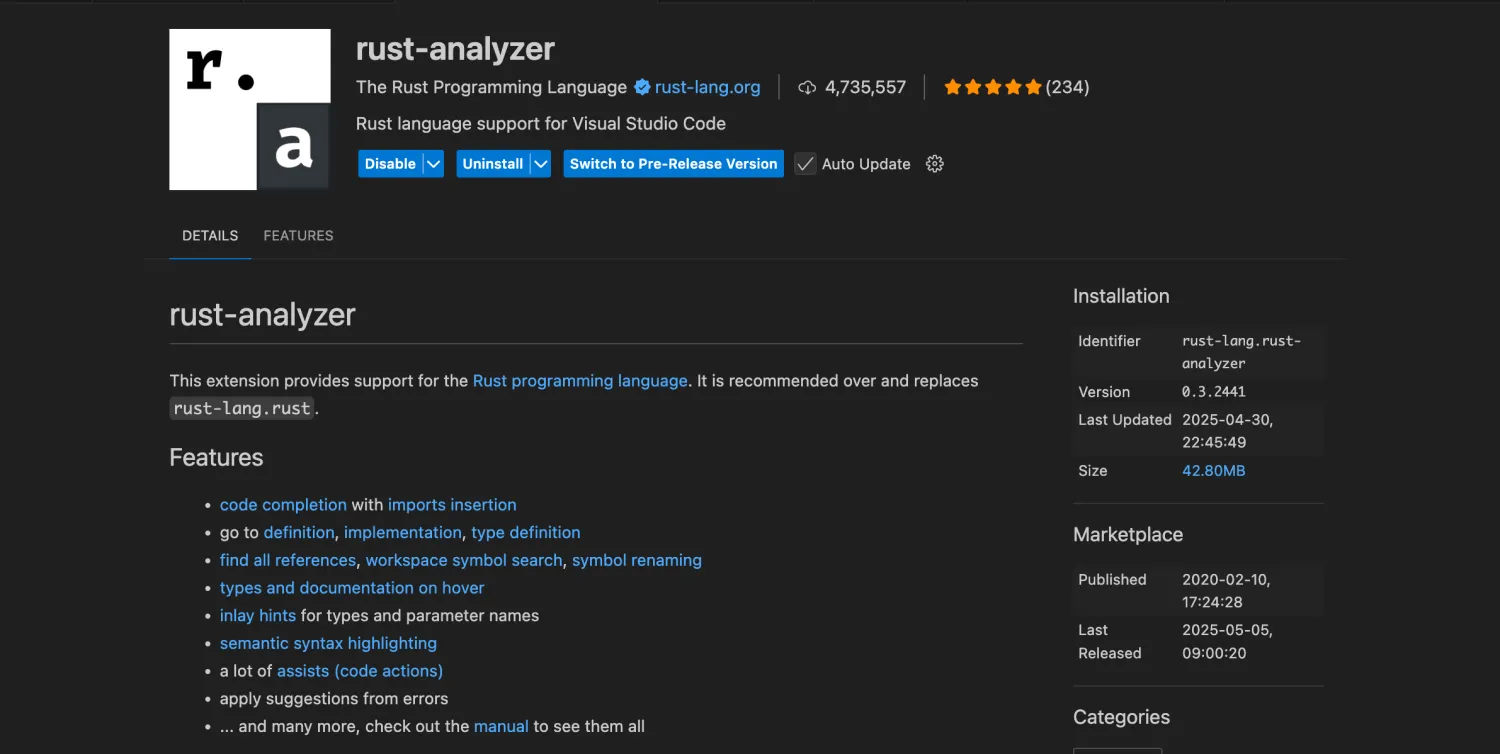
Rust-analyzer
rust-analyzer 是 Rust 基金会开源的语言服务协议(LSP),当代码改动时,用于提供代码语意分析,提供自动补全,变量类型提示、变量跳转等功能,也能提供代码修改建议。
在 VSCode 中安装插件 rust-analyzer 后可以使用。
Rustfmt
rustfmt 是一个代码格式化工具,用于按照社区代码风格自动格式化代码。当 Rust 安装时, rustfmt 会自动安装。
# 格式化单个文件
rustfmt build.rs

# 格式化整个 crate
cargo fmt
其他
检查
只检查 crate 语法,不编译,通常用来节省时间
cargo check
# or
cargo c
编译
编译 crate 或 指定的例程目标
# 编译当前 crate
cargo build
# or
cargo b
# 编译 example 目录下的例程文件 XX
cargo b --example XX
# 以 release 模式编译例程 XX
cargo b --example XX --release
# 编译例程并使能 feature FFF
cargo b --example XX --feature FFF
下载 & 运行
下载 elf 固件到芯片并运行,probe-rs 会实时打印来自单片机的日志
# 下载并运行
cargo run
# or
cargo r
# 以 release 模式运行
cargo r --release
# 运行 例程
cargo r --example blinky --release
模板创建工程
# 使用远程仓库模板创建工程
cargo install cargo-generate
固件分析工具
# 这个工具包将提供一些便捷的 objdump, objcopy, objsize 等命令。通常在生成bin文件或者分析固件时候非常有用
cargo install cargo-binutils
rustup component add llvm-tools-preview
svd2rust
嵌入式 Rust 开发推荐安装的插件
在嵌入式开发领域,Rust 凭借其内存安全、高性能以及对底层的良好控制能力,逐渐成为开发者的新宠。然而,要想在嵌入式 Rust 开发中如鱼得水,一套好用的插件必不可少。它们能帮你提升代码编写效率、优化调试流程、简化构建过程。今天,就为大家推荐几款嵌入式 Rust 开发必备插件!
Rust Analyzer
Rust Analyzer 堪称 Rust 开发者的 “智能大脑”。它为编辑器提供了强大的代码分析功能,能够实现实时的语法检查、代码补全、函数定义跳转等功能。在嵌入式开发中,当你面对复杂的硬件驱动代码和大量的结构体、枚举时,Rust Analyzer 能快速定位定义、提示可能的错误,极大提高编码速度。Rust Analyzer支持多个编辑器,如VSCode,Vim,Zed等。
Probe-rs
Probe - rs 是一个用于与嵌入式设备进行交互的调试工具,主要有以下功能:
- 设备探测与连接:能够自动探测连接到计算机的嵌入式设备,支持多种调试探针,如 J-Link、ST - Link 等,方便用户快速建立与目标设备的连接。
- 闪存编程:可以将编译好的程序固件下载到嵌入式设备的闪存中,支持擦除、写入等操作,并且能够优化编程速度,减少烧写时间。
- 调试支持:提供了丰富的调试功能,包括设置断点、单步执行、查看寄存器和内存值等。还支持实时调试,允许开发者在程序运行时动态查看变量变化和程序执行流程,有助于快速定位和解决代码中的问题。
- 脚本与自动化:支持通过脚本语言编写自动化任务,例如批量烧写固件、执行一系列调试操作等,提高开发效率,减少重复性工作。
- 支持多种平台:兼容多种操作系统,如 Windows、Linux 和 macOS,并且对不同的嵌入式芯片平台有广泛的支持,包括 ARM Cortex - M 系列等常见的微控制器。
Cargo Watch
Cargo 是 Rust 的包管理器和构建工具,而 Cargo Watch 插件则能让你的构建过程更加智能。它会实时监控项目中的文件变化,一旦检测到代码修改,就会自动重新构建项目。在嵌入式开发中,频繁的代码修改和构建是常态,Cargo Watch 能帮你省去手动输入构建命令的步骤,让你专注于代码编写,提升开发效率,同时提升编译速度。
#![allow(unused)]
fn main() {
安装 watch 命令
cargo install cargo-watch

监视源代码的变化, 编辑时候出现任意修改将会触发 cargo check 命令
cargo watch -x check
}
Cargo Check
cargo check 是 Rust 开发中一个轻量级且高效的代码验证命令,作为 cargo 工具链的核心功能之一,它的主要作用是快速检查代码是否能通过编译,但不生成可执行文件。以下是其核心功能的简要介绍:
1. 核心功能
- 语法检查:验证代码是否符合 Rust 语法规则,如变量声明、函数调用、生命周期标注等。
- 类型检查:确保所有表达式的类型正确且兼容,例如不会将
String赋值给需要i32的变量。 - 借用检查:执行 Rust 的所有权系统检查,防止悬垂引用、数据竞争等内存安全问题。
- 快速反馈:相比
cargo build,跳过了生成二进制文件的耗时步骤,通常能在几秒内完成检查。
2. 为什么需要cargo check
- 提升开发效率:在频繁修改代码时,快速验证代码正确性,避免等待完整编译的时间(尤其是大型项目)。
- CI/CD 集成:在自动化测试流程中作为第一步,快速过滤语法错误和类型错误。
- 轻量级验证:当你只需要确认代码能否编译,而不需要运行程序时(如提交代码前的检查)。
3. 常用参数
cargo check           # 检查当前包
cargo check --all     # 检查工作空间中的所有包
cargo check --tests   # 检查测试代码
cargo check --release # 按 release 模式检查(启用优化)
cargo check --features "feature1 feature2" # 检查特定特性
Clippy
Cargo Clippy 是 Rust 生态系统中的一个重要工具,它作为 cargo 的一个子命令存在,主要用于提供更高级的代码分析和风格检查。以下是其核心功能的简要介绍:
- 代码风格检查
除了 Rustfmt 提供的格式化功能外,Clippy 会检查代码是否符合社区公认的最佳实践,例如:- 检测冗余代码(如未使用的变量、导入或注释)
- 发现潜在的逻辑错误(如比较浮点数是否相等)
- 推荐更简洁、更符合 Rust 习惯的写法
- 性能优化建议
它能识别出性能低下的代码模式,并提供优化建议,例如:- 避免不必要的克隆(cloning)操作
- 推荐使用更高效的数据结构或算法
- 检测可能导致堆分配的低效模式
- 安全漏洞检测
Clippy 可以帮助发现潜在的安全风险,例如:- 检测硬编码的敏感信息(如 API 密钥)
- 识别可能导致 panic 的不安全操作
- 发现可能引发竞态条件的并发代码
- 可配置的检查规则
Clippy 提供了超过 400 条 lints(检查规则),可以根据项目需求选择性启用或禁用。例如:
# 在项目的 .clippy.toml 中配置
deny = ["clippy::unwrap_used"]  # 禁止使用 unwrap()
warn = ["clippy::needless_borrow"]  # 对不必要的借用发出警告
- 与开发流程集成
可以在 CI/CD 流程中自动运行 Clippy,确保代码质量:
cargo clippy --all-targets --all-features -- -D warnings
为什么需要 Clippy?
虽然 Rust 编译器本身已经非常严格,但 Clippy 提供了更细致的检查,帮助开发者写出更专业、更安全、更高效的代码。它是 Rust 开发中不可或缺的质量保障工具。
Cargo fmt
Cargo fmt 是 Rust 官方提供的代码格式化工具,作为 cargo 的子命令存在,用于自动统一代码风格,消除团队成员间的格式争议,提升代码可读性和一致性。以下是其核心功能的简要介绍:
- 自动格式化代码
按照 Rust 社区公认的风格指南,自动调整代码格式,包括:- 缩进(默认 4 个空格)
- 行宽限制(默认 100 个字符)
- 大括号位置(K&R 风格)
- 空格与逗号的使用
- 导入模块的分组与排序
- 一键统一风格
只需执行以下命令,即可格式化整个项目:
cargo fmt
支持通过 --check 参数验证代码是否已格式化,常用于 CI/CD 流程:
cargo fmt --check
- 高度可配置
通过项目根目录下的.rustfmt.toml文件,可以自定义格式化规则,例如:
# .rustfmt.toml
max_width = 120          # 调整行宽限制
indent_style = "Spaces"  # 使用空格缩进
fn_single_line = true    # 单行函数样式
- 与编辑器深度集成
在 VS Code、IntelliJ、Vim 等主流 IDE 中安装 Rust 插件后,保存文件时可自动触发格式化,保持代码风格实时统一。 - 与 Rust 编译器无缝协作
Cargo fmt 生成的代码完全符合 Rust 语法,不会引入编译错误,确保格式化过程的安全性。
为什么需要 Cargo fmt?
在团队协作中,手动维护代码风格不仅耗时耗力,还容易引发争议。Cargo fmt 通过自动化手段解决了这一问题,让开发者可以专注于代码逻辑而非格式细节。它是 Rust 生态中保证代码质量和可维护性的基础工具。
cargo-binutils
cargo - binutils 是一组与 Rust 项目二进制文件处理相关的工具,它扩展了cargo命令的功能,主要有以下作用:
- 反汇编功能:可以将 Rust 编译生成的二进制文件进行反汇编,生成汇编代码。这对于分析程序的底层实现、优化代码以及理解程序在机器层面的执行过程非常有帮助。例如,通过反汇编可以查看函数的调用过程、指令的执行顺序等,有助于发现潜在的性能问题或代码错误。
- 目标文件处理:能够对目标文件进行操作,如查看目标文件的符号表、节区信息等。符号表包含了程序中定义和引用的符号名称及其相关信息,节区信息则描述了目标文件中不同部分的内容和属性。这些信息对于调试、链接以及理解程序的内存布局很有价值。
- 链接控制:提供了对链接过程的一些控制选项。可以指定链接脚本、调整链接顺序等,以便更好地满足特定项目的需求,例如在嵌入式开发中,可能需要根据硬件的内存布局来定制链接过程,确保程序能够正确地在目标设备上运行。
- 与 cargo 集成:作为
cargo的插件,它与cargo的工作流程紧密结合。可以在cargo命令中方便地调用相关功能,例如cargo objdump用于反汇编,cargo readelf用于查看目标文件信息等,使得在 Rust 项目中处理二进制文件更加便捷和高效。
通过这些功能,cargo - binutils 为 Rust 开发者提供了更底层、更细致的工具,有助于深入理解和优化 Rust 程序的二进制输出,特别是在性能分析、调试以及与底层硬件交互的场景中非常有用。
# 安装工具链
cargo install cargo-binutils
# 安装 LLVM 工具链依赖
rustup component add llvm-tools-preview

# 查看二进制的资源占用
cargo size --release

# 查看目标固件的汇编代码
cargo objdump -- -d -S

# 查看各段的地址、大小等信息
cargo readobj -- --sections

# 移除 release 构建的调试符号
cargo strip --release

# 查找各函数符号及地址
cargo nm

# 生成bin格式的目标文件
cargo objcopy -- -O binary

# 生成hex的目标文件
cargo objcopy -- -O ihex
串口助手
Mac
WCHSerialPort on the Mac App Store (apple.com)
Windows
野人串口助手 UartAssist串口调试助手-软件工具-野人家园 (cmsoft.cn)
Linux
sudo apt install minicom
TODO
VSCODE 下开发 Rust 嵌入式
常用插件
- rust-analyzer
- Even Better TOML
Zed IDE
TODO
Rust 语法
常见基础类型
Rust 的数据类型与C/C++的基本类型基本一致,但额外增加 128 bit 的整型、浮点型。变量的定义由关键词 let 开头。通常紧跟变量的修改能力的标识,使用 mut 表示定义一个可修改的变量,省略 mut 则默认为不可修改的常量。 与 C 语言相比,你需要知道 Rust 的舒适类型的定义有以下特点:
- 使用
let关键词定义 - 变量的大小通常显式可知(除isize, usize 类型与平台相关)
- 变量默认不能修改,如果需要修改需要
mut修饰 - 不强制手写变量类型,编译器可根据上下文自动推到出变量类型
- 允许在同一上下文定义多次相同的变量名,且允许类型变化,前面定义的变量则自动释放,不能再使用。
- 变量为强类型,不允许赋值非法的值到变量
- 变量使用前必须赋值,不允许读未赋初始值的变量
- Rust 的基础自带一些常用的方法。
无符号整型
| 类型 | 最大值 |
|---|---|
u8 | 255 |
u16 | 65_535 |
u32 | 4_294_967_295 |
u64 | 18_446_744_073_709_551_615 |
u128 | 340_282_366_920_938_463_463_374_607_431_768_211_455 |
usize | 依赖平台指针大小, 可能大小为 u16, u32, or u64. |
有符号整型
| 类型 | 最大值 |
|---|---|
i8 | 127 |
i16 | 32_767 |
i32 | 2_147_483_647 |
i64 | 9_223_372_036_854_775_807 |
i128 | 170_141_183_460_469_231_731_687_303_715_884_105_727 |
isize | 依赖平台指针大小, 可能大小为 i16, i32, or i64. |
| 类型 | 最小值 |
|---|---|
i8 | -128 |
i16 | -32_768 |
i32 | -2_147_483_648 |
i64 | -9_223_372_036_854_775_808 |
i128 | -170_141_183_460_469_231_731_687_303_715_884_105_728 |
isize | 依赖平台指针大小, 可能大小为 i16, i32, or i64. |
浮点类型
| Type | Max value | Min pos value | Max lossless integer1 |
|---|---|---|---|
f16 🚧 | 65536.0 ? | ? | 2048 ? |
f32 | 3.40 ⋅ 10 38 | 3.40 ⋅ 10 -38 | 16_777_216 |
f64 | 1.79 ⋅ 10 308 | 2.23 ⋅ 10 -308 | 9_007_199_254_740_992 |
f128 🚧 | ? | ? | ? |
测试
fn main() {
    let mut v_i32: i32 = 10;
    v_i32 += 10;
    let v_u32: u32 = v_i32 as u32 * 2;

    let v_u8 = 0xffu8;

    let v_f32 = core::f32::consts::PI;


    let v_f64 = 5.1;

    println!("{} {} {} {} {}", v_u32, v_i32, v_u8, v_f32, v_f64);

    println!("i8: {},({}, {})", size_of::<i8>(), i8::MIN, i8::MAX,);
    println!("i16: {},({}, {})", size_of::<i16>(), i16::MIN, i16::MAX,);
    println!("i32: {},({}, {})", size_of::<i32>(), i32::MIN, i32::MAX,);
    println!("i64: {},({}, {})", size_of::<i64>(), i64::MIN, i64::MAX,);
    println!("i128: {},({}, {})", size_of::<i128>(), i128::MIN, i128::MAX,);
}
数组
枚举
元组
指针
参考
Rust 也提供了基本的位操作给整型类型运算。常见操作如下
- 左移 (
<<) - 右移 (
>>) - 与 (
&) - 或 (
|) - 非 (
!), 取反操作 - 异或 (
^)
与 位操作与 C/C++ 中不同的是
- C 语言的取反操作符为
~,布尔操作的非操作为! - C 语言的位操作不会严格检查两个操作数的类型,Rust 要求
与/或/非/异或的操作必须一致,否则编译错误。 - C 语言的左右移操作当移位数超过位数时,通常会编译报警,但 Rust 检测到移位超出位数后编译会立即报错,如果是运行时出现时,则会引起恐慌
panic) 终止程序。
fn main() {
    println!("{:x}", 0x0000_0001 << 4);
    println!("{:x}", 0x1000_0000 >> 4);
    println!("{:x}", 0x1000_0000 | 0x0000_0001);
    println!("{:x}", 0xffff_ffffu32 & 0xffff_0000u32);
    println!("{:x}", !0xffff_0000u32);
    println!("{:x}", 0xffff_0000u32 ^ 0x00ff_00ffu32);
}
结构体
Rust 允许使用结构体自定义类型,与 C 差别如下:
- 可兼容 C 的内存排列
- 默认内部数据可能被编译起自动重新排列
- 允许使用模板
- 可作为对象实现公开或私有的方法
- 可使用属性宏自动实现方法
- 允许空类型
- 无需手动调用释放函数
#![allow(unused)]
fn main() {
#[repr(C)]
pub struct ExceptionFrame {
    r0: u32,
    r1: u32,
    r2: u32,
    r3: u32,
    r12: u32,
    lr: u32,
    pc: u32,
    xpsr: u32,
}

struc Empty;

impl Empty {
    pub fn say_hello() {
        println!("hello");
    }
}

#[derive(Debug)]
struct Student<'a> {
    name: String,
    age: u8,
    nake: &'a str
}

struct Fruit<T> {
    type: T,
    weight: u8,
}

impl <T> Fruit<T> {
    fn new(t: T, w: u8) -> Self {
        Self {
            type: t,
            weight: w
        }
    }
}

}
Rust 的结构体与 C 的结构体的差异
Rust 作为一种系统级编程语言, 与C/C++语言一样,它们都有非常高效的内存读写操作,因此三者都非常适合资源有限的嵌入式平台的开发。
在很多编程语言中都有结构体这个概念,常常用于面向对象开发, 提高代码内聚, 降低耦合。Rust的结构体与C的结构体有非常多的相似之处,甚至可以使用#[repor(C)]属性, 直接与C/C++的结构体进行互操作。让 Rust 调用 C 库使用方法和 C 与 C++ 代码互相调用一样简单。但 Rust 的结构题体与 C 的结构体也有非常多的不同之处,有更多的特性,用于简化编程,简化抽象逻辑。
定义方法
Rust 结构体的预定义关键字与 C 一样,都使用 struct 关键字开头。但Rust 定义的后面通常无需添加分号;,除非结构体为空。各子属性的后面使用逗号分隔。
Rust 的结构体定义方法如下:
#![allow(unused)]
fn main() {
struct Point {
    x: i32,
    y: i32,
}

// 空结构体定义方法
struct EmptyStruct;
}
构造与初始化
Rust 的结构体没有要求必须有构造函数,但可以通过关联函数(如 new)初始化:
#![allow(unused)]
fn main() {
#[derive(Default)]
struct Point {
    x: i32,
    y: i32,
}
impl Point {
    pub fn new(x: i32, y: i32) -> Point {
        Point { x, y }  // 等价于 Point { x: x, y: y }
    }

    pub fn Point(point: Point) -> Point {
        Point {
            x: point.x,
            ..point  // 等价于 Point { x: point.x, y: point.y }
        }
    }
}
}
需要注意的是,Rust 的字段必须都初始化后才能使用,否则编译会报错,来保证字段的安全性。可使用 #[derive(Default)] 注解来为结构体添加默认值。
内部字段的访问
Rust 的结构体的内部字段可使用可见性修饰符,用于控制字段的访问权限。Rust 的结构体支持以下可见性修饰符:
pub:公共可见性,字段可以被外部访问。pub(crate):当前 crate 内可见,字段可以被当前 crate 内的代码访问。pub(super):父级模块可见,字段可以被父级模块内的代码访问。
内存排列
Rust 的结构体的内存排列与 C 结构体的内存排列不同。Rust 的结构体的内存排列是按照字段的定义顺序进行排列的,而 C 结构体的内存排列是按照字段的声明顺序进行排列的。
Rust 的结构体的内存排列如下:
#![allow(unused)]
fn main() {
struct Display {
    x: i32,
    width: u8,
    y: i32,
    height: u8,
}
}
以上代码在编译后的内存顺序可能自动调整为:
#![allow(unused)]
fn main() {
struct Display {
    x: i32,       // offset 0, size 4
    y: i32,       // offset 4, size 4
    width: u8,    // offset 8, size 1
    height: u8,   // offset 9, size 1
}
}
如果需要保持字段的内存顺序与C语言一致,可以使用#[repr(C)]属性,这样就可以保持字段的内存顺序与C语言一致, 在与C交互时则会完全兼容。 如下:
#![allow(unused)]
fn main() {
#[repr(C)]
struct Display {
    x: i32,       // offset 0, size 4
    width: u8,    // offset 4, size 1
    y: i32,       // offset 8, size 4
    height: u8,   // offset 12, size 1
}
}
方法
Rust 的支持为结构体定义方法,方法与函数的定义类似,只是方法定义在结构体的内部。方法的定义格式如下:
#![allow(unused)]
fn main() {
struct Point {
    x: i32,
    y: i32,
}
impl Point {
    fn distance(&self, other: &Point) -> f64 {
        let dx = self.x - other.x;
        let dy = self.y - other.y;
        (dx * dx + dy * dy) as f64
    }

    pub fn new(x: i32, y: i32) -> Point {
        Point { x, y }
    }

    pub(crate) fn get_x(&self) -> i32 {
        self.x
    }
    pub(super) fn get_y(&self) -> i32 {
        self.y
    }
}
}
如上所示,使用 impl 关键字定义结构体的方法,
- 内部的第一个参数如果为
self,表示当前结构体的实例中可使用, 当所有权会被移动。 - 如果方法的第一个参数的类型为
&self,表示当前结构体的实例的引用,结构体变量所有权不会移动,无法修改内部属性的值。 - 方法的第一个参数的类型为
&mut self,表示当前结构体的实例的可变引用,当前函数可修改内部属性的值。 - 如果函数的第一个参数非
self、&self、&mut self,则表示当前函数为静态方法, 可直接通过结构体名调用。
Rust 也能使用 impl trait_name for struct_name 来为结构体实现 trait, 如下:
#![allow(unused)]
fn main() {
struct Point {
    x: i32,
    y: i32,
}
impl Display for Point {
    fn fmt(&self, f: &mut Formatter<'_>) -> std::fmt::Result {
        write!(f, "({},{})", self.x, self.y)
    }
}
}
以上代码定义了一个 Point 结构体,并为其实现了 Display trait, 这样就可以使用 println! 宏来打印 Point 结构体的实例。
#![allow(unused)]
fn main() {
let p = Point { x: 1, y: 2 };
// 代码会输出 `(1,2)`。
println!("{}", p);
}
所有权与生命周期
Rust 的结构体可以包含引用(&T 或 &mut T),但必须指定生命周期:
#![allow(unused)]
fn main() {
struct Bar<'a> {
    data: &'a str, // 必须标注生命周期
}
}
范型化
Rust 的结构体支持模板化, 可以使用泛型来定义结构体, 如下:
#![allow(unused)]
fn main() {
struct Point<T> {
    x: T,
    y: T,
}
}
以上代码定义了一个 Point 结构体, 其中 x 和 y 都是泛型类型 T, 可以是任意类型。这样就可以使用 Point 结构体来表示任意类型的点, 适应不同的场景。
#![allow(unused)]
fn main() {
let p = Point { x: 1, y: 2 };
let p = Point { x: 1.0, y: 2.0 };
}
模式匹配
Rust 的结构体支持模式匹配, 可以使用模式匹配来解构结构体, 如下:
struct Point {
    x: i32,
    y: i32,
}
fn main() {
    let p = Point { x: 1, y: 2 };
    match p {
        Point { x, y } => println!("x={}, y={}", x, y),
        _ => println!("other"),
    }
}
以上代码定义了一个 Point 结构体, 并在 main 函数中使用模式匹配来解构 Point 结构体的实例, 解构后可以使用 x 和 y 变量来访问结构体的内部属性。
析构函数
Rust 的结构体都有析构函数, 析构函数在结构体被释放时自动调用, 可以用于释放资源, 如下:
#![allow(unused)]
fn main() {
struct Foo {
    data: Vec<i32>,
}
impl Drop for Foo {
    fn drop(&mut self) {
        println!("Foo is dropped");
    }
}
}
结构体变量在释放时默认会为内部的字段执行析构函数,避免内存泄漏,保证内存安全。
总结
Rust 的结构体与 C 的结构体有非常多的不同之处, 但 Rust 的结构体也有非常多的优点,用于提高内存安全和简化编程, 如:
- 支持范型化, 可以使用泛型来定义不同属性类型的结构体
- 支持模式匹配, 可以使用模式匹配来解构结构体
- 支持析构函数, 可以使用析构函数来释放资源
- 支持生命周期, 可以使用生命周期来指定结构体的引用的生命周期
- 支持引用, 可以使用引用来指向结构体的内部属性
- 支持方法, 可以使用方法来定义结构体的行为
- 支持可见性修饰符, 可以使用可见性修饰符来控制字段的访问权限
- 支持内存排列, 可以使用内存排列来指定结构体的内存布局
- 支持构造函数, 可以使用构造函数来初始化结构体的实例
- 支持静态方法, 可以使用静态方法来定义结构体的行为
- 支持兼容C, 可以使用
#[repr(C)]属性来与C语言交互, 适应多语言编程
枚举
Rust 的枚举可与C兼容,也有升级之处。
- Rust 枚举项可包含其他类型
- Rust 枚举可使用模板
- Rust 枚举的大小与枚举类型有关,并非一定为整型
#![allow(unused)]
fn main() {
enum Ea{
    A0,
    A1,
}

pub enum Eb{
    B0 = 0,
    B1 = 1,
}

pub(crate) enum Ident{
    ID(u32),
    Num(i32),
    Key(String),
}

enum Rst<T, E> {
    OK(T),
    Err(E),
}
}
Resoult<T, E> 和 Option<T>
Resoult<T, E> 和 Option<T> 这两个枚举由核心库提供,在 Rust 编程中经常使用。原型如下:
#![allow(unused)]
fn main() {
pub enum Option<T> {
    /// No value.
    None,
    /// Some value of type `T`.
    Some(T),
}

pub enum Result<T, E> {
    /// Contains the success value
    Ok(T),

    /// Contains the error value
    Err(E),
}
}
Option<T> 经常用于表示有无,Result<T, E> 常用于返回结果。
流程控制
Rust 也使用 if-else,if-else if-else 语句做为流程控制。与 C/C++ 有以下差异:
- 关键字后面不需带括号
() - 无论流程内部执行多少行代码,都必须添加花括号
{} if-else,if-else if-else等语句能返回值,且不同分支的返回类型必须一致,如果不需要返回值,则默认返回为空类型()。返回的值为每个分支的最后一个值。- 判断的表达式的值只能为布尔值,整型值等其他都非法
if let语句用于 Option 枚举
例
#[derive(PartialEq)]
enum EA {
    AA,
    BB,
}

fn main() {
    if true {
        println!("true");
    }

    let v = 100;
    if v > 0 {
        println!("true")
    }

    let a = 1;
    let b = 2;

    let max = if a > b { a } else { b };
    println!("{}", max);

    let c = 3;

    let rst = if c < 0 {
        -c
    } else if c == 0 {
        0
    } else {
        c
    };
    println!("{rst}");

    let ea = EA::AA;

    if ea == EA::AA {
        println!("hello");
    }

    if let Some(v) = None {
        println!("{}", v);
    }
}
匹配
match 模式匹配 与 C/C++ 有点类似,都用于匹配多个值。与 C/C++ 不同如下:
- match 语句最后会有返回值
- 每个分支的返回值类型必须一致
- 支持模糊匹配
- 无 break,不会出现贯穿错误
- 必须匹配所有范围,否则编译报错, 通常使用
_替代其他值。
实例
#[derive(PartialEq)]
enum EType {
    Ta,
    Tb,
    Tc(i32),
}

fn main() {
    let e1 = EType::Tc(10);

    match e1 {
        EType::Ta => {
            println!("ta");
        }
        EType::Tb => {
            println!("tb");
        }
        EType::Tc(v) => match v {
            0 => println!("tc: 0"),
            _ => println!("tc: {v}"),
        },
    }

    let e2 = EType::Tb;

    let rst = match e2 {
        EType::Ta | EType::Tb => 0,
        EType::Tc(v) => v,
    };
    println!("rst: {rst}");

    let cnt = 10;
    match cnt {
        0..6 => {
            println!("0~5")
        }
        6..10 => {
            println!("6~10")
        }
        _ => {
            println!("others")
        }
    }
}
循环
Rust 也有多种循环语句,能灵活适用于不同的场合。与 C/C++ 区别的是:
- 循环能有返回值
- break 可以有返回值
- 允许迭代器风格的循环
while let语句匹配Option枚举loop
示例
fn main() {
    for i in 0..5 {
        println!("{i}");
    }

    let mut cnt = 10;
    let rst = loop {
        cnt -= 1;
        if cnt == 0 {
            break 0;
        }
    };

    while cnt <= 10 {
        cnt += 1;
    }

    let v = vec![1, 2, 3];
    let mut iter = v.iter();
    while let Some(v) = iter.next() {
        println!("{}", v)
    }

    for v in v.iter() {
        println!("{}", *v);
    }

    let rst = loop {
        cnt -= 1;
        if cnt == 0 {
            break 100
        }
    }
}
trait
附录
Ownership(所有权)
在 C/C++ 编程中,对于内存的使用,需要非常谨慎,在日常的代码调试中,90%的问题都是处理内存问题。例如:
- 内存忘记释放导致内存泄露
- 内存释放多次
- 内存索引超出限制
- 多个任务同时操作内存
- 操作已经释放的内存
这些错误通常很难一眼发现,需要用到coredump工具、反汇编定位、strace等去跟踪定位,耗费大量的工作时间。
Rust 利用所有权机制,完美得解决了内存管理的问题,同时并不需要昂贵的开销,效率与C几乎一样。
在 Rust 中,每个变量都有所有权,在理解所有权前,你需要了解 拷贝 和 移动 语义。在 Rust 的 = 语句中,经常需要考虑 = 的效果是拷贝还是移动操作。通常意味着变量所有权可能变化。
附录
TODO
TODO
Rust 嵌入式开发
Rust 嵌入式抽象层
快速尝试
深入理解 hello world 例程——基于 hal 库
深入理解 hello world 例程——基于 cortex-m-quickstart
点个灯, 如此简单
外部中断与异步编程
中断详解
多任务
Rust 如何跑起来的?
代码如何分布?
外设学习
Led
串口
按键
串口
DMA
IIC
SPI
Clock
timer
exti 中断
rtc
ADC
SPI
Flash
看门狗
操作系统
Embassy
RTIC
Tock
其他
快速体验 Rust 嵌入式
学习新的语言,第一门课程当然是输出hello world。在这节你将能非常轻松得让单片机运行一段打印hello wolrd 的程序。
准备
在阅读本文之前,如果您还没有配置基础的Rust 开发环境,您可以阅读 环境搭建
本文将基于主板 Py32_Rust_Dev 1.1 演示,在此前你需要准备基本的硬件设备如下
- Py32_Rust_dev 1.1
- Jlink V9(或 Stlink V2)+ SWD 下载线 需要准备的软件环境如下:
- Rust (night)
- thumbv6m-none-eabi
- probe-rs
获取代码
你需要获取开发版 Py32_Rust_dev 的 Rust 驱动包,里面有芯片的 Rust 外设驱动以及提供了丰富的学习例程。
使用以下命令获取源码
git clone https://github.com/hysonglet/py32f030-hal.git
测试代码
#![no_std]
#![no_main]

use py32f030_hal as _;

use {defmt_rtt as _, panic_probe as _};

#[cortex_m_rt::entry]
fn main_fun() -> ! {
    defmt::info!("hello world");
    loop {
        cortex_m::asm::wfe();
    }
}
烧录和运行
使用以下命令即可快速编译代码,并且烧录固件到芯片,然后可以在终端中看到 py32f030 的输出打印内容
cargo run --example hello_world
实验结果
➜  py32f030-hal git:(main) ✗ cargo r --example hello_world
warning: unused manifest key: dependencies.embedded-io-async.option
    Finished `dev` profile [optimized + debuginfo] target(s) in 0.16s
     Running `probe-rs run --chip PY32F030x8 target/thumbv6m-none-eabi/debug/examples/hello_world`
      Erasing ✔ [00:00:00] [###############################################################] 12.00 KiB/12.00 KiB @ 92.09 KiB/s (eta 0s )
  Programming ✔ [00:00:02] [##################################################################] 9.50 KiB/9.50 KiB @ 4.18 KiB/s (eta 0s )    Finished in 2.444s
INFO  hello world
└─ hello_world::__cortex_m_rt_main_fun @ examples/hello_world.rs:10
深入理解 hello world 例程——基于 hal 库
工程解说
py32f030-hal crate 为 py32f030 芯片的外设支持库, 提供基本的外设访问接口。
py32f030-hal crate 的目录结构如下:
➜  py32f030-hal git:(main) ✗ tree -L 1
.
├── Cargo.lock
├── Cargo.toml
├── Embed.toml
├── LICENSE
├── README.md
├── examples
├── memory.x
└── src
初次学习时,该目录中有以下几个目录或文件需要了解:
Cargo.toml
该文件为 crate 的包管理文件,通过 toml 文件格式设置 crate 的基本信息,常用属性如下
- crate 版本
- 包名
- 依赖
- features
- 编译属性
Rust 编译的最小单位为 crate,发布的单位也为 crate。通常 crate 分为两种,
- 二进制 crate:直接编译成可执行的二进制,将包含一个 main 函数入口
- 库 crate,提供库接口,编译后为 lib 文件。也可添加多个 example 用来提供接口使用样例,可在 example 文件中包含 main 函数用于直接生成可执行的测试固件。
详细可参考:TOML 格式详解
[package]
name = "py32f030_hal"
version = "0.1.0"
edition = "2021"

# See more keys and their definitions at https://doc.rust-lang.org/cargo/reference/manifest.html
[dependencies]
bare-metal = { version = "1.0.0" }
cast = "0.3"
cortex-m-rt = "0.7"
critical-section = { version = "1.1.2" }
embedded-hal = { version = "0.2", features = ["unproven"] }
embedded-hal-async = { version = "1.0" }
...
[features]
default = ["example"] # "embassy"
example = ["dep:defmt", "dep:defmt-rtt", "dep:panic-probe", "dep:panic-halt"]
embassy = [
    "dep:embassy-executor",
    "dep:embassy-sync",
    "dep:embassy-time",
    "time-driver",
]
## Enable the timer for use with `embassy-time` with a 1KHz tick rate.
time-driver = ["dep:embassy-time-driver", "embassy-time-driver/tick-hz-1_000"]

[dev-dependencies]

[[example]]
name = "blinky"

[profile.dev]
codegen-units = 1
opt-level = "z"
lto = "fat"
debug = true
overflow-checks = true
strip = false

[profile.release]
codegen-units = 1
opt-level = "z"
lto = true
debug = false
overflow-checks = false
# strip = true   # 开启后release模式的日志不会显示
Embed.toml
Embed.toml 是 cargo 插件 cargo-flash 工作依赖的文件,通常来说并不是 Rust crate 中所必备的文件,在嵌入式开发中通常可以用来使用插件命令 cargo embed <args> 来快速编译、运行、或调试固件。详细可了解:cargo-embed
➜  py32f030-hal git:(main) ✗ cat Embed.toml

[default.general]
chip = "PY32F030x8"

[default.rtt]
enabled = false

[default.gdb]
enabled = true

[default.reset]
halt_afterwards = true
在以上代码中则指定命令 cargo embed 执行时所依赖的芯片名, 重启后进入 GDB 状态。
Examples
该目录用来存放一些测试样例代码,如 blinky,uart 等,初学者可以通过运行这些测试代码来快速了解如何使用外设驱动,crate 根目录下直接执行: cargo r --example expample_file_name
➜  py32f030-hal git:(main) ✗ tree -L 1 examples
examples
├── adc_block.rs
├── advanced_timer_block.rs
...
├── hello_world.rs
├── i2c_master_block.rs
├── key.rs
├── rtc_block.rs
└── uart.rs
memory.x
memory.x 文件用来指定芯片 RAM 和 Flash 等存储器的大小和地址,类似 C 中的链接脚本 ld 文件。在本 crate 中非必需,目前仅当使用 example 时才会用到该文件。在自己新建的 bin crate 工程中需要包含芯片对应 memory.x 文件。
MEMORY
{
  FLASH : ORIGIN = 0x08000000, LENGTH = 64K
  RAM : ORIGIN = 0x20000000, LENGTH = 8K
}
在 memory.x 脚本中可以看到,
- Flash 的起始地址:0x08000000, 大小为 64K
- RAM 的起始地址:0x20000000, 大小为 8K
src
src 目录为该库的源文件,通常在单片机外设库中,每个外设作为一个单独的模块。模块的根节点在 lib.rs 中,模块名即为包名,也就是 py32f030_hal。
➜  py32f030-hal git:(main) ✗ tree -L 1 src
src
├── lib.rs
├── adc
...
├── rtc
├── spi
├── syscfg
├── timer
└── usart
main 函数
对于大多数嵌入式工程来说,因 flash 和 ram 资源有限,无法容纳标准 std 接口的代码 ,因此需要指定 rust 引用 非标准库(no_std)。
hello-world.rs 代码如下:
#![no_std]
#![no_main]

use py32f030_hal as _;
use {defmt_rtt as _, panic_probe as _};

#[cortex_m_rt::entry]
fn main_fun() -> ! {
    defmt::info!("hello world");
    loop {
        cortex_m::asm::wfe();
    }
}
文件的 前行代码是 Rust 语言的属性宏,用于指定编译时的特定行为。感叹号 !代表该属性在整个 crate 生效。
#![no_std]: 这个属性宏告诉 Rust 编译器在编译目标程序时不使用标准库(std)。标准库提供了很多常用的功能,比如文件I/O、错误处理、集合类型等。不使用标准库通常意味着你需要自己提供这些功能,或者使用其他库来替代。#![no_main]: 这个属性宏告诉 Rust 编译器不自动生成main函数。在 Rust 中,main函数是程序的入口点。如果你不使用这个属性宏,编译器会自动寻找一个返回()类型的main函数。如果你使用了这个属性宏,你需要自己提供一个#[entry]属性的函数作为程序的入口点。也就是说,应用程序的入口函数名可以不为main!
第4行 use py32f030_hal as _; 引用入本 py32f030_hal.
第5行引入 defmt_rtt 和 panic_probe。
第6行 #[cortex_m_rt::entry] 的属性宏将告诉编译起后面的函数名将作为程序入口。
第8行 fn main_fun() -> !, !表明函数 main_fun 将永不返回。这样设计避免编译检查警告。
第9 行 defmt::info!("hello world"); 该语句将会在终端中打印字符串。然后系统进入停止模式。
编译
通过命令:cargo b --example hello_world 编译程序。首次编译可能耗时较长。
➜  py32f030-hal git:(main) ✗ cargo b --example hello_world
warning: unused manifest key: dependencies.embedded-io-async.option
   Compiling proc-macro2 v1.0.85
   Compiling unicode-ident v1.0.12
   Compiling version_check v0.9.4
   Compiling syn v1.0.109
   Compiling semver-parser v0.7.0
   Compiling nb v1.1.0
   Compiling cortex-m v0.7.7
   Compiling void v1.0.2
   Compiling nb v0.1.3
   Compiling thiserror v1.0.61
   Compiling critical-section v1.1.2
   Compiling embedded-hal v0.2.7
   Compiling semver v1.0.23
   Compiling semver v0.9.0
   Compiling defmt v0.3.8
   Compiling rustc_version v0.2.3
   Compiling proc-macro-error-attr v1.0.4
   Compiling proc-macro-error v1.0.4
   Compiling autocfg v1.3.0
   Compiling bare-metal v0.2.5
   Compiling num-traits v0.2.19
   Compiling ident_case v1.0.1
   Compiling byteorder v1.5.0
   Compiling vcell v0.1.3
   Compiling fnv v1.0.7
   Compiling defmt-macros v0.3.9
   Compiling az v1.2.1
   Compiling volatile-register v0.2.2
   Compiling quote v1.0.36
   Compiling syn v2.0.66
   Compiling bitfield v0.13.2
   Compiling cortex-m-rt v0.7.3
   Compiling atomic-polyfill v1.0.3
   Compiling rustc_version v0.4.0
   Compiling bitflags v1.3.2
   Compiling panic-probe v0.3.2
   Compiling defmt-rtt v0.4.1
   Compiling ssd1309 v0.3.0
   Compiling heapless v0.7.17
   Compiling PY32f030xx-pac v0.1.0
   Compiling display-interface v0.4.1
   Compiling embedded-io-async v0.6.1
   Compiling embedded-hal-async v1.0.0
   Compiling embassy-hal-internal v0.1.0
   Compiling gcd v2.3.0
   Compiling fugit v0.3.7
   Compiling embedded-graphics-core v0.3.3
   Compiling float-cmp v0.8.0
   Compiling darling_core v0.20.9
   Compiling hash32 v0.2.1
   Compiling micromath v1.1.1
   Compiling stable_deref_trait v1.2.0
   Compiling embedded-hal v1.0.0
   Compiling embedded-io v0.6.1
   Compiling embedded-graphics v0.7.1
   Compiling fugit-timer v0.1.3
   Compiling display-interface-i2c v0.4.0
   Compiling embassy-futures v0.1.1
   Compiling panic-halt v0.2.0
   Compiling bare-metal v1.0.0
   Compiling cast v0.3.0
   Compiling drop-move v0.1.0
   Compiling cortex-m-rt-macros v0.7.0
   Compiling thiserror-impl v1.0.61
   Compiling darling_macro v0.20.9
   Compiling darling v0.20.9
   Compiling enumset_derive v0.10.0
   Compiling enumset v1.1.5
   Compiling defmt-parser v0.3.4
   Compiling py32f030_hal v0.1.0 (/Users/hunter/mywork/py32/py32f030-hal)
    Finished `dev` profile [optimized + debuginfo] target(s) in 38.96s
编译完成后生成的 elf 文件路径为:
-
Debug模式:
target/thumbv6m-none-eabi/debug/examples/hello_world -
Release模式:
target/thumbv6m-none-eabi/release/examples/hello_world
常使用size 命令查看 flash 和 ram 占用情况。
arm-none-eabi-size target/thumbv6m-none-eabi/debug/examples/hello_world
   text    data     bss     dec     hex filename
   6344      56    1032    7432    1d08 target/thumbv6m-none-eabi/debug/examples/hello_world
在默认情况下,Debug 模式可能会占用较多的空间,但通常在 Release 模式下,则会减少很多。由于目前使用了 defmt 作为打印接口,因此会占用较多资源,如果资源限制,可选用其他占用较少的 crate。
查看汇编
elf 文件转汇编语言通过命令:
arm-none-eabi-objdump -d target/thumbv6m-none-eabi/debug/examples/hello_world > debug.asm
target/thumbv6m-none-eabi/debug/examples/hello_world:     file format elf32-littlearm


Disassembly of section .text:

080000bc <Reset>:
 80000bc:	f000 fe25 	bl	8000d0a <DefaultPreInit>
 80000c0:	4808      	ldr	r0, [pc, #32]	; (80000e4 <Reset+0x28>)
 80000c2:	4909      	ldr	r1, [pc, #36]	; (80000e8 <Reset+0x2c>)
 80000c4:	2200      	movs	r2, #0
 80000c6:	4281      	cmp	r1, r0
 80000c8:	d001      	beq.n	80000ce <Reset+0x12>
 80000ca:	c004      	stmia	r0!, {r2}
 80000cc:	e7fb      	b.n	80000c6 <Reset+0xa>
 80000ce:	4807      	ldr	r0, [pc, #28]	; (80000ec <Reset+0x30>)
 80000d0:	4907      	ldr	r1, [pc, #28]	; (80000f0 <Reset+0x34>)
 80000d2:	4a08      	ldr	r2, [pc, #32]	; (80000f4 <Reset+0x38>)
 80000d4:	4281      	cmp	r1, r0
 80000d6:	d002      	beq.n	80000de <Reset+0x22>
 80000d8:	ca08      	ldmia	r2!, {r3}
 80000da:	c008      	stmia	r0!, {r3}
 80000dc:	e7fa      	b.n	80000d4 <Reset+0x18>
 80000de:	f000 f895 	bl	800020c <main>
 80000e2:	de00      	udf	#0
 80000e4:	20000038 	.word	0x20000038
 80000e8:	20000040 	.word	0x20000040
 80000ec:	20000000 	.word	0x20000000
 80000f0:	20000038 	.word	0x20000038
 80000f4:	080018c8 	.word	0x080018c8

...

0800020c <main>:
 800020c:	b580      	push	{r7, lr}
 800020e:	af00      	add	r7, sp, #0
 8000210:	f000 f800 	bl	8000214 <_ZN11hello_world22__cortex_m_rt_main_fun17h27b2c8ae827133dbE>

08000214 <_ZN11hello_world22__cortex_m_rt_main_fun17h27b2c8ae827133dbE>:
 8000214:	b580      	push	{r7, lr}
 8000216:	af00      	add	r7, sp, #0
 8000218:	f000 febe 	bl	8000f98 <_defmt_acquire>
 800021c:	4803      	ldr	r0, [pc, #12]	; (800022c <_ZN11hello_world22__cortex_m_rt_main_fun17h27b2c8ae827133dbE+0x18>)
 800021e:	f000 fddc 	bl	8000dda <_ZN5defmt6export6header17hdbd91843ccf33f48E>
 8000222:	f000 fee5 	bl	8000ff0 <_defmt_release>
 8000226:	bf20      	wfe
 8000228:	e7fd      	b.n	8000226 <_ZN11hello_world22__cortex_m_rt_main_fun17h27b2c8ae827133dbE+0x12>
 800022a:	46c0      	nop			; (mov r8, r8)
 800022c:	00000003 	.word	0x00000003

...
细心的读者可以看到汇编的 main 函数里面最终调用了函数 _ZN11hello_world22__cortex_m_rt_main_fun17h27b2c8ae827133dbE, 与我们定义的
#[cortex_m_rt::entry]
fn main_fun() -> !
Rust 源码编译后的函数和变量符号变化规律与C++相似,变量在编译后的名字通常按照一定规律进行 manging(名字改编),确保在链接阶段能够正确识别和处理符号,因此模板变量、不同作用域的变量可以允许相同名字。
如果在编写代码时为避免函数名被重命名,可以使用属性#[no_mangle]标记避免重命名。通常在以下场景被使用:
- 其他语言绑定,如调用C的函数或变量, 确保接口兼容
- 提供接口给其他语言,如汇编等
- 动态库开发
查看符号信息
通常使用 arm-none-eabi-readelf 命令查看编译后的固件的指令格式,大小端,CPU架构,段信息,如中断向量表的偏移、各信息段的大小,方便了解固件各段的具体大小,为优化固件大小提供重要信息。
➜  py32f030-hal git:(main) ✗ arm-none-eabi-readelf target/thumbv6m-none-eabi/debug/examples/hello_world -A
Attribute Section: aeabi
File Attributes
  Tag_conformance: "2.09"
  Tag_CPU_arch: v6S-M
  Tag_CPU_arch_profile: Microcontroller
  Tag_ARM_ISA_use: No
  Tag_THUMB_ISA_use: Thumb-1
  Tag_ABI_PCS_R9_use: V6
  Tag_ABI_PCS_GOT_use: direct
  Tag_ABI_FP_denormal: Needed
  Tag_ABI_FP_exceptions: Needed
  Tag_ABI_FP_number_model: IEEE 754
  Tag_ABI_align_needed: 8-byte
  Tag_ABI_align_preserved: 8-byte, except leaf SP
  Tag_CPU_unaligned_access: None
  Tag_ABI_FP_16bit_format: IEEE 754
➜  py32f030-hal git:(main) ✗ arm-none-eabi-readelf target/thumbv6m-none-eabi/debug/examples/hello_world -S
There are 22 section headers, starting at offset 0x5ef20:

Section Headers:
  [Nr] Name              Type            Addr     Off    Size   ES Flg Lk Inf Al
  [ 0]                   NULL            00000000 000000 000000 00      0   0  0
  [ 1] .vector_table     PROGBITS        08000000 010000 0000bc 00   A  0   0  4
  [ 2] .text             PROGBITS        080000bc 0100bc 001d98 00  AX  0   0  4
  [ 3] .rodata           PROGBITS        08001e54 011e54 000738 00  AM  0   0  4
  [ 4] .data             PROGBITS        20000000 020000 000040 00  WA  0   0  8
  [ 5] .gnu.sgstubs      PROGBITS        080025e0 020040 000000 08   A  0   0 32
  [ 6] .bss              NOBITS          20000040 020040 000140 00  WA  0   0  8
  [ 7] .uninit           NOBITS          20000180 020040 000400 00  WA  0   0  4
  [ 8] .defmt            PROGBITS        00000000 020040 000006 00      0   0  1
  [ 9] .debug_loc        PROGBITS        00000000 020046 0036a7 00      0   0  1
  [10] .debug_abbrev     PROGBITS        00000000 0236ed 000f37 00      0   0  1
  [11] .debug_info       PROGBITS        00000000 024624 0121c5 00      0   0  1
  [12] .debug_aranges    PROGBITS        00000000 0367e9 000bd0 00      0   0  1
  [13] .debug_ranges     PROGBITS        00000000 0373b9 002018 00      0   0  1
  [14] .debug_str        PROGBITS        00000000 0393d1 01bd34 01  MS  0   0  1
  [15] .comment          PROGBITS        00000000 055105 000048 01  MS  0   0  1
  [16] .ARM.attributes   ARM_ATTRIBUTES  00000000 05514d 000030 00      0   0  1
  [17] .debug_frame      PROGBITS        00000000 055180 000d1c 00      0   0  4
  [18] .debug_line       PROGBITS        00000000 055e9c 00632f 00      0   0  1
  [19] .symtab           SYMTAB          00000000 05c1cc 001200 10     21 218  4
  [20] .shstrtab         STRTAB          00000000 05d3cc 0000dd 00      0   0  1
  [21] .strtab           STRTAB          00000000 05d4a9 001a76 00      0   0  1
Key to Flags:
  W (write), A (alloc), X (execute), M (merge), S (strings), I (info),
  L (link order), O (extra OS processing required), G (group), T (TLS),
  C (compressed), x (unknown), o (OS specific), E (exclude),
  y (purecode), p (processor specific)
如上所示,可以看到中断向量表 vector_table 的地址为 0x08000000 , data 段的起始地址为 0x20000000 , 与 memory.x 定义的一致。
深入理解 hello world 例程——基于 cortex-m-quickstart
在本篇中,将带你手把手新建一个基于常用的单片机主板的 hello world 工程。
工具链准备
如果您还没有安装 Rust 的基本开发环境,您可参考 快速搭建环境。
首先,你需要了解你手上的单片机的处理器内核,如 STM32F103 为 Arm® Cortex®-M3 CPU,NRF52840 为 Arm® Cortex®-M4F CPU,CH32V307 为 RISC-V4F 内核。因此你需要根据你芯片内核的来安装相应的交叉编译链。 常见的嵌入式交叉编译工具如下。
➜  rust-embedded-start git:(main) ✗ rustup target list | grep none
aarch64-unknown-none
aarch64-unknown-none-softfloat
armebv7r-none-eabi
armebv7r-none-eabihf
armv7a-none-eabi
armv7r-none-eabi
armv7r-none-eabihf
loongarch64-unknown-none
loongarch64-unknown-none-softfloat
riscv32i-unknown-none-elf
riscv32im-unknown-none-elf
riscv32imac-unknown-none-elf
riscv32imafc-unknown-none-elf
riscv32imc-unknown-none-elf
riscv64gc-unknown-none-elf
riscv64imac-unknown-none-elf
thumbv6m-none-eabi (installed)
thumbv7em-none-eabi
thumbv7em-none-eabihf
thumbv7m-none-eabi (installed)
thumbv8m.base-none-eabi
thumbv8m.main-none-eabi
thumbv8m.main-none-eabihf
x86_64-unknown-none
Rust 交叉工具链的目标是由三元组组成,也叫目标三元组。
它通常采用 <arch>-<vendor>-<sys>-<abi> 的形式来描述目标平台的架构、供应商、操作系统和应用程序二进制接口(ABI)。
- 架构(arch)
- 例如,
thumbv7m - none - eabi中的thumbv7m表示 ARM 架构下的 Thumb - 2 指令集的 v7m 版本。这告诉编译器生成的代码要符合这种特定的 ARM 架构指令集要求,不同的 ARM 指令集(如 ARMv8、Thumb - 2 等)有不同的性能和功能特点,编译器需要根据这个信息生成合适的机器码。 - 对于
powerpc - unknown - linux - gnu中的powerpc,它代表 PowerPC 架构,这是一种与 ARM 不同的处理器架构,具有自己的指令集和硬件特性,编译器要按照 PowerPC 的规则来生成代码。
- 例如,
- 供应商(vendor)
- 在目标三元组中,供应商部分可以提供关于硬件制造商的信息。不过在很多情况下,
none这样的标识被使用,表示这不是特定某个供应商的硬件定义,或者是通用的定义。例如,在thumbv7m - none - eabi中,none表示这个定义不是针对某一个特定的 ARM 芯片供应商(如三星、恩智浦等),而是一种通用的 ARM Thumb - 2 v7m 指令集的定义。
- 在目标三元组中,供应商部分可以提供关于硬件制造商的信息。不过在很多情况下,
- 操作系统(sys)
- 操作系统部分明确了目标代码运行的操作系统环境。例如,
linux表示目标代码是运行在 Linux 操作系统之上。这会影响编译器如何处理系统调用、库链接等操作。对于嵌入式系统,可能会看到none(表示没有操作系统,如裸机环境),像thumbv7m - none - eabi中的none就表明这个代码可能是用于没有操作系统的 ARM 嵌入式设备,编译器就不会生成与复杂操作系统交互的代码部分。 - 而
powerpc - unknown - linux - gnu中的linux说明代码是为运行在 PowerPC 架构的 Linux 系统准备的,编译器需要确保生成的代码能够与 Linux 的系统调用接口、文件系统等兼容。
- 操作系统部分明确了目标代码运行的操作系统环境。例如,
- 应用程序二进制接口(ABI)
- ABI 部分定义了二进制层面上函数调用、数据结构布局等的规则。例如,
eabi(嵌入式应用程序二进制接口)在thumbv7m - none - eabi中是用于嵌入式系统的 ABI 标准。它规定了如何在二进制层面上传递参数、返回值等。不同的 ABI 标准适用于不同的应用场景,gnu(如在powerpc - unknown - linux - gnu中)是一种在 Linux 系统上常用的 ABI,遵循 GNU 的规则来处理函数调用和数据结构布局等。
- ABI 部分定义了二进制层面上函数调用、数据结构布局等的规则。例如,
在清楚对应的交叉编译起三元组名后,你需要使用命令安装它,如对于 Py32f030 芯片来说,内核是 ARM Cortex-M0+ , 无浮点加速,因此需要安装 thumbv6m-none-eabi
rustup target add thumbv6m-none-eabi
其他常见 内核 的单片机与交叉编译器对应如下:
- ARM Cortex-M0:
thumbv6m-none-eabi - ARM Cortex-M3:
thumbv7m-none-eabi - ARM Cortex-M4:
thumbv7em-none-eabi - ARM Cortex-M7:
thumbv7em-none-eabi - ARM Cortex-M33:
thumbv8m.main-none-eabi - ARM Cortex-M4F:
thumbv7em-none-eabihf - ARM Cortex-M7F:
thumbv7em-none-eabihf
如果使用错误的交叉编译器编译 Rust 代码,可能编译失败或生成的固件运行指令会异常。
创建工程
基于模板创建新工程。使用命令:cargo generate --git https://github.com/rust-embedded/cortex-m-quickstart, 然后输入合适的工程名字即可。
➜  tmp cargo generate --git https://github.com/rust-embedded/cortex-m-quickstart --name py32f030_hello_world_start
🔧   Destination: /Users/hunter/Desktop/tmp/tmp/py32f030_hello_world_start ...
🔧   project-name: py32f030_hello_world_start ...
🔧   Generating template ...
🔧   Moving generated files into: `/Users/hunter/Desktop/tmp/tmp/py32f030_hello_world_start`...
🔧   Initializing a fresh Git repository
✨   Done! New project created /Users/hunter/Desktop/tmp/tmp/py32f030_hello_world_start
修改
创建的 工程可能与你的芯片并不完全匹配,因此你可能需要检查以下几个部分:
- 初步编译,可以正常通过,但此时可能并不能在您的主板上运行正常。
➜  py32f030_hello_world_start git:(master) ✗ cargo b
    Updating crates.io index
     Locking 31 packages to latest compatible versions
      Adding aligned v0.3.5 (latest: v0.4.2)
      Adding as-slice v0.1.5 (latest: v0.2.1)
      Adding bare-metal v0.2.5 (latest: v1.0.0)
      Adding bitfield v0.13.2 (latest: v0.17.0)
      Adding cortex-m v0.6.7 (latest: v0.7.7)
      Adding cortex-m-rt v0.6.15 (latest: v0.7.5)
      Adding cortex-m-rt-macros v0.6.15 (latest: v0.7.5)
      Adding cortex-m-semihosting v0.3.7 (latest: v0.5.0)
      Adding embedded-hal v0.2.7 (latest: v1.0.0)
      Adding generic-array v0.12.4 (latest: v1.1.0)
      Adding generic-array v0.13.3 (latest: v1.1.0)
      Adding generic-array v0.14.7 (latest: v1.1.0)
      Adding nb v0.1.3 (latest: v1.1.0)
      Adding panic-halt v0.2.0 (latest: v1.0.0)
      Adding r0 v0.2.2 (latest: v1.0.0)
      Adding rustc_version v0.2.3 (latest: v0.4.1)
      Adding semver v0.9.0 (latest: v1.0.23)
      Adding semver-parser v0.7.0 (latest: v0.10.2)
      Adding syn v1.0.109 (latest: v2.0.87)
   Compiling semver-parser v0.7.0
   Compiling typenum v1.17.0
   Compiling cortex-m v0.7.7
   Compiling proc-macro2 v1.0.89
   Compiling version_check v0.9.5
   Compiling unicode-ident v1.0.13
   Compiling nb v1.1.0
   Compiling void v1.0.2
   Compiling vcell v0.1.3
   Compiling syn v1.0.109
   Compiling stable_deref_trait v1.2.0
   Compiling cortex-m-rt v0.6.15
   Compiling bitfield v0.13.2
   Compiling cortex-m-semihosting v0.3.7
   Compiling volatile-register v0.2.2
   Compiling cortex-m v0.6.7
   Compiling nb v0.1.3
   Compiling r0 v0.2.2
   Compiling embedded-hal v0.2.7
   Compiling py32f030_hello_world_start v0.1.0 (/Users/hunter/Desktop/tmp/tmp/py32f030_hello_world_start)
   Compiling panic-halt v0.2.0
   Compiling semver v0.9.0
   Compiling rustc_version v0.2.3
   Compiling generic-array v0.14.7
   Compiling bare-metal v0.2.5
   Compiling quote v1.0.37
   Compiling generic-array v0.13.3
   Compiling generic-array v0.12.4
   Compiling as-slice v0.1.5
   Compiling aligned v0.3.5
   Compiling cortex-m-rt-macros v0.6.15
    Finished `dev` profile [unoptimized + debuginfo] target(s) in 8.98s
- 修改
memory.x, 指定 flash 和 ram 信息, 修改如下:
diff --git a/memory.x b/memory.x
index b271f22..0f0d381 100644
--- a/memory.x
+++ b/memory.x
@@ -2,9 +2,9 @@ MEMORY
 {
   /* NOTE 1 K = 1 KiBi = 1024 bytes */
   /* TODO Adjust these memory regions to match your device memory layout */
-  /* These values correspond to the LM3S6965, one of the few devices QEMU can emulate */
-  FLASH : ORIGIN = 0x00000000, LENGTH = 256K
-  RAM : ORIGIN = 0x20000000, LENGTH = 64K
+  /* PY32F030K28T6: */
+  FLASH : ORIGIN = 0x08000000, LENGTH = 64K
+  RAM : ORIGIN = 0x20000000, LENGTH = 8K
 }

 /* This is where the call stack will be allocated. */
- 修改编译目标和运行命令
diff --git a/.cargo/config.toml b/.cargo/config.toml
index 9709a75..cb7fde1 100644
--- a/.cargo/config.toml
+++ b/.cargo/config.toml
@@ -2,6 +2,9 @@
 # uncomment this to make `cargo run` execute programs on QEMU
 # runner = "qemu-system-arm -cpu cortex-m3 -machine lm3s6965evb -nographic -semihosting-config enable=on,target=native -kernel"

+[target.thumbv6m-none-eabi]
+runner = 'probe-rs run --chip PY32F030x8'
+
 [target.'cfg(all(target_arch = "arm", target_os = "none"))']
 # uncomment ONE of these three option to make `cargo run` start a GDB session
 # which option to pick depends on your system
@@ -28,8 +31,8 @@ rustflags = [

 [build]
 # Pick ONE of these default compilation targets
-# target = "thumbv6m-none-eabi"        # Cortex-M0 and Cortex-M0+
-target = "thumbv7m-none-eabi"        # Cortex-M3
+target = "thumbv6m-none-eabi"        # Cortex-M0 and Cortex-M0+
+# target = "thumbv7m-none-eabi"        # Cortex-M3
 # target = "thumbv7em-none-eabi"       # Cortex-M4 and Cortex-M7 (no FPU)
 # target = "thumbv7em-none-eabihf"     # Cortex-M4F and Cortex-M7F (with FPU)
 # target = "thumbv8m.base-none-eabi"   # Cortex-M23
如上修改后,执行 cargo r:
➜  py32f030_hello_world_start git:(main) ✗ cargo r
    Finished `dev` profile [unoptimized + debuginfo] target(s) in 0.01s
     Running `probe-rs run --chip PY32F030x8 target/thumbv6m-none-eabi/debug/py32f030_hello_world_start`
 WARN probe_rs::util::rtt: No RTT header info was present in the ELF file. Does your firmware run RTT?
      Erasing ✔ [00:00:00] [####################################] 4.00 KiB/4.00 KiB @ 53.93 KiB/s (eta 0s )
  Programming ✔ [00:00:00] [#####################################] 2.00 KiB/2.00 KiB @ 3.87 KiB/s (eta 0s )    Finished in 0.63s
cargo 将编译工程,然后执行 runner 配置命令,即使用 probe-rs 命令下载固件到芯片,并执行。可以看到,下载完成成后并没有其他日志打印,因此我们需要继续添加打印日志。
- 添加日志 crate
rtt-target,让日志打印像本地端一样简单。修改如下:
diff --git a/Cargo.toml b/Cargo.toml
index 1d1df47..a2b897d 100644
--- a/Cargo.toml
+++ b/Cargo.toml
@@ -6,11 +6,13 @@ name = "py32f030_hello_world_start"
 version = "0.1.0"

 [dependencies]
-cortex-m = "0.6.0"
+cortex-m = { version = "0.7.6", features = ["critical-section-single-core"]}
 cortex-m-rt = "0.6.10"
 cortex-m-semihosting = "0.3.3"
 panic-halt = "0.2.0"

+rtt-target = "0.5.0"
+
 # Uncomment for the panic example.
 # panic-itm = "0.4.1"
添加 crate 后,在 main.rs 需要添加以下代码:
diff --git a/src/main.rs b/src/main.rs
index 7922596..dbeaf9c 100644
--- a/src/main.rs
+++ b/src/main.rs
@@ -3,18 +3,26 @@

 // pick a panicking behavior
 use panic_halt as _; // you can put a breakpoint on `rust_begin_unwind` to catch panics
-// use panic_abort as _; // requires nightly
-// use panic_itm as _; // logs messages over ITM; requires ITM support
-// use panic_semihosting as _; // logs messages to the host stderr; requires a debugger
+                     // use panic_abort as _; // requires nightly
+                     // use panic_itm as _; // logs messages over ITM; requires ITM support
+                     // use panic_semihosting as _; // logs messages to the host stderr; requires a debugger

 use cortex_m::asm;
 use cortex_m_rt::entry;

+use rtt_target::{rprintln, rtt_init_print};
+
 #[entry]
 fn main() -> ! {
-    asm::nop(); // To not have main optimize to abort in release mode, remove when you add code
+    // init rtt
+    rtt_init_print!();
+
+    asm::nop();
+
+    rprintln!("Hello, world!");

     loop {
-        // your code goes here
+        // Wait For Interrupt
+        cortex_m::asm::wfi();
     }
 }
- 最后运行,下载完成后马上打印
hello, world。在此,你已经成功踏入了嵌入式 Rust 的小门。
➜  py32f030_hello_world_start git:(main) ✗ cargo r
   Compiling py32f030_hello_world_start v0.1.0 (/Users/hunter/Desktop/tmp/tttttt/py32f030_hello_world_start)
    Finished `dev` profile [unoptimized + debuginfo] target(s) in 0.10s
     Running `probe-rs run --chip PY32F030x8 target/thumbv6m-none-eabi/debug/py32f030_hello_world_start`
      Erasing ✔ [00:00:00] [##################################] 16.00 KiB/16.00 KiB @ 98.89 KiB/s (eta 0s )
  Programming ✔ [00:00:02] [###################################] 12.25 KiB/12.25 KiB @ 4.21 KiB/s (eta 0s )    Finished in 3.112s
Hello, world!
查看编译信息
固件信息
- Debug 模式
➜  py32f030_hello_world_start git:(main) ✗ cargo size
    Finished `dev` profile [unoptimized + debuginfo] target(s) in 0.01s
   text	   data	    bss	    dec	    hex	filename
  12464	      0	   1088	  13552	   34f0	py32f030_hello_world_start

➜  py32f030_hello_world_start git:(main) ✗ arm-none-eabi-readelf target/thumbv6m-none-eabi/debug/py32f030_hello_world_start -S
There are 22 section headers, starting at offset 0xbf9e4:

Section Headers:
  [Nr] Name              Type            Addr     Off    Size   ES Flg Lk Inf Al
  [ 0]                   NULL            00000000 000000 000000 00      0   0  0
  [ 1] .vector_table     PROGBITS        08000000 0000f4 0000c0 00   A  0   0  4
  [ 2] .text             PROGBITS        080000c0 0001b4 002404 00  AX  0   0  4
  [ 3] .rodata           PROGBITS        080024c4 0025b8 000bec 00  AM  0   0  4
  [ 4] .data             PROGBITS        20000000 0031a4 000000 00   A  0   0  4
  [ 5] .bss              NOBITS          20000000 0031a4 000440 00  WA  0   0  4
  [ 6] .uninit           NOBITS          20000440 0031a4 000000 00  WA  0   0  4
  [ 7] .debug_abbrev     PROGBITS        00000000 0031a4 0024cf 00      0   0  1
  [ 8] .debug_info       PROGBITS        00000000 005673 02d143 00      0   0  1
  [ 9] .debug_aranges    PROGBITS        00000000 0327b6 001ab0 00      0   0  1
  [10] .debug_ranges     PROGBITS        00000000 034266 017248 00      0   0  1
  [11] .debug_str        PROGBITS        00000000 04b4ae 0443c6 01  MS  0   0  1
  [12] .comment          PROGBITS        00000000 08f874 00007b 01  MS  0   0  1
  [13] .ARM.attributes   ARM_ATTRIBUTES  00000000 08f8ef 000032 00      0   0  1
  [14] .debug_frame      PROGBITS        00000000 08f924 0057a8 00      0   0  4
  [15] .debug_line       PROGBITS        00000000 0950cc 0262da 00      0   0  1
  [16] .debug_loc        PROGBITS        00000000 0bb3a6 00027b 00      0   0  1
  [17] .debug_pubnames   PROGBITS        00000000 0bb621 0001e9 00      0   0  1
  [18] .debug_pubtypes   PROGBITS        00000000 0bb80a 000047 00      0   0  1
  [19] .symtab           SYMTAB          00000000 0bb854 0016b0 10     21 271  4
  [20] .shstrtab         STRTAB          00000000 0bcf04 0000e9 00      0   0  1
  [21] .strtab           STRTAB          00000000 0bcfed 0029f4 00      0   0  1
Key to Flags:
  W (write), A (alloc), X (execute), M (merge), S (strings), I (info),
  L (link order), O (extra OS processing required), G (group), T (TLS),
  C (compressed), x (unknown), o (OS specific), E (exclude),
  y (purecode), p (processor specific)
- Release 模式
➜  py32f030_hello_world_start git:(main) ✗ cargo size --release
    Finished `release` profile [optimized + debuginfo] target(s) in 0.01s
   text	   data	    bss	    dec	    hex	filename
   1992	      0	   1088	   3080	    c08	py32f030_hello_world_start

➜  py32f030_hello_world_start git:(main) ✗ arm-none-eabi-readelf target/thumbv6m-none-eabi/release/py32f030_hello_world_start -S
There are 22 section headers, starting at offset 0x1184c:

Section Headers:
  [Nr] Name              Type            Addr     Off    Size   ES Flg Lk Inf Al
  [ 0]                   NULL            00000000 000000 000000 00      0   0  0
  [ 1] .vector_table     PROGBITS        08000000 0000f4 0000c0 00   A  0   0  4
  [ 2] .text             PROGBITS        080000c0 0001b4 0006ec 00  AX  0   0  4
  [ 3] .rodata           PROGBITS        080007ac 0008a0 00001c 00   A  0   0  4
  [ 4] .data             PROGBITS        20000000 0008bc 000000 00   A  0   0  4
  [ 5] .bss              NOBITS          20000000 0008bc 000440 00  WA  0   0  4
  [ 6] .uninit           NOBITS          20000440 0008bc 000000 00  WA  0   0  4
  [ 7] .debug_loc        PROGBITS        00000000 0008bc 0013d4 00      0   0  1
  [ 8] .debug_abbrev     PROGBITS        00000000 001c90 0009bc 00      0   0  1
  [ 9] .debug_info       PROGBITS        00000000 00264c 005097 00      0   0  1
  [10] .debug_aranges    PROGBITS        00000000 0076e3 000340 00      0   0  1
  [11] .debug_ranges     PROGBITS        00000000 007a23 000dc0 00      0   0  1
  [12] .debug_str        PROGBITS        00000000 0087e3 005524 01  MS  0   0  1
  [13] .comment          PROGBITS        00000000 00dd07 000048 01  MS  0   0  1
  [14] .ARM.attributes   ARM_ATTRIBUTES  00000000 00dd4f 000032 00      0   0  1
  [15] .debug_frame      PROGBITS        00000000 00dd84 000680 00      0   0  4
  [16] .debug_line       PROGBITS        00000000 00e404 0024c5 00      0   0  1
  [17] .debug_pubnames   PROGBITS        00000000 0108c9 0001e9 00      0   0  1
  [18] .debug_pubtypes   PROGBITS        00000000 010ab2 000047 00      0   0  1
  [19] .symtab           SYMTAB          00000000 010afc 0005c0 10     21  57  4
  [20] .shstrtab         STRTAB          00000000 0110bc 0000e9 00      0   0  1
  [21] .strtab           STRTAB          00000000 0111a5 0006a5 00      0   0  1
Key to Flags:
  W (write), A (alloc), X (execute), M (merge), S (strings), I (info),
  L (link order), O (extra OS processing required), G (group), T (TLS),
  C (compressed), x (unknown), o (OS specific), E (exclude),
  y (purecode), p (processor specific)
参考
hysonglet/py32f030_hello_world_start
cortex_m_quickstart - Rust (rust-embedded.org)
GPIO
GPIO(General Purpose Input/Output), 代表通用输入/输出引脚,在微控制器的大部分引脚都可用于GPIO用途。
GPIO 引脚可配置为输入或输出功能,也可复用为其他外设的功能引脚。作为输入引脚时,单片机内部可读取引脚的外部电平,当作为输出引脚时,单片机可以配置寄存器来输出高/低电平。
如何控制寄存器
通过配置 GPIO 外设寄存器,将GPIO引脚配置成相应的功能。对于普通输入或输出引脚的来说,通常需要关注以下配置:
- 上拉/下拉
- 开漏/浮空模式
- 速度
- IO模式
当前外设支持库的 GPIO mod 提供了基本的API供使用:
#![allow(unused)]
fn main() {
//! General purpose input/output (GPIO) driver.
//!
//! Output
//!
//! ```rust, ignore
//! let p = hal::init(Default::default());
//! let gpioa = p.GPIOA.split();
//! let mut led = Output::new(gpioa.PA10, PinIoType::PullDown, PinSpeed::Low);
//! ```
//!
//! Input
//! ```rust, ignore
//! let p = hal::init(Default::default());
//! let gpioa = p.GPIOA.split();
//! let key = Input::new(gpioa.PA12, PinPullUpDown::PullUp, PinSpeed::Low);
//! ```
//!
//! AF
//! ```rust, ignore
//! let gpioa = p.GPIOA.split();
//! let _mco_pin = Af::new(
//!    gpioa.PA1,
//!    PinAF::AF15,
//!    PinSpeed::VeryHigh,
//!    PinIoType::PullUp,
//! );
//! Mco::select(clock::McoSelect::SysClk, clock::McoDIV::DIV1);
//! ```
}
本篇将介绍如何基于 Rust 的 hal 库快速点亮 dev 主板的 led 灯。
在单片机的学习中,点灯是开发者的一个入门仪式,点亮一个 led 灯,将会带你进入新世界的大门,让你感受软件如何控制硬件。
硬件
在 Py32_Rust_dev_V1.1 开发版中,LED 的相关原理图如下:
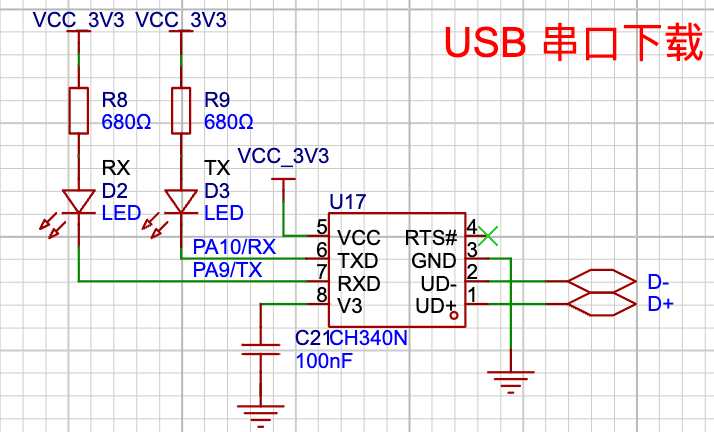
从图中可以看出,开发版有 2 个可以通过 GPIO 引脚控制的 LED,且这两个引脚与串口下载的电路复用。因此在点灯的同时可能会影响串口的正常工作,理论上是不能同时使用。
Rust 的库接口已经保证 PA10 和 PA11 引脚只能在一种场合安全被使用,因此在本篇使用 LED GPOIO 控制亮灭的实验中,请不要去使用其他非常手段来做串口的引脚,当然鼓励去尝试一起使用, 甚至尝试修改代码把同一引脚创建多个 Output 对象,去感受 Rust 的安全特性。本篇仅分享如何使用 GPIO 控制 LED 闪烁。
在原理图图中有以下信息在编程中会用到:
- RX LED:PA9
- TX LED:PA10
- 当引脚为 低电平时,LED 亮,反之则灭
测试代码:examples/blinky.rs
#![no_std]
#![no_main]

use embedded_hal::digital::v2::ToggleableOutputPin;
use hal::gpio::{Output, PinIoType, PinSpeed};
use py32f030_hal as hal;

use {defmt_rtt as _, panic_probe as _};

#[cortex_m_rt::entry]
fn main() -> ! {
    let p = hal::init(Default::default());

    defmt::info!("Led blinky testing...");

    let gpioa = p.GPIOA.split();
    let mut led = Output::new(gpioa.PA10, PinIoType::PullDown, PinSpeed::Low);

    loop {
        // 翻转led
        let _ = led.toggle();
        cortex_m::asm::delay(10_000_000);
    }
}
编译&运行
cargo r --example blinky
效果
➜  py32f030-hal git:(main) ✗ cargo r --example blinky
warning: unused manifest key: dependencies.embedded-io-async.option
   Compiling py32f030_hal v0.1.0 (/Users/hunter/mywork/py32/py32f030-hal)
    Finished `dev` profile [optimized + debuginfo] target(s) in 0.48s
     Running `probe-rs run --chip PY32F030x8 target/thumbv6m-none-eabi/debug/examples/blinky`
      Erasing ✔ [00:00:00] [######################################################################################################################] 12.00 KiB/12.00 KiB @ 57.31 KiB/s (eta 0s )
  Programming ✔ [00:00:04] [#######################################################################################################################] 10.62 KiB/10.62 KiB @ 2.53 KiB/s (eta 0s )    Finished in 4.483s
INFO  Led blinky testing...
└─ blinky::__cortex_m_rt_main @ examples/blinky.rs:14
图片:TODO
你可能好奇的地方
- 为什么添加
use embedded_hal::digital::v2::ToggleableOutputPin;? 引用这个 trait后,Output实例将能在该代码范围使用ToggleableOutputPin的函数,当然Output已经在文件src/gpio/mod.rs中实现了ToggleableOutputPin, 因此 Output 具备了ToggleableOutputPintrait 的能力, 如果不引用ToggleableOutputPin, 则Outout的toggle接口将被隐藏不能使用。 - 为什么没有开启 GPIOA 外设的时钟地方?因为在
p.GPIOA.split();中,驱动帮我们偷偷开启了外设时钟,因此上层应用开发者可以无感使用。 cortex_m::asm::delay(10_000_000);定时准吗?通常与cpu 的频率有关,参数为 tick 数。- use 的调用顺序有关系吗?没关系,只要调用了,编译会自动识别的。
Rust 多任务操作系统
在前面几篇文章中,我们已经知道如何点亮一个 LED 灯,那么在这一篇,我们即将提升难度,在不同的任务中点灯,感受并行编程的快乐。
请在你感到好奇或疑惑的地方修改代码!
代码: examples/embassy_blinky.rs
//! 在不同的任务中闪烁不同的 LED, 学习多任务操作
//!

#![no_std]
#![no_main]

use embassy_executor::Spawner;
use embassy_time::Timer;
use embedded_hal::digital::v2::ToggleableOutputPin;
use hal::gpio::{Output, PinIoType, PinSpeed};
use py32f030_hal::{
    self as hal,
    gpio::{AnyPin, Pin},
};

use {defmt_rtt as _, panic_probe as _};

#[embassy_executor::task(pool_size = 2)]
async fn run_led(led: AnyPin, delay_ms: u64) {
    let mut led = Output::new(led, PinIoType::PullDown, PinSpeed::Low);
    loop {
        let _ = led.toggle();
        Timer::after_millis(delay_ms).await;
    }
}

#[embassy_executor::main]
async fn main(spawner: Spawner) {
    let p = hal::init(Default::default());

    defmt::info!("Testing the flashing of different LEDs in multi-tasking.");

    let gpioa = p.GPIOA.split();

    // spawner.must_spawn(run_led(gpioa.PA9.degrade(), 1000));
    // spawner.must_spawn(run_led(gpioa.PA10.degrade(), 2000));

    spawner.spawn(run_led_1(gpioa.PA9.degrade(), 1000)).unwrap();
    spawner.spawn(run_led_1(gpioa.PA10.degrade(), 500)).unwrap();

    loop {
        Timer::after_secs(2).await;
    }
}
图片:TODO
也许你有疑惑的地方
pool_size = 2表示异步任务async fn run_led(led: AnyPin, delay_ms: u64)最多能被 2 个任务使用async表示函数为异步函数embassy_executor::task表示将定义一个异步任务Spawner是异步执行器框架提供的一个类型,它的主要职责是在执行器的任务调度环境中创建新的异步任务。它封装了任务创建的具体细节和逻辑,例如确定任务应该在哪个任务池中运行、分配任务所需的资源(如栈空间等)以及将任务注册到执行器的任务队列中以便后续调度执行。- embassy 的 异步入口函数定义为:
#[embassy_executor::main]
async fn main(spawner: Spawner) {

}
spawner.spawn():spawn方法是将一个异步函数(或异步闭包)包装成一个任务,并将其放入异步执行器的任务调度队列中,以便在合适的时候执行。这个方法是异步执行器框架提供的关键接口,用于启动新的异步任务并将其纳入任务管理体系。let _ = led.toggle();用于避免编译器报警,忽视led.toggle()的返回结果- 在例程中实际会有 3 个任务运行
按键的检测
在本节中将介绍如何使用普通的 GPIO 按键,检测引脚的电平。
原理图
由原理图可知:我们的评估版只有两个按键,其中 RST 按键为系统复位按键,BOOT 按键有两个功能,在复位时候按下 BOOT 按键时,单片机将进入串口下载程序模式。当复位时候 BOOT 未按下,则单片机进入用户程序运行的模式,程序运行时,BOOT 按键可作为普通输入检测。
- BOOT 按键的引脚为 PF4
- BOOT 按键释放时候,电平为低电平,按下后电平为高电平
- 建议使用时 PF4 关闭上下拉即可
测试代码:examples/key.rs
#![no_std]
#![no_main]

use {defmt_rtt as _, panic_probe as _};

use embedded_hal::digital::v2::InputPin;
use hal::delay;
use hal::gpio::{Input, PinPullUpDown, PinSpeed};
use py32f030_hal as hal;

#[cortex_m_rt::entry]
fn main() -> ! {
    defmt::println!("examples: key");

    let p = hal::init(Default::default());

    let gpioa = p.GPIOF.split();

    let key = Input::new(gpioa.PF4_BOOT0, PinPullUpDown::No, PinSpeed::Low);

    loop {
        defmt::info!("key: {}", key.is_low());
        delay::delay_ms(1000);
    }
}
例程代码非常简单,在循环中每隔 100 毫秒读取一次 引脚电平并打印到终端。
编译并烧录
cargo r --example key
测试
➜  py32f030-hal git:(main) ✗ cargo r --example key
warning: unused manifest key: dependencies.embedded-io-async.option
   Compiling py32f030_hal v0.1.0 (/Users/hunter/mywork/py32/py32f030-hal)
    Finished `dev` profile [optimized + debuginfo] target(s) in 6.42s
     Running `probe-rs run --chip PY32F030x8 target/thumbv6m-none-eabi/debug/examples/key`
      Erasing ✔ [00:00:00] [#################################################] 8.00 KiB/8.00 KiB @ 64.50 KiB/s (eta 0s )
  Programming ✔ [00:00:02] [##################################################] 7.50 KiB/7.50 KiB @ 3.44 KiB/s (eta 0s )    Finished in 2.349s
<lvl> examples: key
└─ key::__cortex_m_rt_main @ examples/key.rs:22
INFO  key: Ok(true)
└─ key::__cortex_m_rt_main @ examples/key.rs:22
INFO  key: Ok(true)
└─ key::__cortex_m_rt_main @ examples/key.rs:22
INFO  key: Ok(true)
└─ key::__cortex_m_rt_main @ examples/key.rs:22
INFO  key: Ok(false)
└─ key::__cortex_m_rt_main @ examples/key.rs:22
INFO  key: Ok(false)
└─ key::__cortex_m_rt_main @ examples/key.rs:22
INFO  key: Ok(false)
└─ key::__cortex_m_rt_main @ examples/key.rs:22
INFO  key: Ok(true)
└─ key::__cortex_m_rt_main @ examples/key.rs:22
你可能好奇的地方
- 为什么设置上拉为:
PinPullUpDown::No? 因为 PF4 引脚内部默认为下拉,确保正常情况单片机能运行主flash程序,如果设置为上拉,可能导致捕获的电平不能识别。取决于开发版的下拉电阻大小。去勇敢尝试PullUp/PullDown测试一下吧 - 如果提高检测效率?去开一个 embassy 任务吧,把检测放在单独的任务中,或者使用异步检测方式。
panic
附录
外部中断
在上节中, 我们在按键状态的示例中,在循环中定时读取引脚状态,为了尽可能及时读取引脚的状态,需要不断去查询,因此需要占用大量的 CPU 时间。那么如何提高效率呢?
举个例子,你在家里需要一直去通过猫眼检查是否有人在你家门口,一旦有客人来了,你能快速快门接客,但是大部分时间你去查看猫眼时候并没人,因此就会耽误你做其他事情。 那么,如果你在门上安装一个门铃,当客人来了后按下门铃,你再去看门,这样就无需反复去看猫眼,你就能从查询的任务中解放出来,去做其他重要的事,更重要的是,其他的事也不会阻碍你去响应门铃的行为,也就是说,实时性也变高了。
外部中断就是一个这样的逻辑,当引脚的电平变化或电平边沿动作时,CPU 将会收到外部中断,然后进入到中断服务函数。
这一过程与 C 嵌入式的流程完全一致!一旦开启中断使能,只要相应的通道中断没有屏蔽,在匹配到变化的信号后,CPU 自动跳转到 Rust 的中断服务函数。
示例
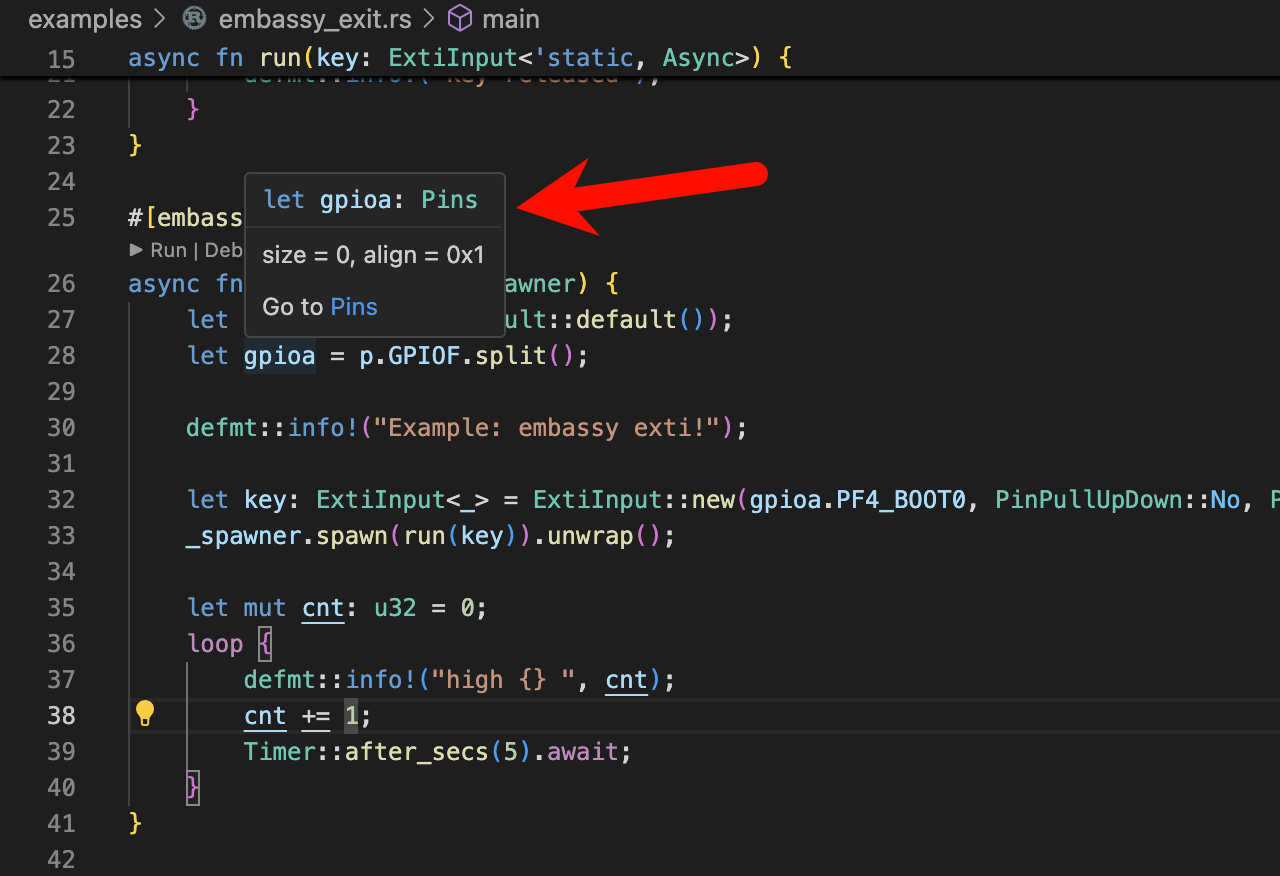
#![no_std]
#![no_main]

use embedded_hal::digital::v2::InputPin;
use hal::exti::ExtiInput;
use hal::gpio::{PinPullUpDown, PinSpeed};
use hal::mode::Async;
use py32f030_hal as hal;
use {defmt_rtt as _, panic_probe as _};

use embassy_executor::Spawner;
use embassy_time::Timer;

#[embassy_executor::task]
async fn run(key: ExtiInput<'static, Async>) {
    loop {
        defmt::info!("wating for key push...");
        key.wait_for_low().await;
        defmt::info!("key pushed {}, and wating for key release", key.is_high());
        key.wait_for_high().await;
        defmt::info!("key released");
    }
}

#[embassy_executor::main]
async fn main(_spawner: Spawner) {
    let p = hal::init(Default::default());
    let gpioa = p.GPIOF.split();

    defmt::info!("Example: embassy exti!");

    let key: ExtiInput<_> = ExtiInput::new(gpioa.PF4_BOOT0, PinPullUpDown::No, PinSpeed::Low);
    _spawner.spawn(run(key)).unwrap();

    let mut cnt: u32 = 0;
    loop {
        defmt::info!("high {} ", cnt);
        cnt += 1;
        Timer::after_secs(5).await;
    }
}
在以上代码中,使用的是异步的方式查询引脚状态,写法与传统的阻塞式编程方式一样,但实际内部则根据中断来唤醒接口。底层驱动如下:
#![allow(unused)]
fn main() {
use super::types::*;
use crate::clock::peripheral::PeripheralInterrupt;
use crate::exti::hal::sealed::Instance;
use crate::gpio::{AnyPin, GpioPort};
use crate::pac::interrupt;

use embassy_sync::waitqueue::AtomicWaker;

use core::{future::Future, marker::PhantomData, task::Poll};

const EXIT_GPIO_COUNT: usize = 17;
#[allow(clippy::declare_interior_mutable_const)]
const ATOMIC_WAKE_CONST: AtomicWaker = AtomicWaker::new();
static EXIT_GPIO_WAKERS: [AtomicWaker; EXIT_GPIO_COUNT] = [ATOMIC_WAKE_CONST; EXIT_GPIO_COUNT];

impl Instance for Exti {}

pub(crate) struct Exti;

pub struct ExtiInputFuture<'a> {
    line: Line,
    edge: Edge,
    life: PhantomData<&'a mut AnyPin>,
}

impl<'a> ExtiInputFuture<'a> {
    pub fn new(port: GpioPort, pin: usize, edge: Edge) -> Self {
        let line: Line = pin.into();
        // line 选择
        Exti::exit_channle_select(line, port.into());

        critical_section::with(|_| {
            // 设置上升沿触发条件
            Exti::line_ring_edge(line, edge.is_rising());
            // 设置下降沿的触发条件
            Exti::line_falling_edge(line, edge.is_falling());

            // clear pending bit
            Exti::clear_pending(line);
            Exti::line_pend_enable(line, true);
        });

        Self {
            line,
            edge,
            life: PhantomData,
        }
    }
}

impl<'d> Future for ExtiInputFuture<'d> {
    type Output = ();
    fn poll(
        self: core::pin::Pin<&mut Self>,
        cx: &mut core::task::Context<'_>,
    ) -> core::task::Poll<Self::Output> {
        if !Exti::is_line_pend_enable(self.line) {
            Poll::Ready(())
        } else {
            EXIT_GPIO_WAKERS[self.line as usize].register(cx.waker());
            self.line.enable_interrupt();
            Poll::Pending
        }
    }
}

impl<'d> Drop for ExtiInputFuture<'d> {
    fn drop(&mut self) {
        critical_section::with(|_| {
            if self.edge.is_rising() {
                Exti::line_ring_edge(self.line, false);
            } else if self.edge.is_falling() {
                Exti::line_falling_edge(self.line, false);
            }
            // Exit::line_falling_edge(self.line, false);
            // Exit::line_pend_enable(self.line, false);
        })
    }
}

#[interrupt]
fn EXTI0_1() {
    critical_section::with(|_cs| unsafe { on_gpio_line_irq(0x03) })
}

#[interrupt]
fn EXTI2_3() {
    critical_section::with(|_cs| unsafe { on_gpio_line_irq(0xc0) })
}

#[interrupt]
fn EXTI4_15() {
    critical_section::with(|_cs| unsafe { on_gpio_line_irq(0xfff0) })
}

unsafe fn on_gpio_line_irq(mask: u32) {
    let flag = Exti::block().pr.read().bits() & mask;
    for line in BitIter(flag) {
        Exti::line_pend_enable(Line::from(line as usize), false);
        Exti::clear_pending(Line::from(line as usize));
        EXIT_GPIO_WAKERS[line as usize].wake();
    }
}
}
在以上代码中,有分别有3个外部中断的服务函数:EXTI0_1,EXTI2_3,EXTI4_15。
当相应的通道触发中断后,CPU 执行中断服务函数,设置唤醒标志,退出后调度器会自动唤醒上层任务继续执行。
详细驱动代码请查看:src/exti/mod.rs,src/exti/future.rs,src/exti/hal.rs
Rust嵌入式中如何使用中断服务函数
在 CPU 在正常执行指令序列时,当外部源(外设信号或GPIO引脚)或内部(指令异常、总线错误等)触发 CPU 暂停当前工作,跳转到相应的服务函数入口执行紧急任务。
对于每个中断类型都需要指定一个中断处理函数,这些中断处理函数的地址组成中断向量表,当发生中断时,如果中断使能,CPU 会自动跳转的相应的中断处理函数去执行中断处理任务。
Py32f030 中断
主要特性如下:
- 32 个可屏蔽的中断通道(不包括 16 个 CPU 的中断)
- 4 个可编程的优先级(2 位中断优先级)
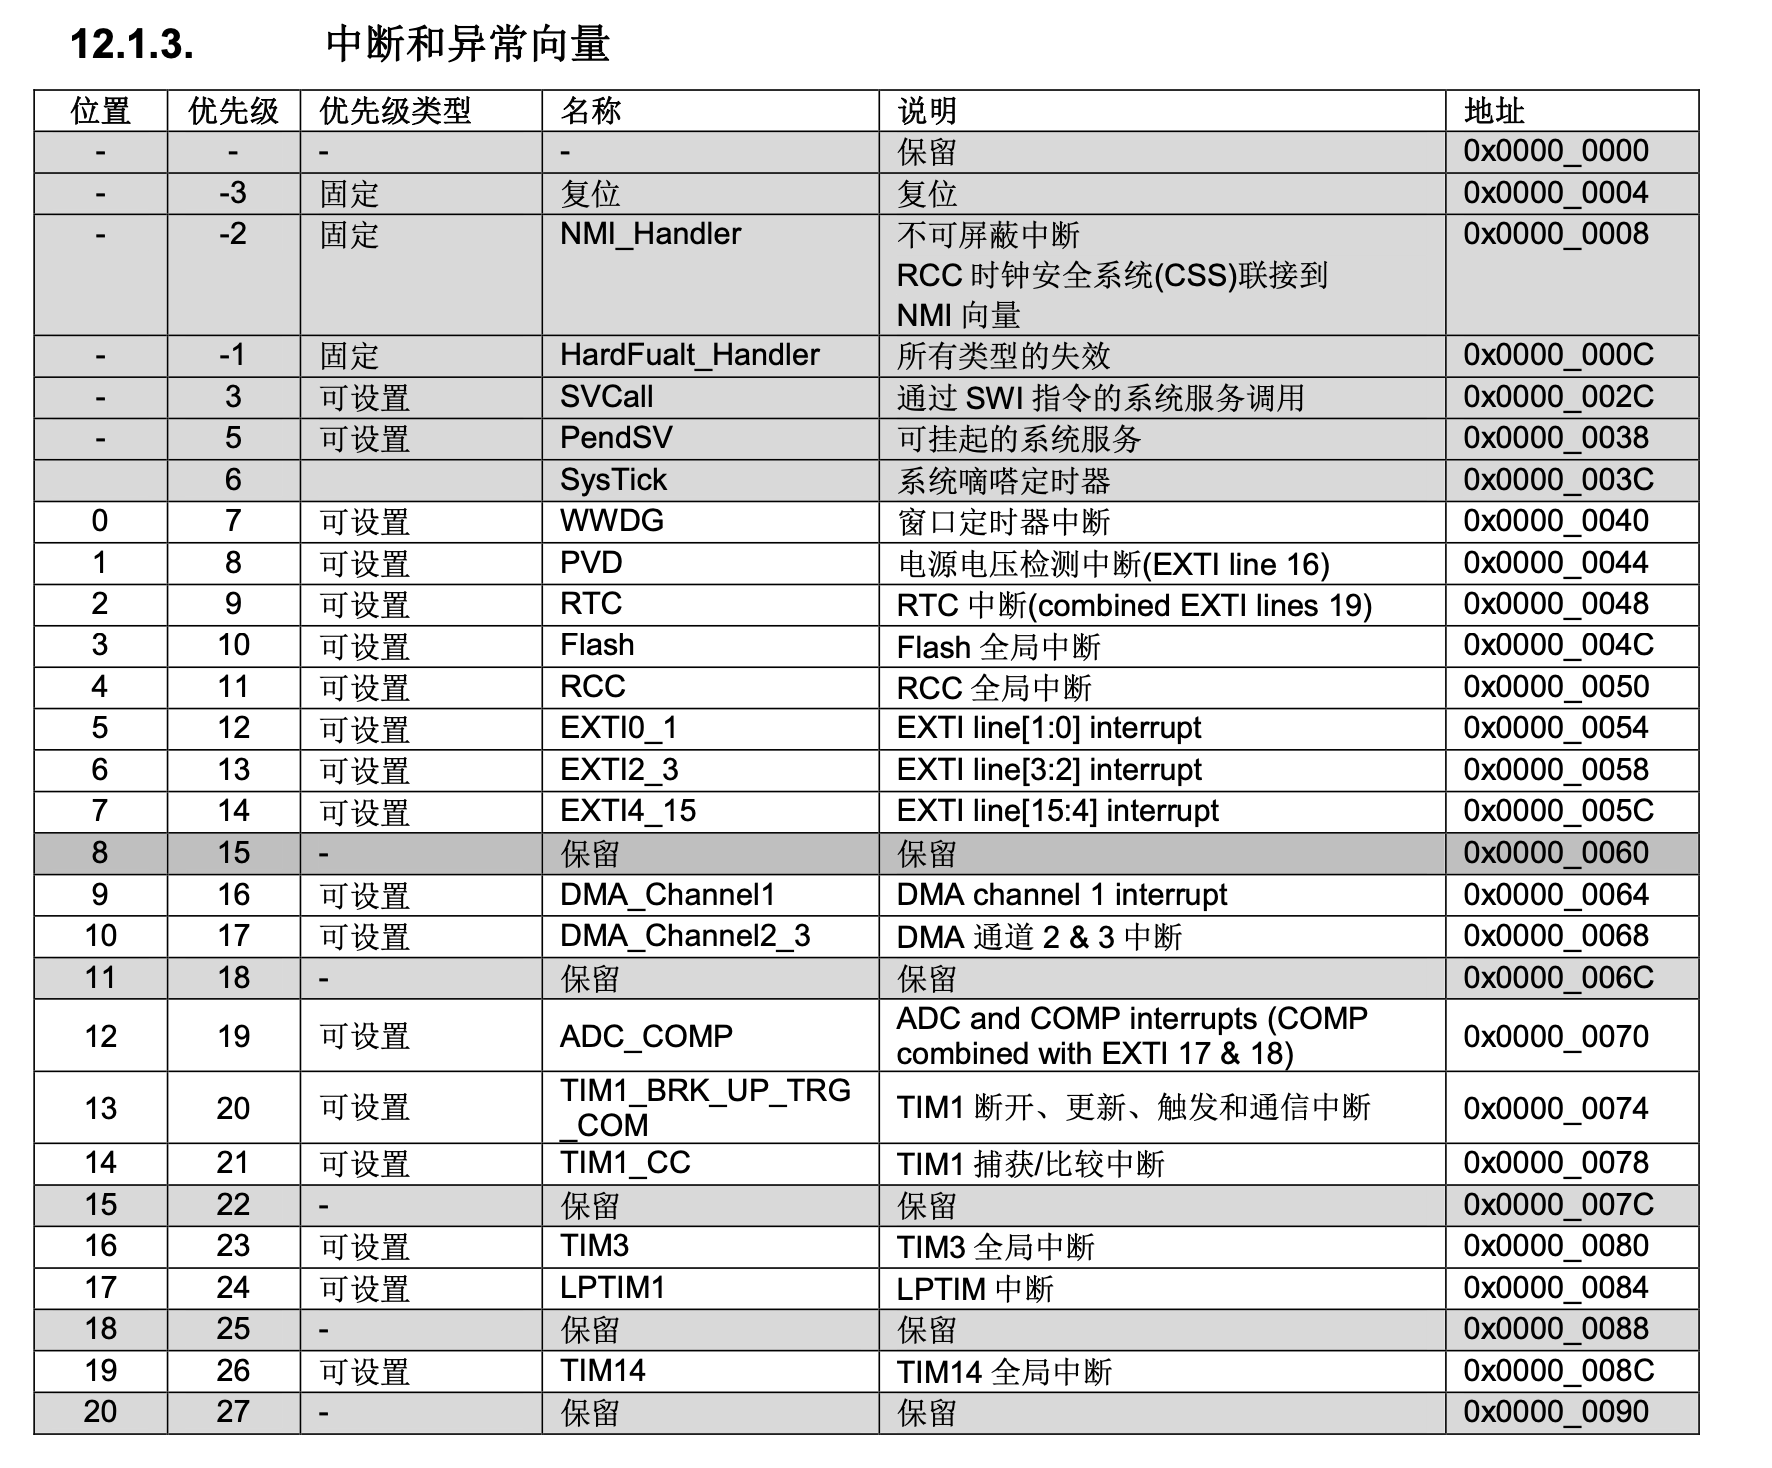
代码实现
Py32f030 的内核为 Cortex-M0+ 内核,内核的标准中断抽象在 cortex-m-rt,这部分的中断抽象实现在文件:src/lib.rs
#![allow(unused)]
fn main() {
/* Exceptions */
#[doc(hidden)]
pub enum Exception {
    NonMaskableInt,

    // Not overridable
    // HardFault,
    #[cfg(not(armv6m))]
    MemoryManagement,

    #[cfg(not(armv6m))]
    BusFault,

    #[cfg(not(armv6m))]
    UsageFault,

    #[cfg(armv8m)]
    SecureFault,

    SVCall,

    #[cfg(not(armv6m))]
    DebugMonitor,

    PendSV,

    SysTick,
}

#[doc(hidden)]
pub use self::Exception as exception;

extern "C" {
    fn Reset() -> !;

    fn NonMaskableInt();

    fn HardFaultTrampoline();

    #[cfg(not(armv6m))]
    fn MemoryManagement();

    #[cfg(not(armv6m))]
    fn BusFault();

    #[cfg(not(armv6m))]
    fn UsageFault();

    #[cfg(armv8m)]
    fn SecureFault();

    fn SVCall();

    #[cfg(not(armv6m))]
    fn DebugMonitor();

    fn PendSV();

    fn SysTick();
}

#[doc(hidden)]
pub union Vector {
    handler: unsafe extern "C" fn(),
    reserved: usize,
}

#[doc(hidden)]
#[cfg_attr(cortex_m, link_section = ".vector_table.exceptions")]
#[no_mangle]
pub static __EXCEPTIONS: [Vector; 14] = [
    // Exception 2: Non Maskable Interrupt.
    Vector {
        handler: NonMaskableInt,
    },
    // Exception 3: Hard Fault Interrupt.
    Vector {
        handler: HardFaultTrampoline,
    },
    // Exception 4: Memory Management Interrupt [not on Cortex-M0 variants].
    #[cfg(not(armv6m))]
    Vector {
        handler: MemoryManagement,
    },
    #[cfg(armv6m)]
    Vector { reserved: 0 },
    // Exception 5: Bus Fault Interrupt [not on Cortex-M0 variants].
    #[cfg(not(armv6m))]
    Vector { handler: BusFault },
    #[cfg(armv6m)]
    Vector { reserved: 0 },
    // Exception 6: Usage Fault Interrupt [not on Cortex-M0 variants].
    #[cfg(not(armv6m))]
    Vector {
        handler: UsageFault,
    },
    #[cfg(armv6m)]
    Vector { reserved: 0 },
    // Exception 7: Secure Fault Interrupt [only on Armv8-M].
    #[cfg(armv8m)]
    Vector {
        handler: SecureFault,
    },
    #[cfg(not(armv8m))]
    Vector { reserved: 0 },
    // 8-10: Reserved
    Vector { reserved: 0 },
    Vector { reserved: 0 },
    Vector { reserved: 0 },
    // Exception 11: SV Call Interrupt.
    Vector { handler: SVCall },
    // Exception 12: Debug Monitor Interrupt [not on Cortex-M0 variants].
    #[cfg(not(armv6m))]
    Vector {
        handler: DebugMonitor,
    },
    #[cfg(armv6m)]
    Vector { reserved: 0 },
    // 13: Reserved
    Vector { reserved: 0 },
    // Exception 14: Pend SV Interrupt [not on Cortex-M0 variants].
    Vector { handler: PendSV },
    // Exception 15: System Tick Interrupt.
    Vector { handler: SysTick },
];

// If we are not targeting a specific device we bind all the potential device specific interrupts
// to the default handler
#[cfg(all(any(not(feature = "device"), test), not(armv6m)))]
#[doc(hidden)]
#[cfg_attr(cortex_m, link_section = ".vector_table.interrupts")]
#[no_mangle]
pub static __INTERRUPTS: [unsafe extern "C" fn(); 240] = [{
    extern "C" {
        fn DefaultHandler();
    }

    DefaultHandler
}; 240];

// ARMv6-M can only have a maximum of 32 device specific interrupts
#[cfg(all(not(feature = "device"), armv6m))]
#[doc(hidden)]
#[link_section = ".vector_table.interrupts"]
#[no_mangle]
pub static __INTERRUPTS: [unsafe extern "C" fn(); 32] = [{
    extern "C" {
        fn DefaultHandler();
    }

    DefaultHandler
}; 32];

}
Py32f030 的芯片中断抽象在 PY32f030xx-pac 已经自动实现。
中断向量表的定义在文件:src/lib.rs +35
#![allow(unused)]
fn main() {
#[cfg(feature = "rt")]
extern "C" {
    fn WWDG();
    fn PVD();
    fn RTC();
    fn FLASH();
    fn RCC();
    fn EXTI0_1();
    fn EXTI2_3();
    fn EXTI4_15();
    fn DMA_CHANNEL1();
    fn DMA_CHANNEL2_3();
    fn ADC_COMP();
    fn TIM1_BRK_UP_TRG_COM();
    fn TIM1_CC();
    fn TIM3();
    fn TIM14();
    fn TIM16();
    fn TIM17();
    fn I2C1();
    fn SPI1();
    fn SPI2();
    fn USART1();
    fn USART2();
    fn LED();
}
#[doc(hidden)]
pub union Vector {
    _handler: unsafe extern "C" fn(),
    _reserved: u32,
}
#[cfg(feature = "rt")]
#[doc(hidden)]
#[link_section = ".vector_table.interrupts"]
#[no_mangle]
pub static __INTERRUPTS: [Vector; 31] = [
    Vector { _handler: WWDG },
    Vector { _handler: PVD },
    Vector { _handler: RTC },
    Vector { _handler: FLASH },
    Vector { _handler: RCC },
    Vector { _handler: EXTI0_1 },
    Vector { _handler: EXTI2_3 },
    Vector { _handler: EXTI4_15 },
    Vector { _reserved: 0 },
    Vector {
        _handler: DMA_CHANNEL1,
    },
    Vector {
        _handler: DMA_CHANNEL2_3,
    },
    Vector { _reserved: 0 },
    Vector { _handler: ADC_COMP },
    Vector {
        _handler: TIM1_BRK_UP_TRG_COM,
    },
    Vector { _handler: TIM1_CC },
    Vector { _reserved: 0 },
    Vector { _handler: TIM3 },
    Vector { _reserved: 0 },
    Vector { _reserved: 0 },
    Vector { _handler: TIM14 },
    Vector { _reserved: 0 },
    Vector { _handler: TIM16 },
    Vector { _handler: TIM17 },
    Vector { _handler: I2C1 },
    Vector { _reserved: 0 },
    Vector { _handler: SPI1 },
    Vector { _handler: SPI2 },
    Vector { _handler: USART1 },
    Vector { _handler: USART2 },
    Vector { _reserved: 0 },
    Vector { _handler: LED },
];
#[doc = r"Enumeration of all the interrupts."]
#[derive(Copy, Clone, Debug, PartialEq, Eq)]
#[repr(u16)]
pub enum Interrupt {
    #[doc = "0 - Window WatchDog Interrupt"]
    WWDG = 0,
    #[doc = "1 - PVD Interrupt through EXTI Lines 16"]
    PVD = 1,
    #[doc = "2 - RTC Interrupt through EXTI Lines 19"]
    RTC = 2,
    #[doc = "3 - FLASH global Interrupt"]
    FLASH = 3,
    #[doc = "4 - RCC global Interrupt"]
    RCC = 4,
    #[doc = "5 - EXTI Line 0 and 1 Interrupt"]
    EXTI0_1 = 5,
    #[doc = "6 - EXTI Line 2 and 3 Interrupt"]
    EXTI2_3 = 6,
    #[doc = "7 - EXTI Line 4 to 15 Interrupt"]
    EXTI4_15 = 7,
    #[doc = "9 - DMA Channel 1 Interrupt"]
    DMA_CHANNEL1 = 9,
    #[doc = "10 - DMA Channel 2 and Channel 3 Interrupt"]
    DMA_CHANNEL2_3 = 10,
    #[doc = "12 - ADC and COMP Interrupt through EXTI Lines 17 and 18"]
    ADC_COMP = 12,
    #[doc = "13 - TIM1 Break, Update, Trigger and Commutation Interrupt"]
    TIM1_BRK_UP_TRG_COM = 13,
    #[doc = "14 - TIM1 Capture Compare Interrupt"]
    TIM1_CC = 14,
    #[doc = "16 - TIM3 global Interrupt"]
    TIM3 = 16,
    #[doc = "19 - TIM14 global Interrupt"]
    TIM14 = 19,
    #[doc = "21 - TIM16 global Interrupt"]
    TIM16 = 21,
    #[doc = "22 - TIM17 global Interrupt"]
    TIM17 = 22,
    #[doc = "23 - I2C1 global Interrupt"]
    I2C1 = 23,
    #[doc = "25 - SPI1 global Interrupt"]
    SPI1 = 25,
    #[doc = "26 - SPI2 global Interrupt"]
    SPI2 = 26,
    #[doc = "27 - USART1 global Interrupt"]
    USART1 = 27,
    #[doc = "28 - USART2 global Interrupt"]
    USART2 = 28,
    #[doc = "30 - LED global Interrupt"]
    LED = 30,
}
unsafe impl cortex_m::interrupt::InterruptNumber for Interrupt {
    #[inline(always)]
    fn number(self) -> u16 {
        self as u16
    }
}
}
中断服务函数的实现
尽管 PY32f030xx-pac crate 已经对所有的中断进行了抽象,但对于中断服务函数的实现只做了默认的空函数,如果需要重写某个中断服务函数,也非常简单, 与嵌入式 C 的方式原理一样。中断函数名必须与中断向量表中预定的函数名保持一致,且添加属性 #[interrupt]。如下所示展示串口1 和串口2的中断服务函数:
#![allow(unused)]
fn main() {
use crate::pac::interrupt;

#[interrupt]
fn USART1() {
    critical_section::with(|cs| unsafe {
        EventFuture::<USART1>::on_interrupt(cs, Id::USART1 as usize)
    })
}

#[interrupt]
fn USART2() {
    critical_section::with(|cs| unsafe {
        EventFuture::<USART2>::on_interrupt(cs, Id::USART2 as usize)
    })
}
}
在单片机中使用闭包优雅应对中断
什么是闭包
闭包这个词语由来已久,自上世纪 60 年代就由 Scheme 语言引进之后,被广泛用于函数式编程语言中,进入 21 世纪后,各种现代化的编程语言也都不约而同地把闭包作为核心特性纳入到语言设计中来。那么到底何为闭包?
闭包是一种匿名函数,它可以赋值给变量也可以作为参数传递给其它函数,不同于函数的是,它允许捕获调用者作用域中的值,例如:
fn main() {
   let x = 1;
   let sum = |y| x + y;

    assert_eq!(3, sum(2));
}
上面的代码展示了非常简单的闭包 sum,它拥有一个入参 y,同时捕获了作用域中的 x 的值,因此调用 sum(2) 意味着将 2(参数 y)跟 1(x)进行相加,最终返回它们的和:3。
可以看到 sum 非常符合闭包的定义:可以赋值给变量,允许捕获调用者作用域中的值。
使用闭包优雅处理中断
本篇文章将介绍如何使用闭包优雅处理中断。Rust 使用闭包处理中断的设计模式,目的是让中断处理更加及时、同时让 Rust 中的所有权检查能够顺利通过,也让API的使用更加简洁,符合人体工学设计,同时保证上层应用与底层逻辑的分离。
代码示例:examples/adc_block_interrupt_closure.rs
#![no_std]
#![no_main]

extern crate alloc;

use defmt::Debug2Format;
use hal::adc::{AdcChannel, AnyAdc, ChannelConfig, Config, Event, SampleCycles, TrigleSignal};

use py32f030_hal::adc::ConversionMode;
use py32f030_hal::clock::peripheral::PeripheralInterrupt;
use py32f030_hal::clock::sys_core_clock;
use py32f030_hal::{self as hal, mode::Blocking};

use {defmt_rtt as _, panic_probe as _};

#[cortex_m_rt::entry]
fn main() -> ! {
    // -------- Setup Allocator --------
    const HEAP_SIZE: usize = 128;
    static mut HEAP: [u8; HEAP_SIZE] = [0; HEAP_SIZE];
    #[global_allocator]
    static ALLOCATOR: alloc_cortex_m::CortexMHeap = alloc_cortex_m::CortexMHeap::empty();
    unsafe {
        ALLOCATOR.init(
            &mut HEAP as *const u8 as usize,
            core::mem::size_of_val(&HEAP),
        )
    }
    let p = hal::init(Default::default());

    defmt::info!("{}", sys_core_clock());

    let mut adc: AnyAdc<_, Blocking> = AnyAdc::new(
        p.ADC,
        Config::default().sample(SampleCycles::Cycle_239_5),
        ChannelConfig::default()
            .over_write(false)
            .wait(true) // 转换完成后等待读取完毕再开始转换
            .singal(TrigleSignal::Soft)
            .mode(ConversionMode::Continuous),
        &[AdcChannel::Channel11, AdcChannel::Channel12],
        // &[AdcChannel::Channel11],
    )
    .unwrap();

    // 使用闭包的方式在中断中调用闭包处理函数
    // 兼顾友好型 api
    static mut QUEUE: [u16; 16] = [0; 16];
    adc.on_interrupt(
        Event::EOC.into(), /* EOC 中断 */
        alloc::boxed::Box::new(move |adc| {
            /* 中断自动调用的闭包 */
            static mut CNT: usize = 0;
            unsafe {
                QUEUE[CNT] = adc;
                CNT += 1;
                if QUEUE.len() == CNT {
                    CNT = 0;
                }
            }

            // 打印转换成功的adc, 打印耗时会导致打印完毕后直接再次进入中断哦,
            // 导致很难看到loop里面的打印
            // defmt::info!("adc: {}", adc);
        }),
    );

    // 开启 EOC 中断
    adc.event_config(Event::EOC, true);
    adc.id().enable_interrupt();
    adc.start();
    loop {
        cortex_m::asm::wfi();

        defmt::info!(
            "adc {:?} sum: {} avrage: {}",
            Debug2Format(unsafe { &QUEUE }),
            unsafe { QUEUE.iter().sum::<u16>() },
            unsafe { QUEUE.iter().sum::<u16>() / QUEUE.len() as u16 }
        );
    }
}
测试代码中使用接口来注入闭包函数,让上下文能够轻松得进入中断处理函数中,中断发生时能被调用。
#![allow(unused)]
fn main() {
pub fn on_interrupt(
        &mut self,
        events: EnumSet<Event>,
        callback: alloc::boxed::Box<dyn Fn(u16)>,
)
}
那么如何实现这种设计模式呢? 在ADC 模块的驱动中可以阅读 src/adc/interrupt.rs 以及 src/adc/mod.rs
#![allow(unused)]
fn main() {
//  src/adc/interrupt.rs
use crate::pac::interrupt;

pub(super) static mut CLOSURE: Option<*const dyn Fn()> = None;

pub fn dispatch() {
    unsafe {
        if let Some(func) = CLOSURE {
            (*func)()
        }
    }
}

// ADC 中断服务函数
#[interrupt]
fn ADC_COMP() {
    // ADC1 的中断 eoc
    critical_section::with(|_cs| {
        dispatch();
    })
}

// src/adc/mod.rs

impl<'d, T: Instance, M: Mode> AnyAdc<'d, T, M> {
    pub fn on_interrupt(
        &mut self,
        events: EnumSet<Event>,
        callback: alloc::boxed::Box<dyn Fn(u16)>,
    ) {
        crate::interrupt::register(
            #[allow(static_mut_refs)]
            unsafe {
                &mut CLOSURE
            },
            alloc::boxed::Box::new(move || {
                callback(T::data_read());
                for e in events {
                    T::event_flag(e);
                }
            }),
        );
        for e in events {
            self.event_config(e, true);
        }
    }
}

}
ADC 的中断服务函数为:fn ADC_COMP(), 中断发生时,进入 fn dispatch() 函数,fn dispatch() 内部检查存储ADC中断专用的闭包全局变量,当设置了 Option 的值后,即注册了闭包,则执行闭包的逻辑。
on_interrupt 函数为 ADC 内部成员函数,负责提供给上层应用接口注入闭包逻辑。 crate::interrupt::register(...) 函数实现如下:
#![allow(unused)]
fn main() {
// src/interrupt.rs
use alloc::boxed::Box;

pub fn register(closure: &'static mut Option<*const dyn Fn()>, f: Box<dyn Fn()>) {
   unsafe {
       if let Some(old) = *closure {
           *closure = None;
           let _ = alloc::boxed::Box::from_raw(old as *mut dyn Fn());
       }
       let raw = alloc::boxed::Box::into_raw(f);
       *closure = Some(raw)
   }
}
}
注册函数将会使用 Box 申请堆空间用于存储闭包逻辑,因此可在测试的 main 函数中看到设置堆区的初始化逻辑。要求堆的大小必须保证大于上层接口中的闭包所占用的空间大小。在注册新的闭包时,register 内部会管理旧的闭包,即释放旧的堆空间,读者可以尝试注释let _ = alloc::boxed::Box::from_raw(old as *mut dyn Fn()); 后,多次调用 on_interrupt 即可。
测试结果
运行:cargo r --example adc_block_interrupt_closure --no-default-features -F "example"
注意需要关闭默认的宏embassy, 在 cargo r 命令后添加 --no-default-features 即可
     Erasing ✔ [00:00:00] [#######################################################################] 16.00 KiB/16.00 KiB @ 193.12 KiB/s (eta 0s )
 Programming ✔ [00:00:01] [#######################################################################] 13.75 KiB/13.75 KiB @ 8.18 KiB/s (eta 0s )    Finished in 1.784s
INFO  8000000
└─ adc_block_interrupt_closure::__cortex_m_rt_main::{closure#0} @ examples/adc_block_interrupt_closure.rs:35
INFO  adc "[0, 1441, 2170, 1394, 2243, 1446, 2172, 1399, 2251, 1442, 2182, 1412, 2261, 0, 0, 0]" sum: 1441 avrage: 1133
└─ adc_block_interrupt_closure::__cortex_m_rt_main::{closure#0} @ examples/adc_block_interrupt_closure.rs:78
INFO  adc "[2210, 1426, 2278, 1370, 2220, 1429, 2258, 1380, 2228, 1435, 2182, 1412, 2261, 1428, 2278, 1362]" sum: 26881 avrage: 1820
└─ adc_block_interrupt_closure::__cortex_m_rt_main::{closure#0} @ examples/adc_block_interrupt_closure.rs:78
INFO  adc "[2268, 1456, 2180, 1402, 2256, 1408, 2202, 1418, 2274, 1367, 2203, 1419, 2278, 1363, 2212, 1430]" sum: 29056 avrage: 1819
└─ adc_block_interrupt_closure::__cortex_m_rt_main::{closure#0} @ examples/adc_block_interrupt_closure.rs:78
引用
Rust语言圣经(Rust Course) py32f030-hal
串口通信
串口(Serial)作为 MCU 常用的通信外设,应用非常广泛,如日志打印、通信交互、控制等。通常我们使用异步串口(UART)接口通信,通常只有 RX,TX两根线即可完成接收和发送的功能。
串口通信的底层逻辑非常容易理解,就像是我们日常两人谈话或多人谈话交流一样,我们想要表达一些意思时,需要一个字一个字念出来,在场的所有人都能听到,同时如果有其他人同时说话,可能接听者就容易误解。同时,不同的人说话速度、连读可能不一样,因此为了提高交流效率,要求大家都用同样的语速和语言交流。
对于串口外设来说,有以下参数必须需要设置:
- 波特率
- 位数
- 停止位
- 校验位
通信双方必须配置一致才能正常通信。
由于计算机的发展,现在常用的笔记本电脑或台式机已经不再附带串口,但可使用USB转串口工具来使用串口设备。在本开发板中自带一个USB转串口的电路,电脑使用 Type-C 线连接即可使用串口功能。本开发板的串口的电路如下:
该电路可用于串口下载程序,也可在单片机程序中作为串口与电脑进行通信。
示例: examples/uart.rs
#![no_std]
#![no_main]

use embedded_io::Write;
use hal::usart::AnyUsart;
use heapless::String;
use py32f030_hal as hal;

use {defmt_rtt as _, panic_probe as _};

#[cortex_m_rt::entry]
fn main() -> ! {
    let p = hal::init(Default::default());
    let gpioa = p.GPIOA.split();

    let tx = gpioa.PA9;
    let rx = gpioa.PA10;

    let usart = AnyUsart::new(p.USART1, Some(rx), Some(tx), None, None, Default::default());

    let (_, mut tx) = usart.split();

    defmt::info!("usart start...");
    let buf: String<20> = "hello rust\r\n".into();
    loop {
        // 使用标准接口来发送串口数据
        let _ = write!(tx, "example for usart\r\n");

        // 使用自定义的驱动接口发送串口数据
        let _ = tx.write(buf.as_bytes());

        defmt::info!("send: {} ", buf.as_bytes());
        cortex_m::asm::delay(1000 * 1000 * 10);
    }
}
测试如下
➜  py32f030-hal git:(main) ✗ cargo r --example uart
warning: unused manifest key: dependencies.embedded-io-async.option
    Finished `dev` profile [optimized + debuginfo] target(s) in 0.03s
     Running `probe-rs run --chip PY32F030x8 target/thumbv6m-none-eabi/debug/examples/uart`
      Erasing ✔ [00:00:00] [########################################################################] 12.00 KiB/12.00 KiB @ 84.02 KiB/s (eta 0s )
  Programming ✔ [00:00:02] [#########################################################################] 11.25 KiB/11.25 KiB @ 3.91 KiB/s (eta 0s )    Finished in 3.062s
INFO  usart start...
└─ uart::__cortex_m_rt_main @ examples/uart.rs:23
INFO  send: [104, 101, 108, 108, 111, 32, 114, 117, 115, 116, 13, 10]
└─ uart::__cortex_m_rt_main @ examples/uart.rs:32
INFO  send: [104, 101, 108, 108, 111, 32, 114, 117, 115, 116, 13, 10]
└─ uart::__cortex_m_rt_main @ examples/uart.rs:32
INFO  send: [104, 101, 108, 108, 111, 32, 114, 117, 115, 116, 13, 10]
└─ uart::__cortex_m_rt_main @ examples/uart.rs:32
INFO  send: [104, 101, 108, 108, 111, 32, 114, 117, 115, 116, 13, 10]
└─ uart::__cortex_m_rt_main @ examples/uart.rs:32
INFO  send: [104, 101, 108, 108, 111, 32, 114, 117, 115, 116, 13, 10]
└─ uart::__cortex_m_rt_main @ examples/uart.rs:32
^C%
电脑主机端需要串口工具用于显示单片机发送的信息。如果没有安装串口工具,可以参考 串口工具
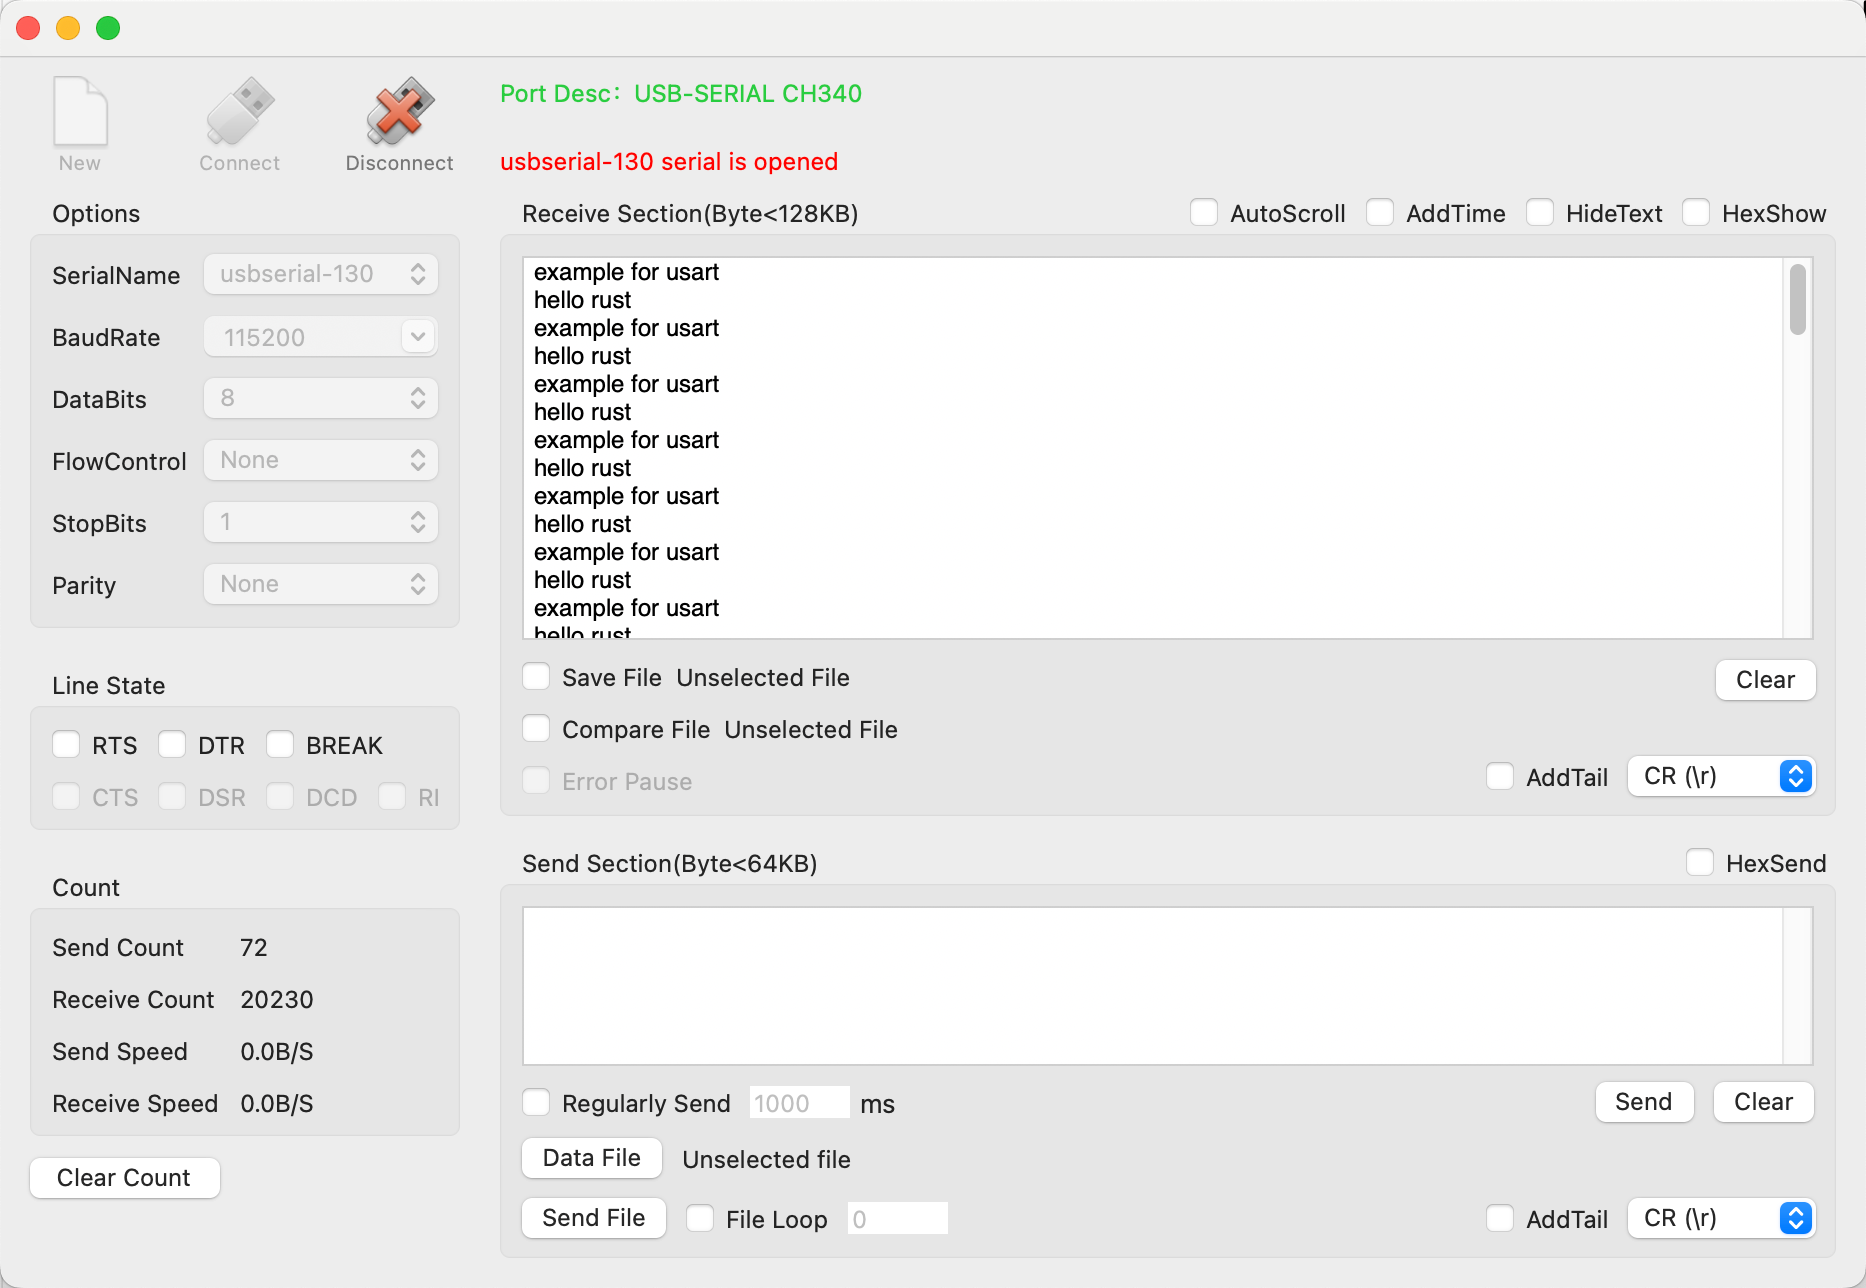
在测试代码的串口配置中,使用了驱动默认的配置,Default::default(),在Vscode 点击代码可以进入驱动层看到如下:
#![allow(unused)]
fn main() {
/// 串口的综合配置结构体
#[derive(Default)]
pub struct Config {
    pub baud_rate: BaudRate,
    pub stop_bit: StopBits,
    pub word_len: WordLen,
    pub parity: Parity,
    // pub hw_flow_ctrl: HwFlowCtrl,
    pub data_bits: DataBits,
    pub over_sampling: OverSampling,
    // pub mode: T,
}

/// 串口的波特率定义
#[derive(Default)]
pub enum BaudRate {
    // Auto = 0,
    Bps300 = 300,
    Bps1200 = 1200,
    Bps2400 = 2400,
    Bps4800 = 4800,
    Bps9600 = 9600,
    Bps1440 = 1440,
    Bps19200 = 19200,
    Bps28800 = 28800,
    Bps38400 = 38400,
    Bps57600 = 57600,
    Bps74880 = 74880,
    #[default]
    Bps115200 = 115200,
    Bps230400 = 230400,
}

/// 串口数据长度
#[derive(Default)]
pub enum WordLen {
    #[default]
    WordLen8 = 0,
    WordLen9 = 1,
}
...
}
在各个配置中,使用宏#[derive(Default)] 声明使用各个定义默认枚举所标记的值。
其他示例:examples/embassy_uart.rs
以下展示使用异步接口来与主机端通信,展示接收和发送数据。以下代码也可轻松改造成接收和发送使用不同的任务去运行。
#![no_std]
#![no_main]

// use embedded_io::Write;
use defmt::Debug2Format;
use hal::usart::AnyUsart;
use heapless::String;
use py32f030_hal::{self as hal, mode::Async};

use {defmt_rtt as _, panic_probe as _};

use embassy_executor::Spawner;
use embassy_time::Timer;

#[embassy_executor::main]
async fn main(_spawner: Spawner) {
    let p = hal::init(Default::default());

    let gpioa = p.GPIOA.split();
    let rx = gpioa.PA10;
    let tx = gpioa.PA9;

    let usart: AnyUsart<_, Async> =
        AnyUsart::new(p.USART1, Some(rx), Some(tx), None, None, Default::default());

    let (mut rx, mut tx) = usart.split();

    defmt::info!("usart start...");
    let buf: String<20> = "hello rust\r\n".into();

    let mut rx_buf: [u8; 10] = [0; 10];

    loop {
        // 使用标准接口来发送串口数据
        // let _ = write!(tx, "example for usart\r\n");
        let rst = rx.read(&mut rx_buf).await;
        // let rst = rx.read_with_idle(&mut rx_buf).await;
        // defmt::info!("recv: rst: {:?} {:x}", Debug2Format(&rst), rx_buf);
        // 使用自定义的驱动接口发送串口数据
        let rst = tx.write(buf.as_bytes()).await;

        defmt::info!("send: rst:{} {:x} ", Debug2Format(&rst), buf.as_bytes());
        Timer::after_secs(1).await;
    }
}
运行:cargo r --example embassy_uart --features embassy
I2C
I2C(Inter-IC Communication. IIC), 也是使用非常广泛的同步串行总线, 支持多控制器,多从设备的总线,只需要 SCL 和 CLK两根线即可,与 UART 串口不同的是, I2C 总线支持总线仲裁,解决多主设备同时发送时数据冲突问题,同时主从设备通信更稳定,因为使用时钟线 CLK 用于同步收发双方的速度。
I2C 总线支持一个主机并联多个从设备。通常使用拓扑如下:
I2C 总线常用于板内设备通信,如M应用与CU与传感器、控制电路、屏幕等设备之间的通信。 各从设备都具备一个 I2C 地址,且同一并联的总线不能有相同的地址。I2C 的时钟与数据线有着严格的时序要求。
- 起始信号:SCL保持高,SDA下降沿
- 停止信号:SCL保持高,SDA上升沿
- 采集数据:SDA稳定,SCL上升沿
- ACK信号:接收方拉低SDA后,主机在SCL上升沿接收到低电平
- NACK信号:
示例:examples/i2c_master_block.rs
#![no_std]
#![no_main]

use defmt::Debug2Format;
// use embedded_io::Write;
use embedded_hal::digital::v2::OutputPin;
use hal::delay;
use hal::i2c::{AnyI2c, Config};
use py32f030_hal::delay::delay_ms;
use py32f030_hal::gpio::{Output, PinIoType, PinSpeed};
use py32f030_hal::{self as hal, mode::Blocking};

use {defmt_rtt as _, panic_probe as _};

#[cortex_m_rt::entry]
fn main() -> ! {
    defmt::info!("i2c start...");
    let p = hal::init(Default::default());

    let gpioa = p.GPIOA.split();

    let mut lcd_rst = Output::new(gpioa.PA4, PinIoType::PullUp, PinSpeed::Low);
    let _ = lcd_rst.set_low();
    delay_ms(200);
    let _ = lcd_rst.set_high();

    let sda = gpioa.PA2;
    let scl = gpioa.PA3;
    let config = Config::default().speed(200_000);
    // 配置 200K的速度
    let i2c1 = AnyI2c::<_, Blocking>::new(p.I2C, scl, sda, config).unwrap();
    let master = i2c1.as_master();

    let buf: [u8; 10] = [1, 2, 3, 4, 5, 6, 7, 8, 9, 0];
    let mut r_buf: [u8; 2] = [0; 2];
    let mut cnt = 0;
    const SLAVE_DEVICE_ADDRESS: u8 = 0x3c;
    loop {
        // write from i2c
        let rst = master.write_block(SLAVE_DEVICE_ADDRESS, &buf);

        defmt::info!("write rst: {:?} ", Debug2Format(&rst));
        if rst.is_err() {
            // master.clear_errors()
        }

        // read from i2c
        let rst = master.read_block(SLAVE_DEVICE_ADDRESS, &mut r_buf);
        defmt::info!("read rst: {:?} ", Debug2Format(&rst));

        delay::delay_ms(1000);
        defmt::info!("{}", cnt);
        cnt += 1;
    }
}
参考
TODO
DMA
直接存储器存取(DMA)用来提供在外设和存储器之间或者存储器和存储器之间的高速数据传输。无须 CPU干预,数据可以通过 DMA 快速地移动,节省了 CPU 的资源,进行其他操作。DMA 控制器有 3 条 DMA 通道,每条通道负责管理来自 1 个或者多个外设对存储器访问的请求。
DMA 控制器包括处理 DMA 请求的仲裁器,用于处理各个 DMA 请求的优先级。
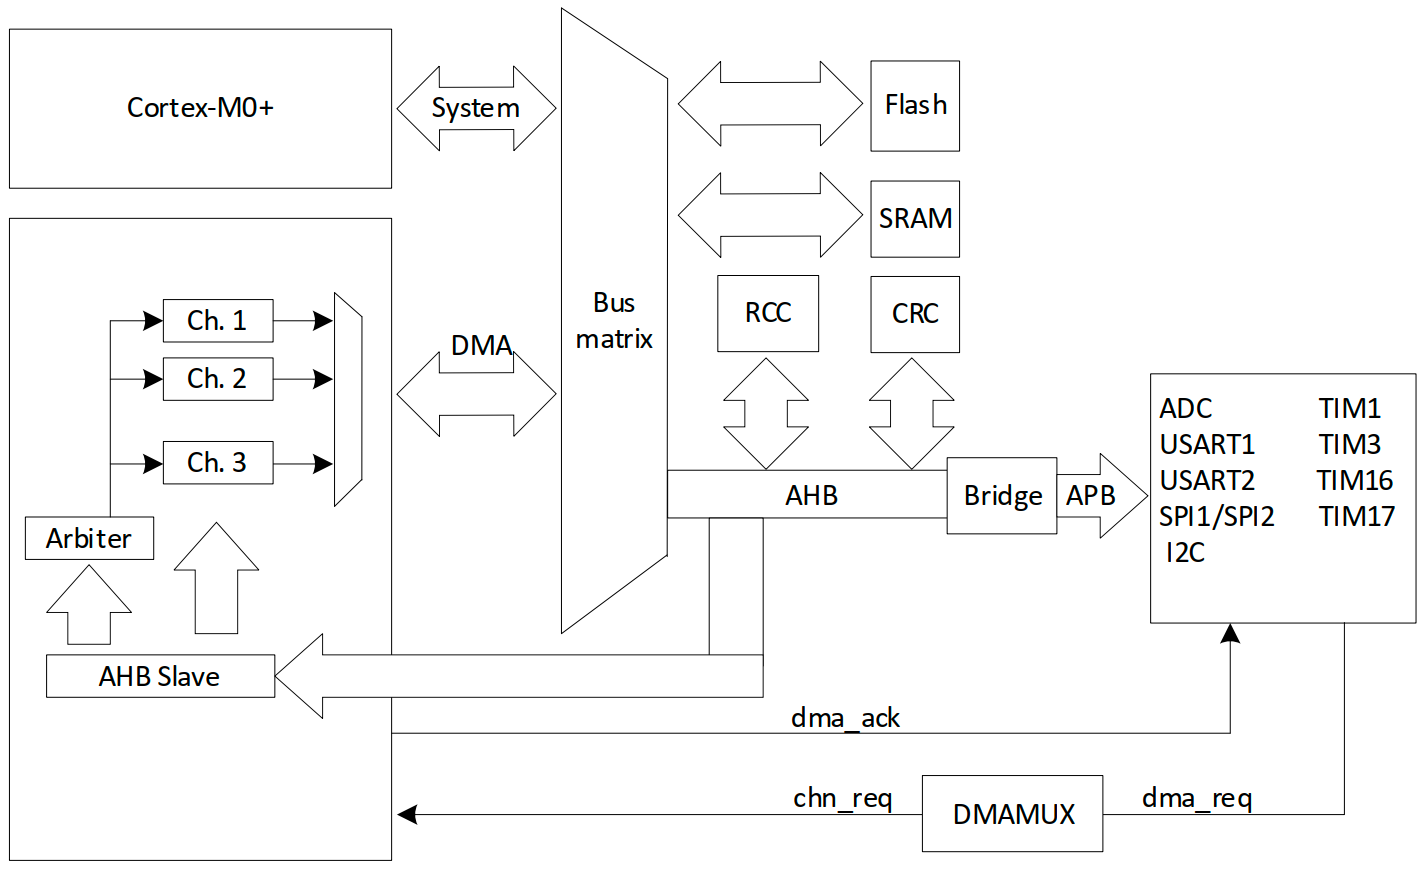
PY32F030 的DMA 内部有3个独立的通道,可用于外设与存储器或存储器与存储器之间的高速数据传输,可配置各通道的优先级。
示例
存储器与存储器:examples/dma_mem2mem.rs
#![no_std]
#![no_main]

use defmt::Debug2Format;
use hal::dma::{AnyDma, Burst, Priorities, RepeatMode};
use py32f030_hal::{self as hal, dma::Config, mode::Blocking};

use {defmt_rtt as _, panic_probe as _};

#[cortex_m_rt::entry]
fn main() -> ! {
    let p = hal::init(Default::default());
    defmt::info!("embassy_dma_mem2mem example!");

    let mut src: [u32; 4] = [1, 2, 3, 4];
    let mut dst: [u32; 4] = [0; 4];

    let mut dma: AnyDma<_, Blocking> = AnyDma::new(p.DMA);

    let [mut channel1, _, _] = dma.split();
    channel1.config(Config::new_mem2mem(
        src.as_mut_ptr() as u32,
        true,
        dst.as_mut_ptr() as u32,
        true,
        Priorities::Low,
        RepeatMode::OneTime(src.len() as u16),
        Burst::World,
    ));

    channel1.start();

    let rst = channel1.wait_complet();

    defmt::info!("rst: {:?}", Debug2Format(&rst));
    defmt::info!("src: {} ", src);
    defmt::info!("dst: {} ", dst);

    loop {
        cortex_m::asm::wfe();
    }
}
什么是 CRC(Cyclic Redundancy Check)?
循环冗余校验CRC(Cyclic Redundancy Check)是数据通信领域常用的一种数据传输检错技术。通过在发送端对数据按照某种算法计算出校验码,并将得到的校验码附在数据帧的后面,一起发送到接收端。接收端对收到的数据和校验码按照相同算法进行验证,以此判断接收到的数据是否正确、完整。
CRC简介
在多端通信中,数据的交互过程中经常会因为信号干扰或距离过长产生数据丢失或变化,从而导致对方接收到不完整或错误的数据。因此为尽量提高通信的数据的完整率、正确率,在接收数据之前需要对数据进行差错检测,当检测的结果为正确时才接收数据。
差错检测的方式有多种,常见的有奇偶校验、求和校验、CRC校验等。他们的工作原理都是发送端对数据按照某种算法计算出来校验码,将校验码和数据一起发送到接收端,然后接收端进行检验确定数据是否发生变化。
CRC是由W. Wesley Peterson在1961年发表的论文中提出,由于CRC校验在速度、成本、正确率等方面比其他校验方式更具有优势,因此,CRC成为计算机信息、通信领域最为普遍的校验方式。例如在标准的以太帧格式中,最后有4个字节长度的冗余位,用于存储CRC校验的值,这个冗余位又常称为帧检验序列FCS(Frame Check Sequence)。
CRC是如何计算的?
CRC的思想就是先在要发送的K比特长度的数据后面附加一个R比特长度的校验码,然后生成一个新帧发送给接收端。接收端接收到新帧后,根据收到的数据和校验码来验证接收到的数据是否正确。
当然,这个附加的校验码不是随意添加的,要使所生成的新帧能与发送端和接收端共同选定的某个特定数整除(“模2除法”)。接收端把接收到的新帧除以这个选定的除数。因为在发送数据帧之前就已通过附加一个数,做了“去余”处理(也就已经能整除了),所以结果应该是没有余数。如果有余数,则表明该帧在传输过程中出现了差错。
在K比特数据后面再拼接R比特的校验码,整个编码长度为N比特,这种编码也叫(N,K)码。对于一个给定的(N,K)码,可以证明存在一个最高次幂为N-K=R的多项式g(x),根据g(x)可以生成R比特的校验码。其算法是以GF(2)多项式算术为数学基础的,原理如下图所示。
CRC计算公式
g(x)叫做这个校验码的生成多项式。不同的CRC生成多项式,其检错能力是不同的。要使用R位校验码,生成多项式的次幂应为R。以下为常见的一些标准多项式。
这些多项式的值便是模2除法的除数。而根据这个除数获得校验码并进行校验的原理可以分为以下几个步骤:
发送端、接收端在通信前,约定好除数P,也就是前面说的多项式的值。P应该是R+1位长度; 发送端首先在原来的K位数据后面加R个0,相当于原来的数据左移了R位; 然后进行模2除法运算(其实就是异或XOR运算),将加0之后的K+R位的数除以P,循环计算,直到余数的阶数小于R,这个余数就是附加的校验码,如果长度不足R位需要在前面加0补齐; 发送端将R位校验码附加在原数据后面发送给接收方; 接收方接收到数据后,将数据以模2除法方式除以除数P。如果没有余数,说明在传输过程中没有出现错误,否则说明有错误。 下面以一个简单示例来展示CRC的计算过程:
以g(x)为CRC-4=X4+X+1为例,此时除数P=10011。假设源数据M为10110011。
在发送端将M左移4位,然后除以P。
计算得到的余数就是0100,也就是CRC校验码。将0100附加到原始数据帧10110011后,组成新帧101100110100发送给接收端。接收端接收到该帧后,会用该帧去除以上面选定的除数P,验证余数是否为0,如果为0,则表示数据在传输过程中没有出现差错。
PY32F030 内置的 CRC 外设采用 CRC32 多项式作为公式。

示例:examples/crc.rs
#![no_std]
#![no_main]

use embassy_executor::Spawner;
use py32f030_hal::crc::Crc;
use py32f030_hal::{self as hal};

use {defmt_rtt as _, panic_probe as _};

#[embassy_executor::main]
async fn main(_spawner: Spawner) {
    let p = hal::init(Default::default());

    let crc = Crc::new(p.CRC);

    let buf1 = [
        0x00001021, 0x20423063, 0x408450a5, 0x60c670e7, 0x9129a14a, 0xb16bc18c, 0xd1ade1ce,
        0xf1ef1231, 0x32732252, 0x52b54294, 0x72f762d6, 0x93398318, 0xa35ad3bd, 0xc39cf3ff,
        0xe3de2462, 0x34430420, 0x64e674c7, 0x44a45485, 0xa56ab54b, 0x85289509, 0xf5cfc5ac,
        0xd58d3653, 0x26721611, 0x063076d7, 0x569546b4, 0xb75ba77a, 0x97198738, 0xf7dfe7fe,
        0xc7bc48c4, 0x58e56886, 0x78a70840, 0x18612802, 0xc9ccd9ed, 0xe98ef9af, 0x89489969,
        0xa90ab92b, 0x4ad47ab7, 0x6a961a71, 0x0a503a33, 0x2a12dbfd, 0xfbbfeb9e, 0x9b798b58,
        0xbb3bab1a, 0x6ca67c87, 0x5cc52c22, 0x3c030c60, 0x1c41edae, 0xfd8fcdec, 0xad2abd0b,
        0x8d689d49, 0x7e976eb6, 0x5ed54ef4, 0x2e321e51, 0x0e70ff9f, 0xefbedfdd, 0xcffcbf1b,
        0x9f598f78, 0x918881a9, 0xb1caa1eb, 0xd10cc12d, 0xe16f1080, 0x00a130c2, 0x20e35004,
        0x40257046, 0x83b99398, 0xa3fbb3da, 0xc33dd31c, 0xe37ff35e, 0x129022f3, 0x32d24235,
        0x52146277, 0x7256b5ea, 0x95a88589, 0xf56ee54f, 0xd52cc50d, 0x34e224c3, 0x04817466,
        0x64475424, 0x4405a7db, 0xb7fa8799, 0xe75ff77e, 0xc71dd73c, 0x26d336f2, 0x069116b0,
        0x76764615, 0x5634d94c, 0xc96df90e, 0xe92f99c8, 0xb98aa9ab, 0x58444865, 0x78066827,
        0x18c008e1, 0x28a3cb7d, 0xdb5ceb3f, 0xfb1e8bf9, 0x9bd8abbb, 0x4a755a54, 0x6a377a16,
        0x0af11ad0, 0x2ab33a92, 0xed0fdd6c, 0xcd4dbdaa, 0xad8b9de8, 0x8dc97c26, 0x5c644c45,
        0x3ca22c83, 0x1ce00cc1, 0xef1fff3e, 0xdf7caf9b, 0xbfba8fd9, 0x9ff86e17, 0x7e364e55,
        0x2e933eb2, 0x0ed11ef0,
    ];

    assert_eq!(crc.calculate(&buf1), 0x379E9F06);

    defmt::info!("{:x}", crc.calculate(&buf1));
    crc.reset();

    crc.accumulat(&buf1[0..10]);
    let rst = crc.accumulat(&buf1[10..]);
    defmt::info!("{:x}", rst);

    loop {
        cortex_m::asm::wfe();
    }
}
时钟配置
时钟是单片机运行指令的节拍,时钟频率代表着单片机CPU或外设运行的速度。PY32F030 支持多个时钟源作为 MCU 的输入时钟,分别是
- HSI,高速内部时钟 (24M)
- HSE,高速外部时钟(4~32MHz)
- LSI,低速内部时钟 (32K)
- LSE,低速外部时钟 (32.768K)
系统时钟也可使用PLL作为时钟源。PY32F030的内部时钟树如下。
在 嵌入式C 中,配置单片机的时钟通常需要非常小心规划每个时钟频率,且配置正确的时钟节点。在 Rust 驱动中,将时钟的配置严格按照手册逻辑,严格对齐依赖关系。只需要简单对照时钟树框图或代码提示即可配置成功。
示例
#![no_std]
#![no_main]

use defmt_rtt as _;
use embedded_hal::digital::v2::ToggleableOutputPin;
use panic_probe as _;

use hal::clock::{self, Mco};
use hal::gpio::{Af, PinAF};
use py32f030_hal as hal;
use py32f030_hal::gpio::{Output, PinIoType, PinSpeed};

#[cortex_m_rt::entry]
fn main() -> ! {
    defmt::println!("examples: clock");
    let p = hal::init(Default::default());
    let gpioa = p.GPIOA.split();

    let _mco_pin = Af::new(
        gpioa.PA1,
        PinAF::AF15,
        PinSpeed::VeryHigh,
        PinIoType::PullUp,
    );
    Mco::select(clock::McoSelect::SysClk, clock::McoDIV::DIV1);

    let mut led = Output::new(gpioa.PA11, PinIoType::PullUp, PinSpeed::VeryHigh);

    cortex_m::asm::delay(1000 * 1000 * 5);
    // let _sysclk = clock::SysClock::<clock::HSIDiv<1>>::config().unwrap();
    let _sysclk = clock::SysClock::<clock::HSE>::config().unwrap();

    // let _sysclk = clock::SysClock::<clock::PLL<HSE>>::config().unwrap();

    // PA1 输出 16M
    // let _sysclk = clock::SysClock::<clock::PLL<HSI>>::config().unwrap();

    cortex_m::asm::delay(1000 * 1000 * 5);
    defmt::info!("freq: {}MHZ", clock::sys_core_clock() / 1000 / 1000);

    loop {
        cortex_m::asm::delay(1000 * 1000 * 5);

        let _ = led.toggle();
    }
}
运行:cargo r --example clock
在测试中,可以将内部时钟通过MCO引脚输出,通过示波器查看真实的时钟。
高级定时器
PY32F030 的内部有一个高级定时器TIM1,是一个16位可编程的定时器,可用于多种场合,如基础定时功能,输入脉冲测量,输出PWM。TIM1的主要特性如下:
- 16bit 可配置的向下、向上、上下重载模式
- 16位的分频器,支持1~65535的分频
- 4 个独立的通道,可用于
- 输入脉冲捕获
- 输出比较
- PWM
- 单脉冲输出
- 支持互补输出的死区配置
- 外部信号控制定时器或定时器级联控制
- DMA 操作
- 中断事件
- 更新事件
- 触发事件
- 输入捕获事件
- 输出比较
- 刹车输入
- 支持正交编码与霍尔传感器电路
在驱动包 py32f030-hal 中,目前已实现常用的定时、PWM输出、中断等功能,扩展其他功能也非常简单。以下将提供裸机环境操作定时器以及多任务系统中操作定时器的例程。
示例1: 定时:examples/advanced_timer_block.rs
#![no_std]
#![no_main]

use embedded_hal::digital::v2::ToggleableOutputPin;
use hal::gpio::{Output, PinIoType, PinSpeed};
use hal::mode::Blocking;
use hal::timer::advanced_timer::AnyTimer;
use py32f030_hal as hal;

use {defmt_rtt as _, panic_probe as _};

#[cortex_m_rt::entry]
fn main() -> ! {
    defmt::info!("timer counter examples start...");
    let p = hal::init(Default::default());

    let gpioa = p.GPIOA.split();

    let timer = AnyTimer::<_, Blocking>::new(p.TIM1).unwrap();
    let mut counter = timer.as_counter();

    let mut led = Output::new(gpioa.PA0, PinIoType::PullUp, PinSpeed::Low);

    let mut cnt = 0;

    loop {
        let _ = led.toggle();
        // 延时 1s
        counter.delay_us_blocking(1_000_000);
        defmt::info!("{}", cnt);
        cnt += 1;
    }
}
运行:cargo r --example advanced_timer_block
示例2: examples/advanced_timer_block_2.rs
#![no_std]
#![no_main]

use embedded_hal::timer::CountDown;
use fugit::ExtU32;
use hal::mode::Blocking;
use hal::timer::advanced_timer::AnyTimer;
use py32f030_hal as hal;

use {defmt_rtt as _, panic_probe as _};

#[cortex_m_rt::entry]
fn main() -> ! {
    defmt::info!("timer counter examples start...");
    let p = hal::init(Default::default());

    let timer = AnyTimer::<_, Blocking>::new(p.TIM1).unwrap();
    let mut counter = timer.as_counter();

    let mut cnt = 0;
    loop {
        // 延时 5s
        defmt::info!("repeat...{} ", cnt);
        counter.start(5u32.secs());
        let _ = counter.wait();
        cnt += 1;
    }
}
运行:cargo r --example advanced_timer_block_2
示例3:PWM输出:examples/embassy_pwm.rs
配置输出 PWM 波形
#![no_std]
#![no_main]

// use hal::gpio::{Af, PinIoType, PinSpeed};
// use hal::timer::advanced_timer::TimerChannel1Pin;
use hal::timer::advanced_timer::{AnyTimer, ChannelConfig, ChannelOutputConfig};
use py32f030_hal::gpio::gpioa::PA0;
use py32f030_hal::{self as hal, mode::Blocking, timer::advanced_timer::Channel};

use embassy_executor::Spawner;
use embassy_time::Timer;
// use hal::mcu::peripherals::TIM1;
use embedded_hal::Pwm;

use {defmt_rtt as _, panic_probe as _};

#[embassy_executor::task]
async fn run() {
    loop {
        Timer::after_secs(2).await;
        defmt::info!("task run");
    }
}

#[embassy_executor::main]
async fn main(_spawner: Spawner) {
    defmt::info!("time1 start...");
    let p = hal::init(Default::default());
    let gpioa = p.GPIOA.split();

    _spawner.spawn(run()).unwrap();

    let timer: AnyTimer<_, Blocking> = AnyTimer::new(p.TIM1).unwrap();
    let mut pwm = timer.as_pwm();

    let channel_1_pin = gpioa.PA3;

    // 引脚指定方式1
    // let _oc1_pin = Af::new(
    //     channel_1_pin, //gpioa.PA3,
    //     PinAF::AF13,
    //     PinSpeed::VeryHigh,
    //     PinIoType::PullUp,
    // );

    // 引脚指定方式2
    // channel_1_pin.set_instance_af(PinSpeed::VeryHigh, PinIoType::PullUp);

    // 引脚指定方式3
    // PA0,指定为OC_N, 当为None时候不会被使用,当引脚没有被模版冲突则不需要指定模版类型
    pwm.set_channel_1_pin::<_, PA0>(Some(channel_1_pin), None);

    // 配置定时器
    pwm.config(
        /* 配置通道1 */
        Some(ChannelConfig::default().ch(ChannelOutputConfig::default())),
        None,
        None,
        None,
    );

    // 计数频率为1M
    pwm.set_frequency(1_000_000);
    // 设置计数周期为1000,则波形的频率为 1000_000/1000 = 1K
    pwm.set_period(1000u16 - 1);
    let max_duty = pwm.get_max_duty();
    // 33%的占空比
    pwm.set_duty(Channel::CH1, max_duty / 3);
    // 使能通道
    pwm.enable(Channel::CH1);
    // 开始计数器
    pwm.start();

    loop {
        Timer::after_secs(1).await;
    }
}
运行: cargo r --example embassy_pwm
引言:当单片机遇上音乐
你是否想过,用一颗只有64KB Flash的廉价单片机(如PY32F030)就能播放复杂的MIDI音乐?传统嵌入式音频开发往往需要高性能芯片,但通过Rust语言的高效和现代嵌入式生态,我们可以在资源受限的设备上实现比较满意的的音乐效果。
本文将带你探索:
- MIDI协议的解析工具
- 如何用Rust为ARM Cortex-M0单片机的定时器外设开发音频蜂鸣器程序
硬件准备:简约而不简单
核心器件:
- PY32_Rust_Dev Board:Py32f030主控,ARM Cortex-M0内核,主频48MHz,64KB Flash/8KB RAM
- 有源蜂鸣器(或无源蜂鸣器+驱动电路或其他喇叭)
硬件连接:
- 使用蜂鸣器的两端连接GND和PA0或PA3。
- 使用USB或SWD口供电

软件设计
- Midi转换工具
由于单片机资源有限,因此需要先将Midi文件解析为直接用于控制频率和延时,因此开发了一个小工具用于转换。部分代码如下:
#![allow(unused)]
fn main() {
for track in &tracks {
    match track {
        Track::Midi(midi) => {
            for m in midi {
                let event = &m.event;
                let tick_ms: u16 = (m.delta_time as f32 * one_tick_ms) as u16;
                println!("track event: {:?}", m);
                match event {
                    MidiMsg::Meta { msg } => match *msg {
                        Meta::SetTempo(tempo) => {
                            let bpm_ms = tempo as f32 / 1000.0;
                            one_tick_ms = bpm_ms / tpqn as f32;
                            println!("tempo: {} bpm, one tick ms: {}", bpm_ms, one_tick_ms);
                        }
                        _ => {}
                    },
                    MidiMsg::ChannelVoice { channel, msg } => match *msg {
                        ChannelVoiceMsg::NoteOn { note, velocity } => {
                            note_list.push(if velocity == 0 {
                                Note::new(*channel as u8, 0, tick_ms)
                            } else {
                                Note::new(*channel as u8, note, tick_ms)
                            });
                        }
                        ChannelVoiceMsg::NoteOff {
                            note: _,
                            velocity: _,
                        } => {
                            // 关闭声音时,需要将note设置为0,否则会一直播放
                            note_list.push(Note::new(*channel as u8, 1, tick_ms));
                        }

                        _ => {
                            continue;
                        }
                    },
                    _ => {}
                }
            }
        }
        Track::AlienChunk(alien_chunk) => {
            for a in alien_chunk {
                println!("alien chunk: {}", a);
            }
        }
    }
}
}
可使用命令直接安装在Cargo中。
cargo install --git https://github.com/hysonglet/midi2rust.git
使用方式如下:
midi2rust ~/Downloads/PLACE.MID place
执行后将会生成rust数组如下:
#![allow(unused)]
fn main() {
struct Note {
    channel: u8,
    note: u8,
    delay: u16,
}

pub const MIDI_CONTENT: [Note; 5898] = [
    Note {
        channel: 0,
        note: 60,
        delay: 24705,
    },
    Note {
        channel: 0,
        note: 0,
        delay: 192,
    },
    ...
    Note {
        channel: 9,
        note: 0,
        delay: 3,
    },
];

}
- 单片机播放MIDI音乐
单片机只需要遍历音频数组,执行播放指定的频率和延时即可,代码如下:
#![no_std]
#![no_main]

use core::u16;

use hal::gpio::{Af, PinIoType, Speed};
// use hal::timer::advanced_timer::TimerChannel1Pin;
use hal::timer::advanced_timer::{AnyTimer, ChannelConfig, ChannelOutputConfig};
use py32f030_hal::gpio::gpioa::PA0;
use py32f030_hal::gpio::PinAF;
use py32f030_hal::{self as hal, mode::Blocking, timer::advanced_timer::Channel};

use embassy_executor::Spawner;
use embassy_time::Timer;
// use hal::mcu::peripherals::TIM1;
use embedded_hal_027::Pwm;

use defmt::info;
use {defmt_rtt as _, panic_probe as _};

#[embassy_executor::main]
async fn main(_spawner: Spawner) {
    info!("time1 start...");
    let p = hal::init(Default::default());
    let gpioa = p.GPIOA.split();

    let timer: AnyTimer<_, Blocking> = AnyTimer::new(p.TIM1).unwrap();
    let mut pwm = timer.as_pwm();

    pwm.set_channel_1_pin::<_, _>(Some(gpioa.PA3), Some(gpioa.PA0));

    // 配置定时器
    pwm.config(
        /* 配置通道1 */
        Some(ChannelConfig::default().ch(ChannelOutputConfig::default())),
        None,
        None,
        None,
    );

    // 计数频率为1M
    pwm.set_frequency(1_000_000);
    pwm.set_duty(Channel::CH1, 50);
    // 设置计数周期为1000,则波形的频率为 1000_000/1000 = 1K
    // pwm.set_period(1000u16 - 1);
    // let max_duty = pwm.get_max_duty();
    // // 33%的占空比
    // pwm.set_duty(Channel::CH1, max_duty / 3);
    // 使能通道
    pwm.enable(Channel::CH1);
    // 开始计数器
    pwm.start();

    loop {
        for note in &MIDI_CONTENT {
            let delay = note.delay;
            let channel = note.channel;
            let note = note.note as u32;
            // 只播放指定的 通道
            if channel == 0 {
                let period = (1000_000.0 / NOTE_FREQ[note as usize] - 1.0) as u16;

                info!("freq: {}, note: {}, delay: {}", period, note, delay);

                Timer::after_millis((delay) as u64).await;
                pwm.set_period(period);
            }
        }
    }
}

const NOTE_FREQ: [f32; 128] = [
    // 8.18, /* 0 */
    0.05, /* 0 */
    8.66, 9.18, 9.72, 10.3, 10.91, 11.56, 12.25, 12.98, 13.75, 14.57, /* 1~10 */
    15.43, 16.35, 17.32, 18.35, 19.45, 20.6, 21.83, 23.12, 24.5, 25.96, 27.5, /* 11~21 */
    29.14, 30.87, 32.7, 34.65, 36.71, 38.89, 41.2, 43.65, 46.25, 49.0, 51.91, /* 22~32 */
    55.0, 58.27, 61.74, 65.41, 69.3, 73.42, 77.78, 82.41, 87.31, 92.5, 48.99, /* 33~43 */
    51.91, 55.00, 58.27, 61.74, 65.41, 69.30, 73.42, 77.78, 82.41, 87.31, 92.5, /* 44~54 */
    98.0, 103.8, 110.0, 116.5, 123.5, 130.8, 138.6, 146.8, 155.6, 164.8, 174.6, /* 55~65 */
    185.0, 196.0, 207.7, 220.0, 233.1, 246.9, 261.6, 277.2, 293.7, 311.1, 329.6, /* 66~76 */
    349.2, 370.0, 392.0, 415.3, 440.0, 466.2, 493.9, 523.3, 554.4, /* 77~85 */
    1174.66, 1244.51, 1318.51, 1396.91, 1479.98, 1567.98, 1661.22, 1760.0, 1864.66,
    1975.53, /* 86~95 */
    2093.0, 2217.46, 2349.32, 2489.02, 2637.02, 2793.83, 2959.96, 3135.96, 3322.44,
    3520.0, /* 96~105 */
    3729.31, 3951.07, 4186.01, 4434.92, 4698.64, 4978.03, 5274.04, 5587.65, 5919.91,
    6271.93, /* 106~115 */
    6644.88, 7040.0, 7458.62, 7902.13, 8372.02, 8869.84, 9397.27, 9956.06, 10548.08,
    11175.3, /* 116~125 */
    11839.82, 12543.85, /* 126~127 */
];

struct Note {
    channel: u8,
    note: u8,
    delay: u16,
}

const MIDI_CONTENT: [Note; 896] = [
    Note {
        channel: 0,
        note: 71,
        delay: 26,
    },
    Note {
        channel: 0,
        note: 0,
        delay: 465,
    },
    ...
    Note {
        channel: 0,
        note: 0,
        delay: 0,
    },
];
实验
如果下载了库py32f030-hal,执行以下命令即可用usb串口或stlink或jlink下载并运行:
# 使用jlink或stlink下载
cargo r --example embassy_pwm_midi

# 使用USB串口下载
# 生成bin文件
cargo objcopy --example  embassy_pwm_midi -- -O binary embassy_pwm_midi.bin
# 串口下载
pyisp -s tty.usbserial-1140 -g -f embassy_pwm_midi.bin
固件大小为:
# Debug 编译
text    data     bss     dec     hex filename
22336      72    5752   28160    6e00 embassy_pwm_midi

# Release 编译
text    data     bss     dec     hex filename
19504      72    5752   25328    62f0 embassy_pwm_midi
快去写个低成本的生日祝福的歌曲吧
结语
使用这个小demo,音质和效果虽然有很多待改善的地方,但是仍然非常有趣,相比使用Arduno或C/C++去实现相同的功能,Rust的更加简洁,在这个小尝试中,我们可以感受到:
- Rust的零成本抽象在资源受限设备上的优势
- 现代嵌入式开发可以兼顾性能和开发效率
- 即使0.5美元的MCU也能实现复杂音频功能
附录
完整代码已开源([GitHub链接]),欢迎继续优化!
- midi2rust:https://github.com/hysonglet/midi2rust
- py32f030-hal: https://github.com/hysonglet/py32f030-hal
- midi音乐库:https://www.aigei.com/music/midi/
- midi频率表:https://newt.phys.unsw.edu.au/jw/notes.html
已发布
RTC
实时时钟(RTC)也是一个独立的定时器外设,PY32F030 的RTC外设位 32 位的可编程计数器,可用于计数、时间测量等场景。
其 RTC 模块可以选择三种时钟源:
- HSE/128
- LSE
- LSI
可配置3个可屏蔽的中断:
- 闹钟中断
- 秒中断
- 溢出中断
示例1: examples/rtc_block.rs
///! #  RTC demo
///  该代码实现了一个RTC定时的功能
#![no_std]
#![no_main]

use hal::rtc::AnyRtc;
use py32f030_hal::{self as hal, mode::Blocking};

// use panic_halt as _;
use {defmt_rtt as _, panic_probe as _};

#[cortex_m_rt::entry]
fn main() -> ! {
    let p = hal::init(Default::default());

    let rtc: AnyRtc<_, Blocking> = AnyRtc::new(p.RTC, Default::default()).unwrap();

    loop {
        defmt::info!("{}", rtc.read());
        rtc.wait_block(5);
    }
}
运行:运行:cargo r --example rtc_block`
示例2: examples/embassy_rtc.rs
异步多任务方式使用 RTC 外设
#![no_std]
#![no_main]

use embassy_futures::select;
use py32f030_hal::mode::Async;
use py32f030_hal::{self as hal};

use embassy_executor::Spawner;
use embassy_time::Timer;
use hal::rtc::AnyRtc;

// use panic_halt as _;
use {defmt_rtt as _, panic_probe as _};

#[embassy_executor::task]
async fn run() {
    let mut cnt: u32 = 0;
    loop {
        defmt::info!("task run {} ", cnt);
        cnt += 2;
        Timer::after_secs(2).await;
    }
}

#[embassy_executor::main]
async fn main(spawner: Spawner) {
    let p = hal::init(Default::default());

    let rtc: AnyRtc<_, Async> = AnyRtc::new(p.RTC, Default::default()).unwrap();

    defmt::info!("start: {}", rtc.read());
    spawner.spawn(run()).unwrap();

    loop {
        rtc.wait_alarm(3).await;
        defmt::info!("rtc: {}", rtc.read());

        rtc.wait_second().await;
        defmt::info!("rtc: {}", rtc.read());

        select::select(rtc.wait_alarm(3), rtc.wait_second()).await;
        defmt::info!("rtc: {}", rtc.read());
    }
}
运行:cargo r --example embassy_rtc --features embassy
ADC
ADC 的 rust crate也提供了异步和阻塞两种接口方式,简化 ADC的配置和使用。
示例:examples/adc_block.rs
#![no_std]
#![no_main]

use hal::adc::{temperature, vrefence_internal, AdcChannel, AnyAdc, ChannelConfig, Config};
use hal::delay;
use py32f030_hal::{self as hal, mode::Blocking};

// use panic_halt as _;
use {defmt_rtt as _, panic_probe as _};

#[cortex_m_rt::entry]
fn main() -> ! {
    let p = hal::init(Default::default());

    let adc: AnyAdc<_, Blocking> = AnyAdc::new(
        p.ADC,
        Config::default(),
        ChannelConfig::new_multiple_channel_perferred(),
        &[AdcChannel::Channel11, AdcChannel::Channel12],
    )
    .unwrap();

    loop {
        // adc.start();
        let temp = adc.read_block(1000000).unwrap();
        // adc.start();
        let vol = adc.read_block(1000000).unwrap();
        defmt::info!(
            "temp: {}: {}, vol: {}: {}",
            temp,
            temperature(temp),
            vol,
            vrefence_internal(vol)
        );
        delay::delay_s(1);
    }
}
示例二:examples/embassy_adc.rs
#![no_std]
#![no_main]

use py32f030_hal::adc::{TemperatureChannel, VRrefChannel};
use py32f030_hal::mode::Async;
use py32f030_hal::{self as hal};

use embassy_executor::Spawner;
use embassy_time::Timer;
use hal::adc::{AnyAdc, ChannelConfig, Config};

// use panic_halt as _;
use {defmt_rtt as _, panic_probe as _};

#[embassy_executor::task]
async fn run() {
    loop {
        Timer::after_secs(2).await;
    }
}

#[embassy_executor::main]
async fn main(_spawner: Spawner) {
    let p = hal::init(Default::default());

    let adc: AnyAdc<_, Async> = AnyAdc::new(
        p.ADC,
        Config::default(),
        ChannelConfig::new_exclusive_single(),
        &[],
    )
    .unwrap();

    _spawner.spawn(run()).unwrap();

    loop {
        defmt::info!("temp {}", adc.read(TemperatureChannel).await,);
        defmt::info!("vref {}", adc.read(VRrefChannel).await);
        Timer::after_secs(2).await;
    }
}
运行:cargo r --example embassy_adc --features embassy
独立看门狗
独立看门狗外设常用来检测系统是否死机、系统卡死、指令跑飞等异常的场景。PY32F030 的独立看门狗是一个独立的 12 位向下计数器。由 LSI 提供时钟。喂狗周期最长达 32 秒。
示例:examples/embassy_iwdg.rs
#![no_std]
#![no_main]

use py32f030_hal as hal;
use {defmt_rtt as _, panic_probe as _};

use embassy_executor::Spawner;
use embassy_time::Timer;
use hal::iwdg::{Config, IWdg};

#[embassy_executor::main]
async fn main(_spawner: Spawner) {
    let p = hal::init(Default::default());
    defmt::info!("Hello World!");

    let config: Config = Default::default();
    defmt::info!("iwdg timeout: {}us", config.timeout_us());
    let iwdg = IWdg::new(p.IWdg, config);
    iwdg.start();

    let mut cnt: u32 = 0;
    loop {
        defmt::info!("time {} ", cnt);
        iwdg.feed();
        cnt += 1;
        // 10 秒内喂狗
        if cnt <= 10 {
            Timer::after_millis(1000).await;
        } else {
            // 10秒后等待喂狗超时
            Timer::after_secs(30).await;
        }
    }
}
运行:cargo r --example embassy_iwdg --features embassy
TODO
TODO
TODO
TODO
TODO
TODO
附录
Embedded - Embedded Rust: Creating a Launch Configuration
Embedded - Embedded Rust: Hello World!
Embedded - Embedded Rust: learning the toolchain
Embedded - Embedded Rust: The Cortex-M QuickStart Template
Embedded - Embedded Rust: Adding support for your target microcontroller
[C++/Rust Interoperability Problem Statement]([interop-initiative/problem-statement.md at main · rustfoundation/interop-initiative (github.com)
开发板附属资料
- Py32 Rust开发板驱动与丰富的例程:https://github.com/hysonglet/py32f030-hal
- 普冉官方文档:https://www.puyasemi.com/download.html?keywords=py32f030
- Rust Bind C 框架: https://github.com/decaday/py32-bind-hal
- Rust 社区支持库: https://github.com/py32-rs/py32-hal
- Arduino 支持文档:https://github.com/py32duino/Arduino-PY32
- Pura 开源文档:https://github.com/OpenPuya
- Cmake 编译框架:https://github.com/decaday/py32f0-cmake
- 资料包:https://pan.baidu.com/s/1QsamOP78Fen8efGEXfNonA?pwd=rust
支持IDE: Rust/Keil/IAR/EIDE/CMake/Arduino/VSCode/Zed Rust嵌入式QQ学习群:1020500869
TODO
参考
-
Concurrency Techniques and Hardware Abstraction Layer concept for embedded system in rust.pdf